Jobzilla - Job Listing
WordPress Theme


Jobzilla
Jobzilla - Job Listing WordPress Theme
This documentation is Released on 27 December 2022.
Thank you for purchasing this Theme.
If you like this theme, Please support us by rating this theme with 5 stars
Introduction - #back to top
 We would happily welcome feedback from you on how, if anywhere, you would like this documentation improved. If you would find anything a little bit easier and more helpful if we went into more detail, or explained something a little better - we'd be happy to hear it. We want Jobzilla to be the best theme! If you have any comments, please mail us via the form on https://themeforest.net/user/dexignzone
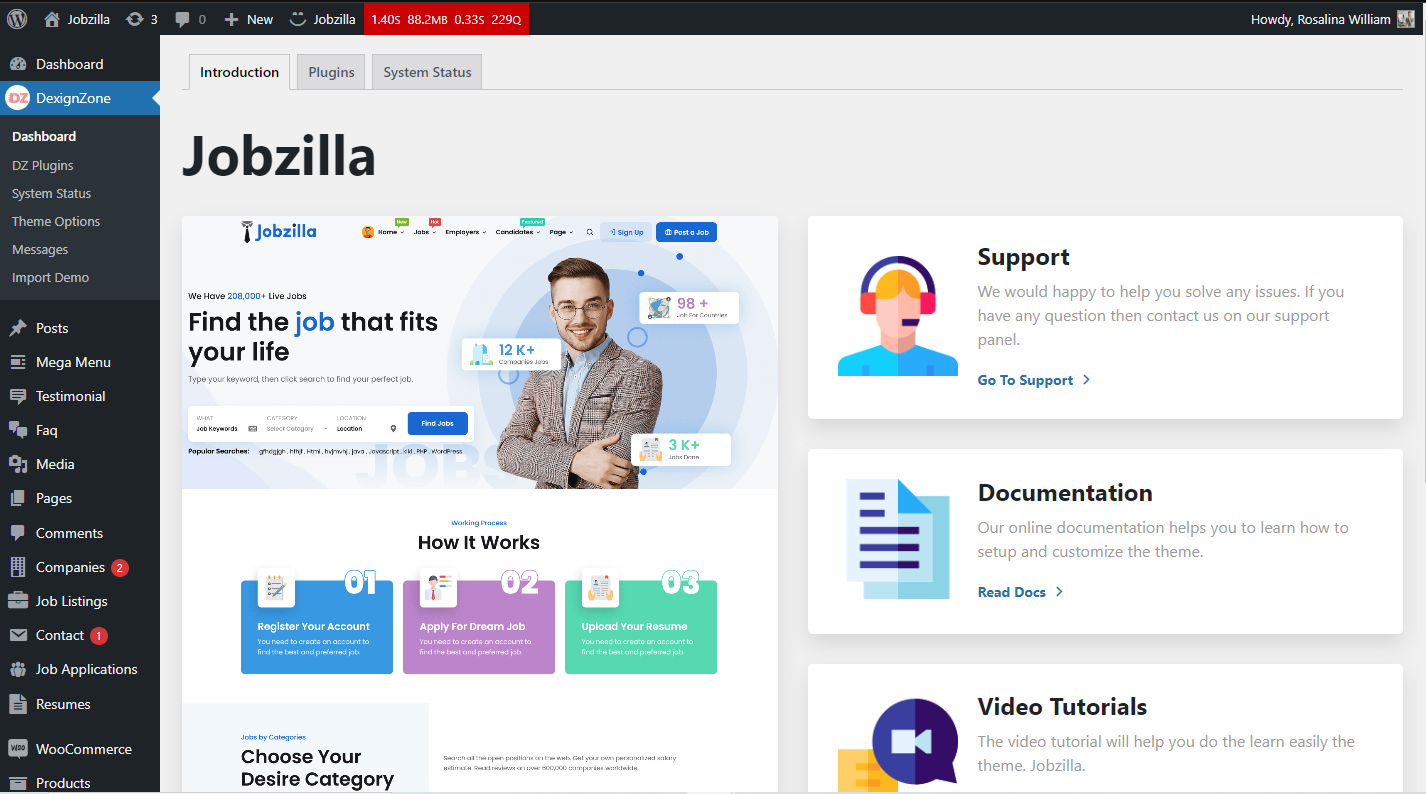
Jobzilla is a WordPress theme to create a website for any type of Business specially for Consulting Services. Jobzilla comes with powerful features. The Jobzilla is built with Elementor and Contact From Seven the popular and flexible plugin in WordPress. Jobzilla a clean responsive WordPress theme comes with two header layouts. The theme comes with the option of contact form to allow users to contact you.
Jobzilla is fully compatible with latest version of plugins to allow you easy handling. The Jobzilla comes with one click demo and also more flexible features.
Upload and Activation - #back to top
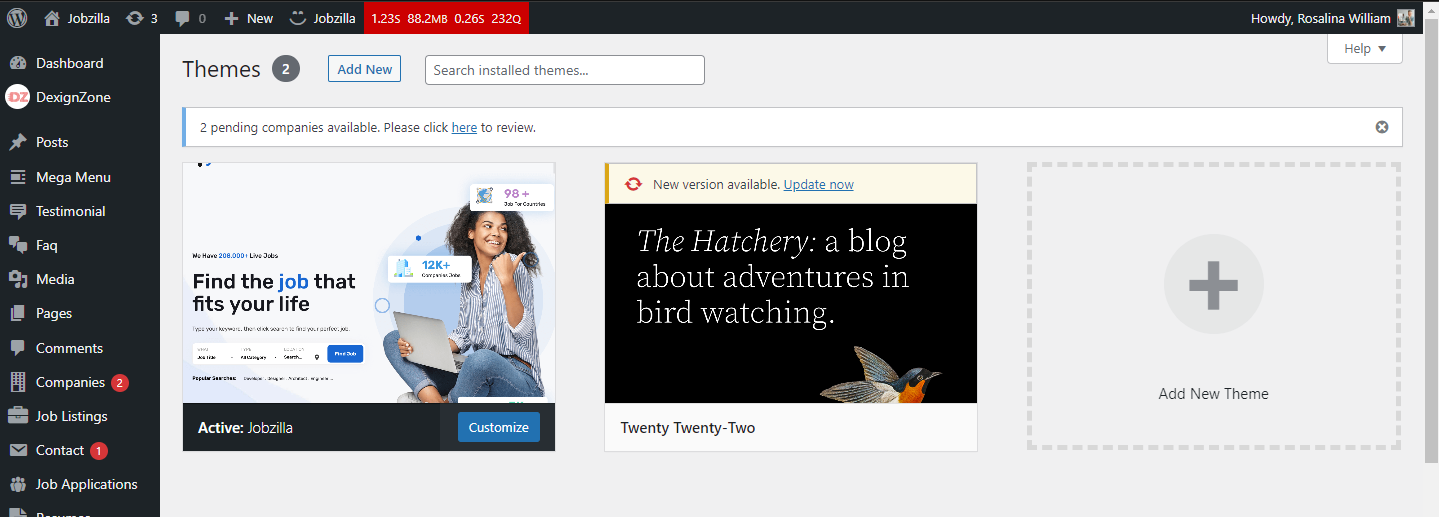
1. Navigate to Appearance → Themes in your WordPress admin dashboard.
2. Click the Add New button at the top of the page then go for the Theme Upload option.
3. For the file upload, pick Theme Install / Jobzilla.zip in the theme package downloaded from ThemeForest and click Install Now.
4. Click Activate once the upload has finished and you're ready for the next step: Installing the Plugins.
Installing the Plugins - #back to top
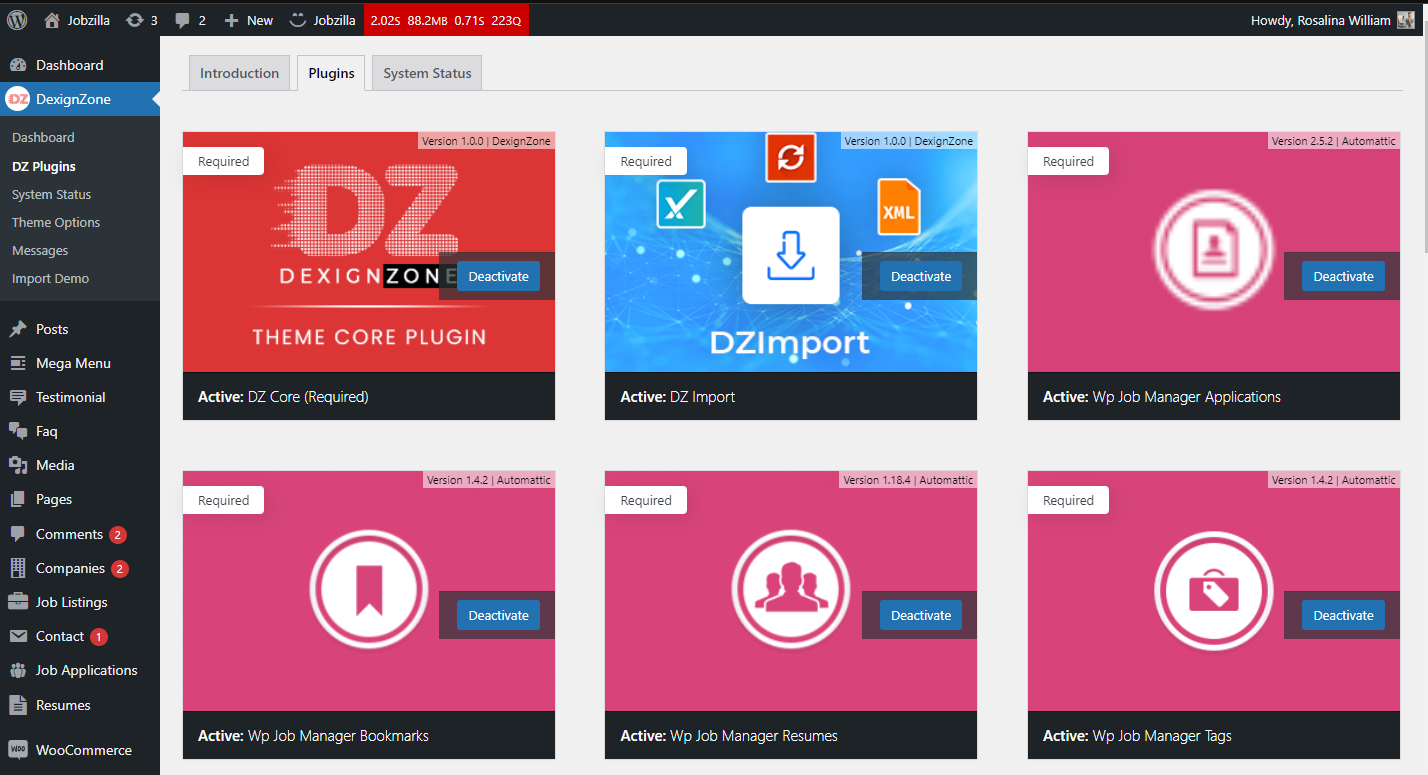
 Right after the theme was activated, a notification at the top of the screen will suggest to continue with the installation of the plugins recommended for getting the best our of your theme.
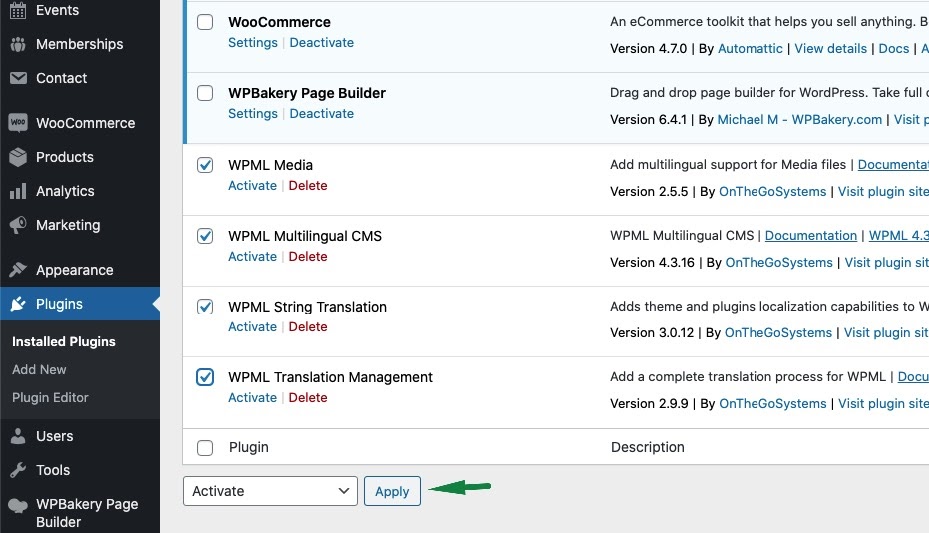
1. Click 'Begin installing plugins' and select all the plugins in the list.
2. Activate the Plugins you just installed.
3. After the plugins are activated, return to Dashboard.
Dummy Content Import - #back to top
Jobzilla comes with one click demo installation exactly like the original demo. Just click on Import button and your demo site is ready.
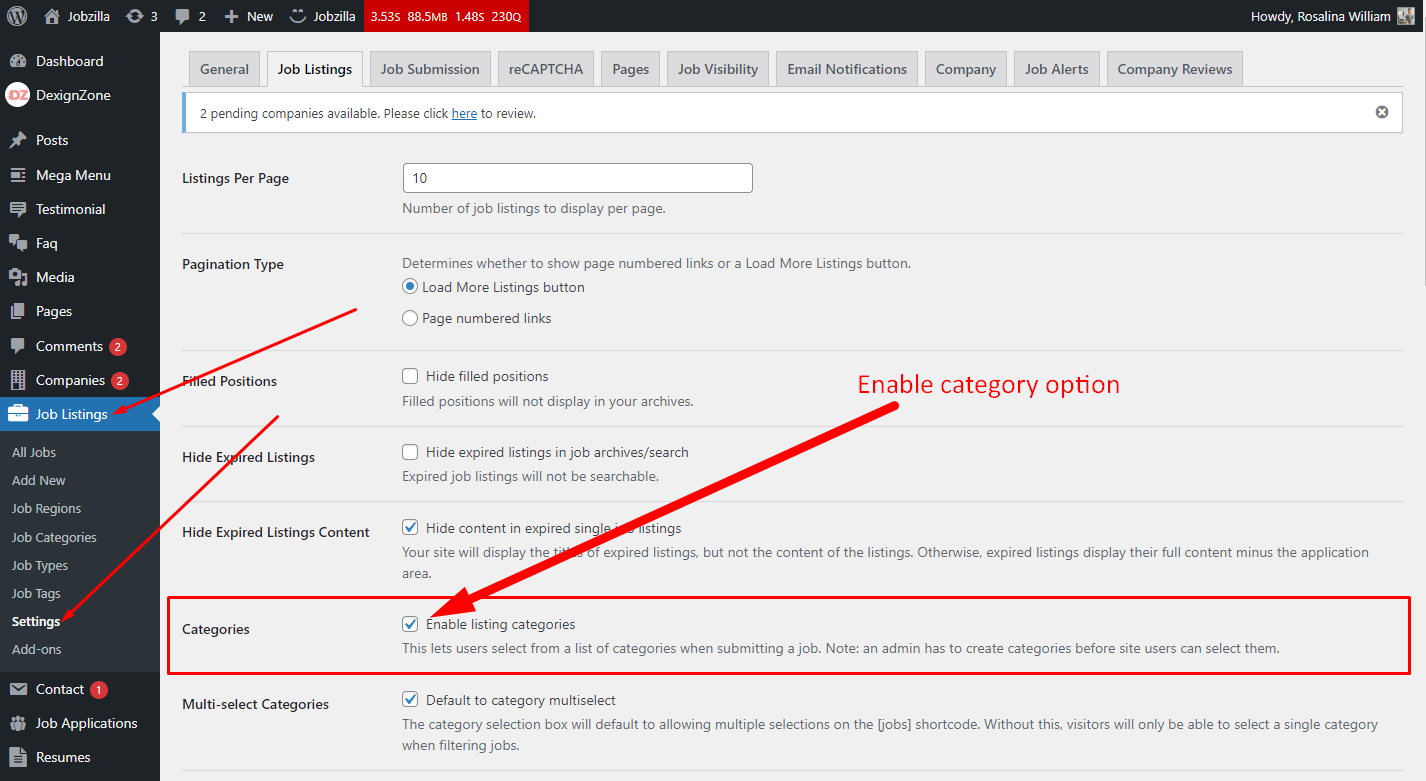
1. Before importing demo you Enable listing categories.
Follow Some Steps :- Job Listing -> Settings -> Job Listing
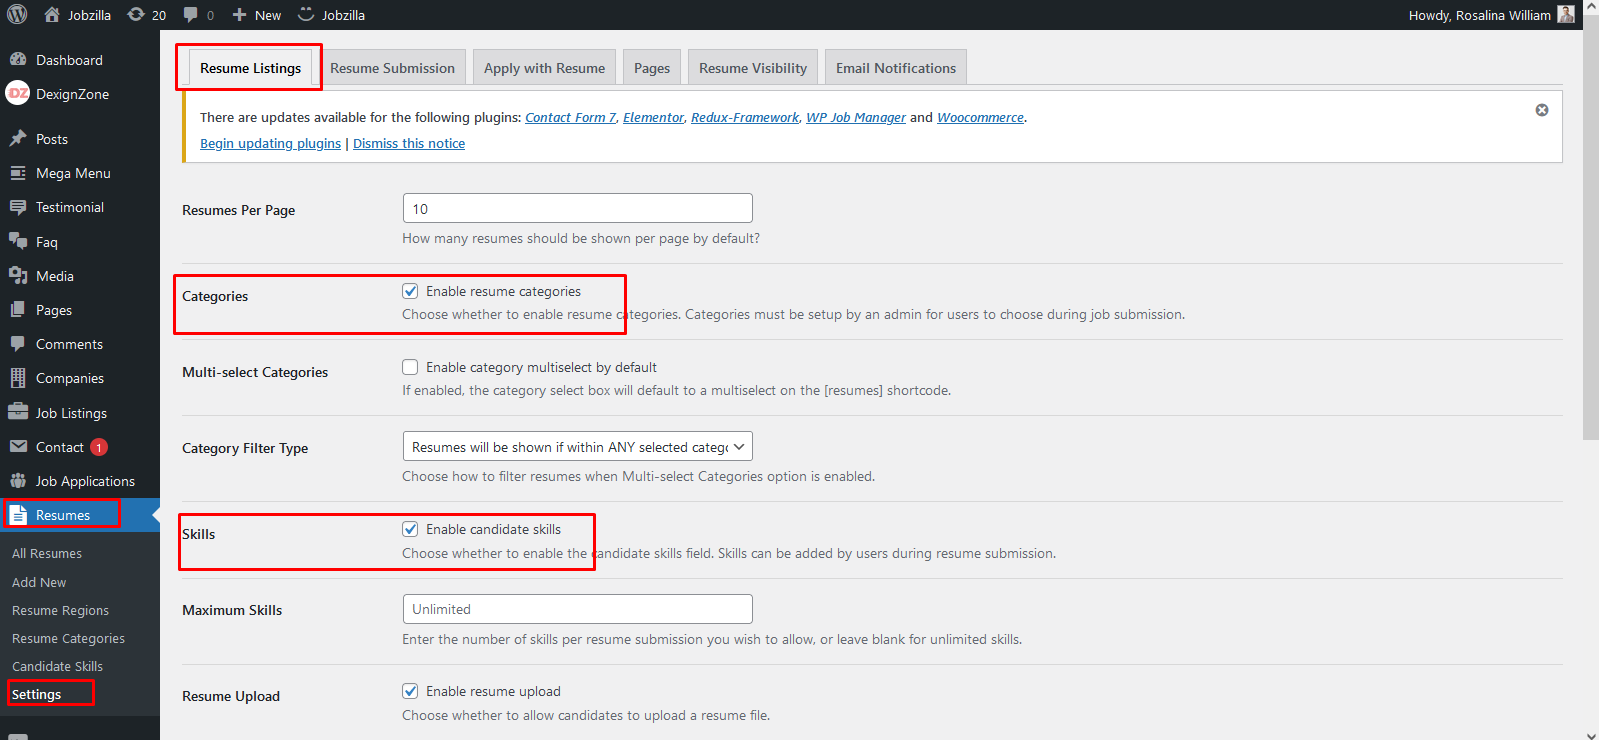
2. Before importing demo you Enable Resume categories and resume skills.
Follow Some Steps :- Resumes -> Settings -> Resume Listing
3. In your WordPress admin dashboard, navigate to DexignZone → Import Demo
4. From the page you can see the available options, click Import Demo button
5. Wait until you see the all importing process is completed.
(Please wait 10 to 15 minutes in demo import process.)
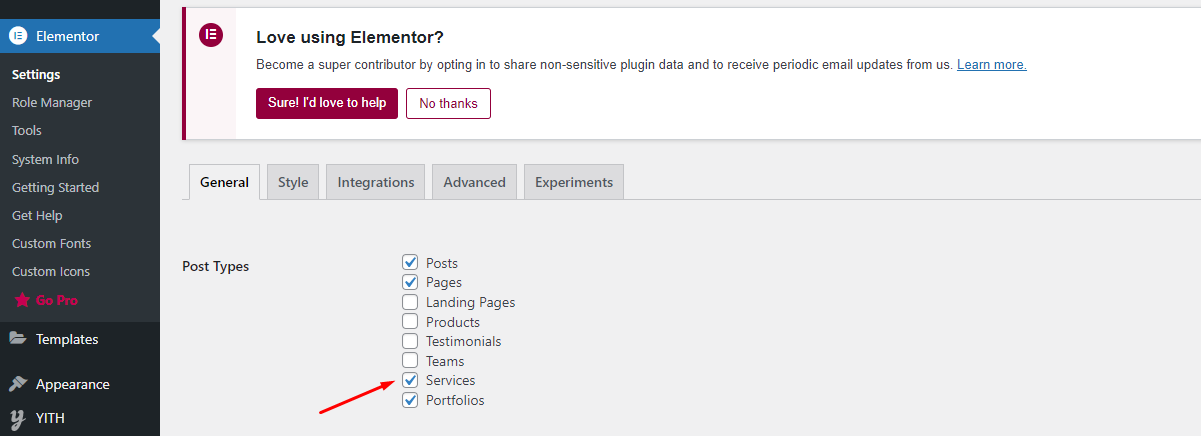
5. Add Page Builder in custom post type :- Go to Elementor page builder -> Setting
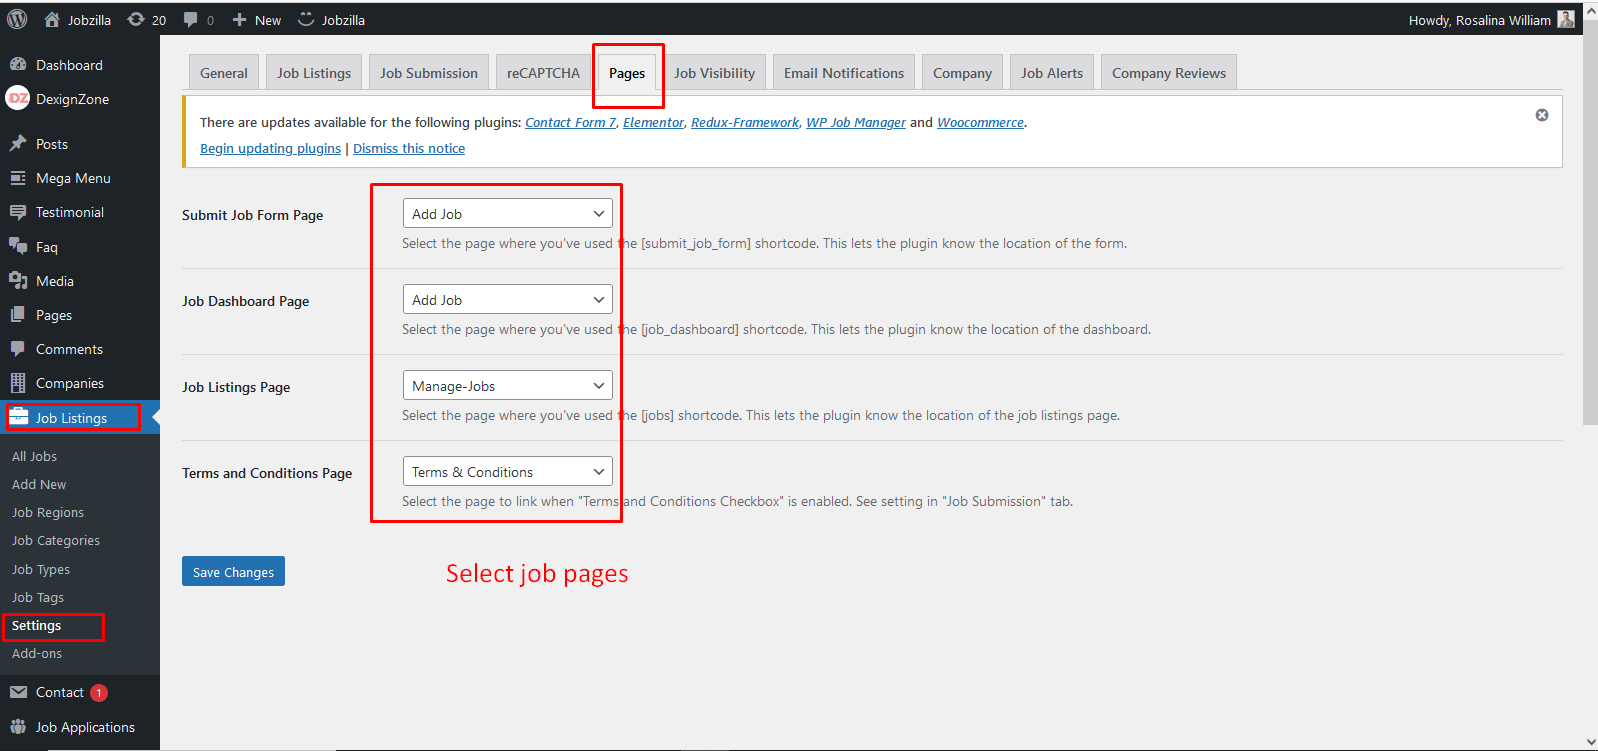
6.After importing demo you Select Pages.
Follow Some Steps :- Job Listing -> Settings -> Pages
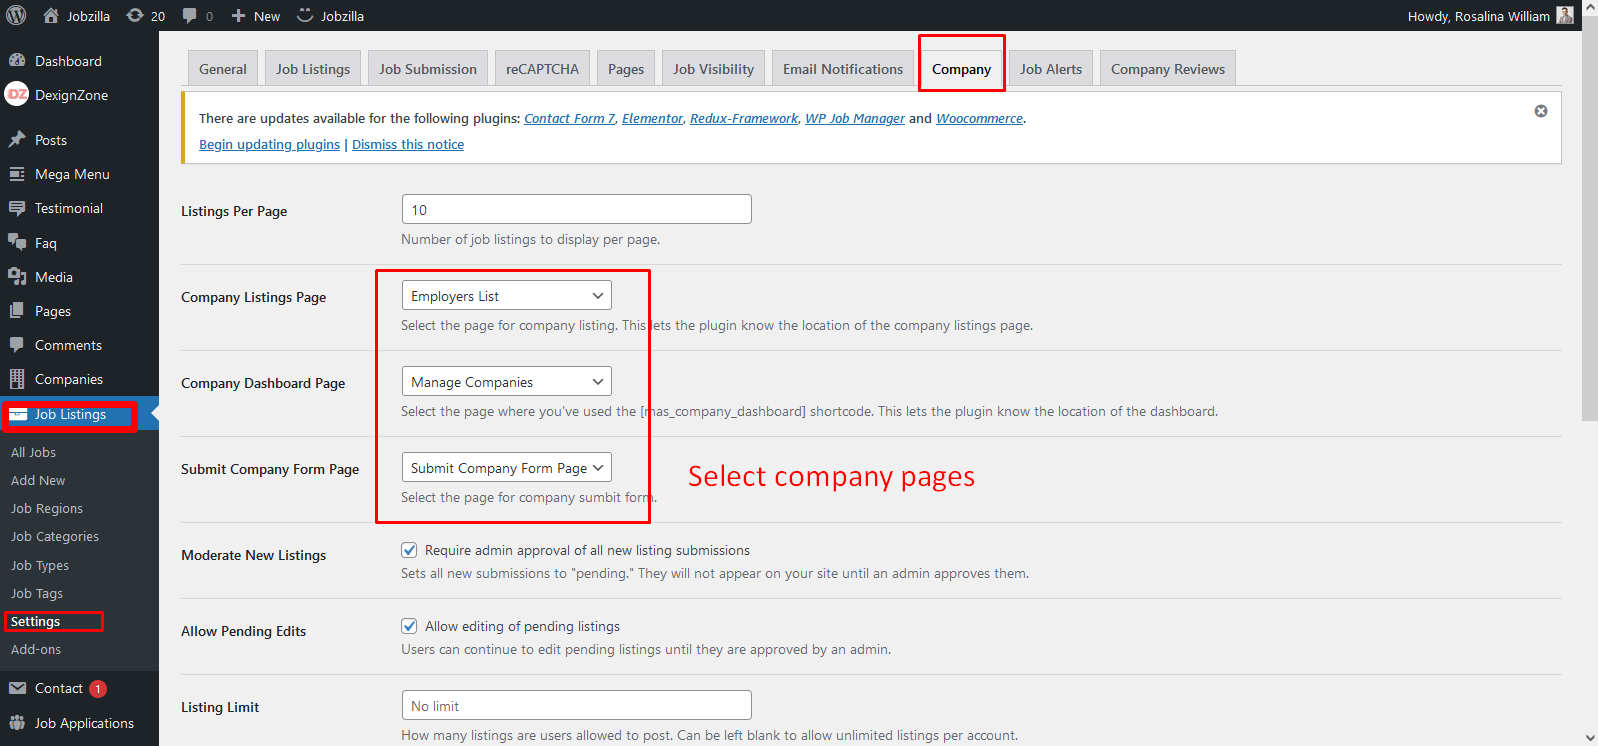
Follow Some Steps :- Job Listing -> Settings -> Company
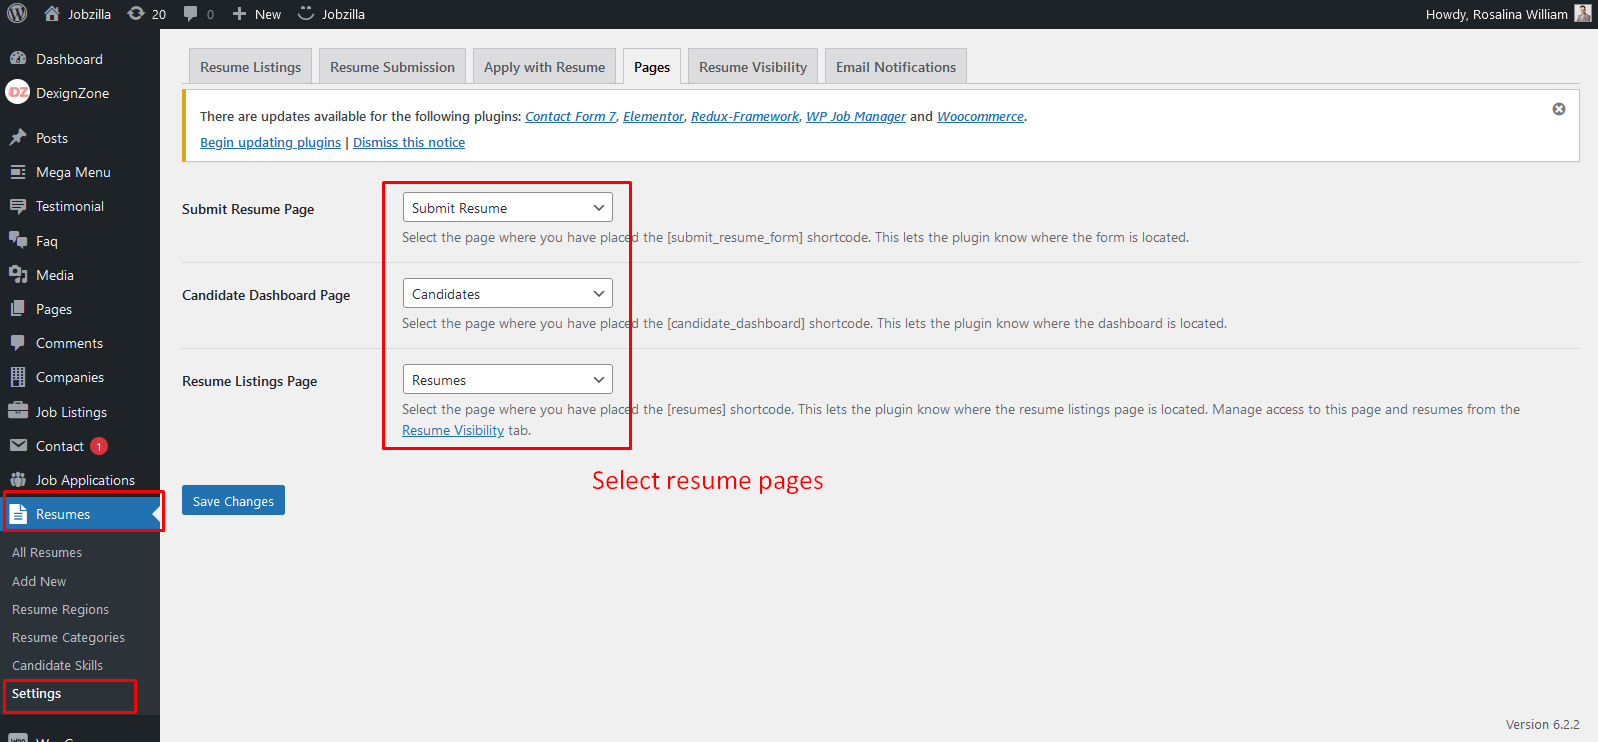
Follow Some Steps :- Resumes -> Settings -> Resume Pages
Theme Settings - #back to top
Introduction -
Theme DZ Plugins -
1. Navigate to Appearance → Themes in your WordPress admin dashboard.
2. Click the Add New button at the top of the page then go for the Theme Upload option.
3. For the file upload, pick Theme Install / Jobzilla.zip in the theme package downloaded from ThemeForest and click Install Now.
4. Click Activate once the upload has finished and you're ready for the next step: Installing the Plugins.
Homepage & Blog — Setup - #back to top
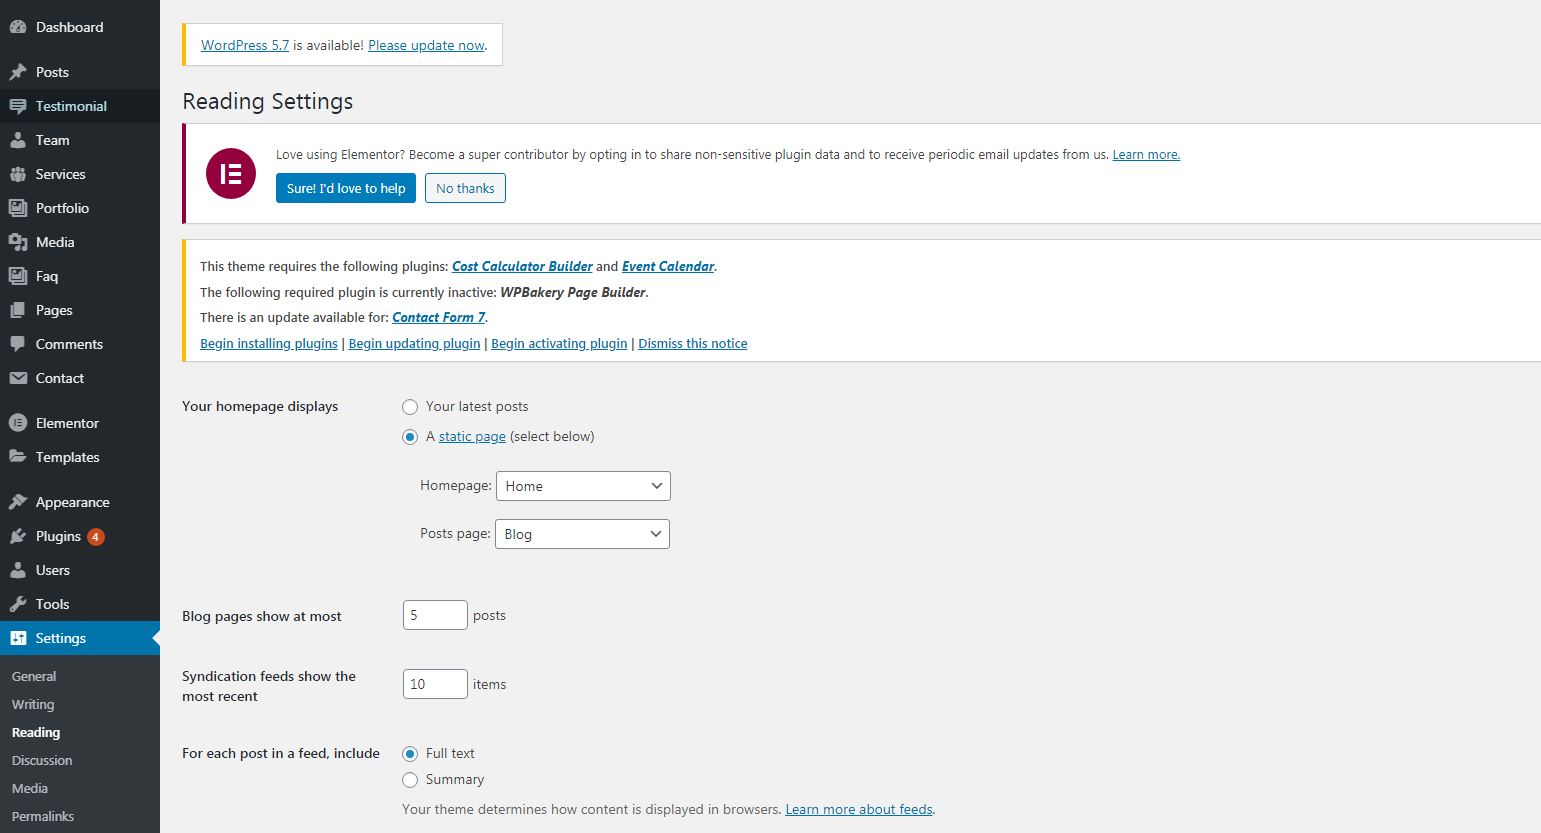 To setup the blog page, in your WordPress admin panel, navigate to Settings → Reading.
Assuming you already have a page named "Blog", for the Front page display, select "A static page" and choose your "Blog" page as the Posts page. This is what you should be seeing on your screen from left side.
To setup the home page, in your WordPress admin panel, navigate to Settings → Reading.
Assuming you already have a page named "Front Page", for the Front page display, select "A static page" and choose your "Home 1" page as the home page. This is what you should be seeing on your screen from left side.
Important Tips to Use Jobzilla - #back to top
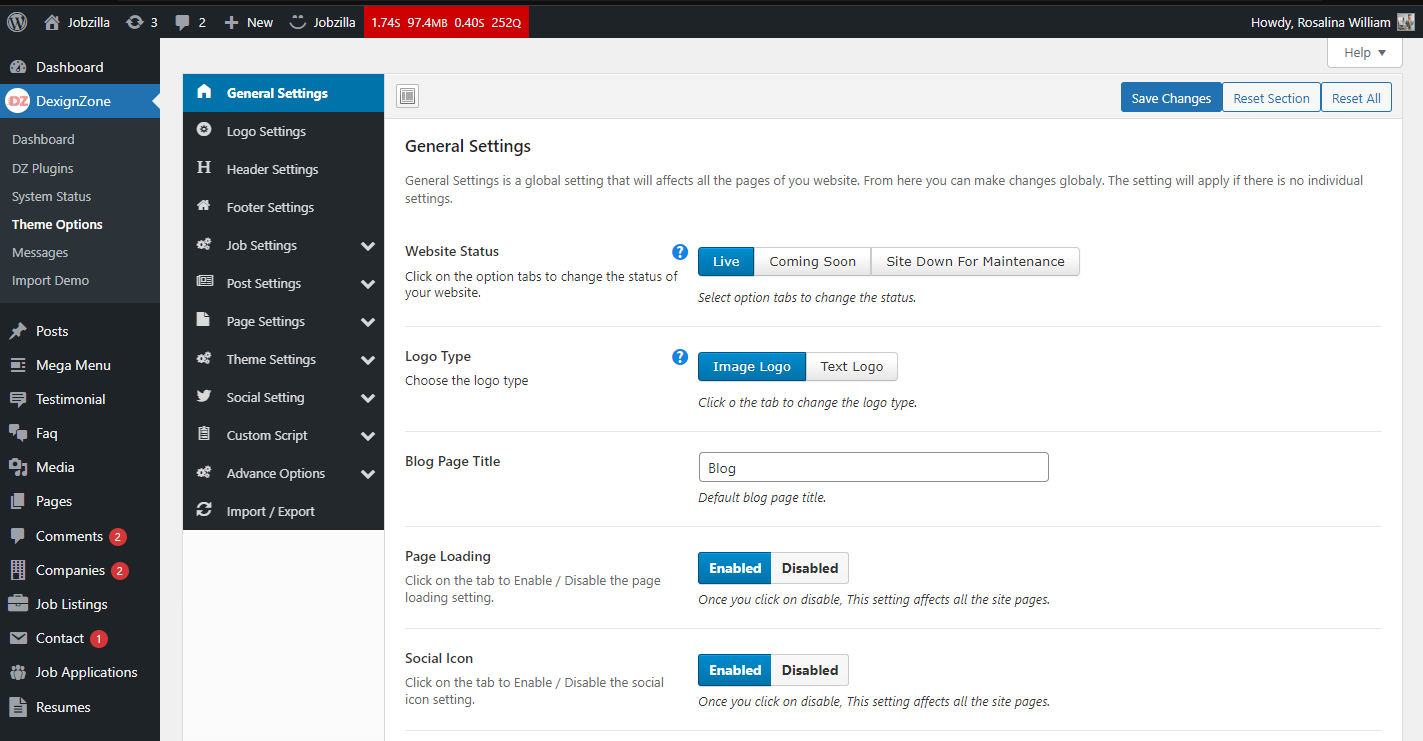
There are many other settings that are related to Jobzilla theme, go to Theme Options, where you will find lots of theme related settings .
1. General Settings enable login & register button
2. On header login & register
3. For registration required, please enable WordPress default register settings
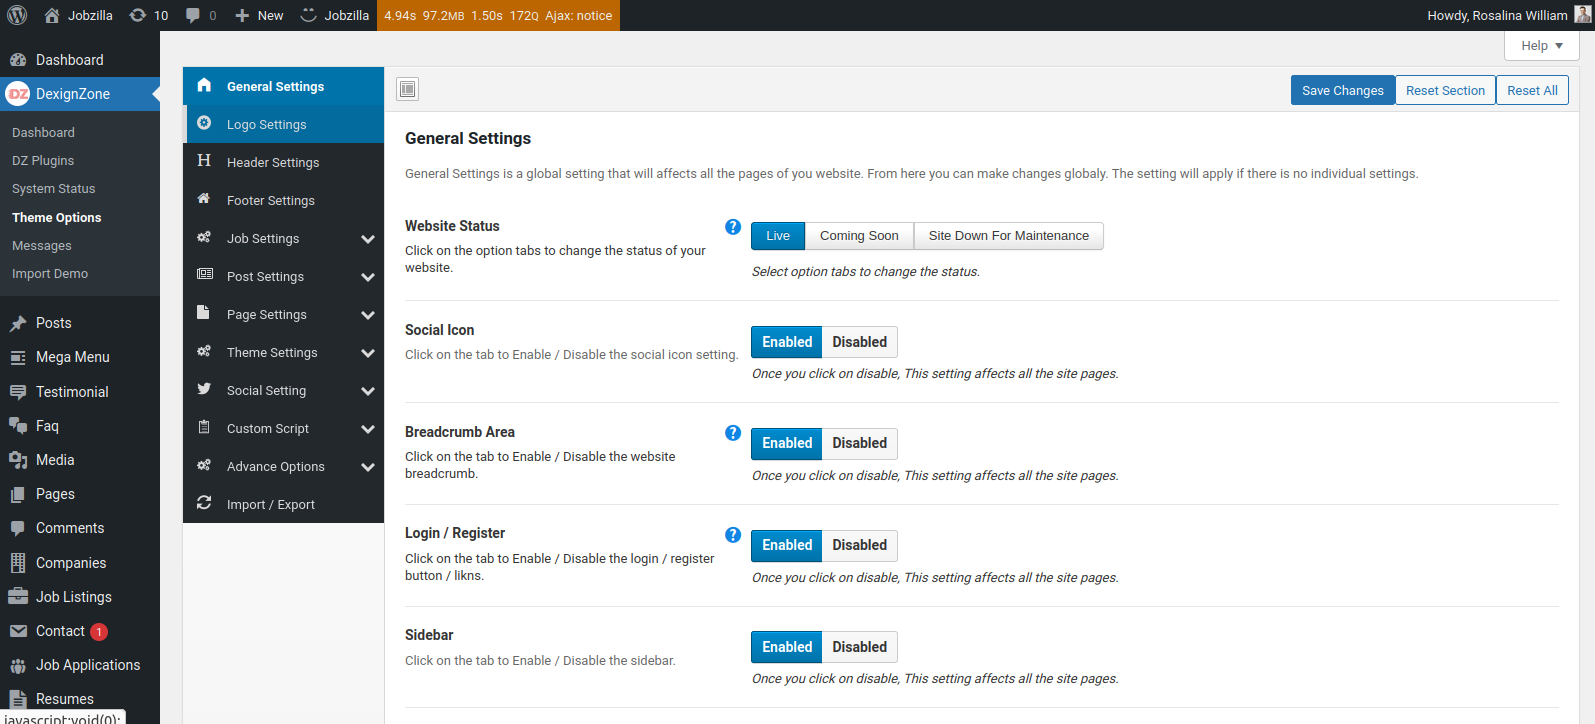
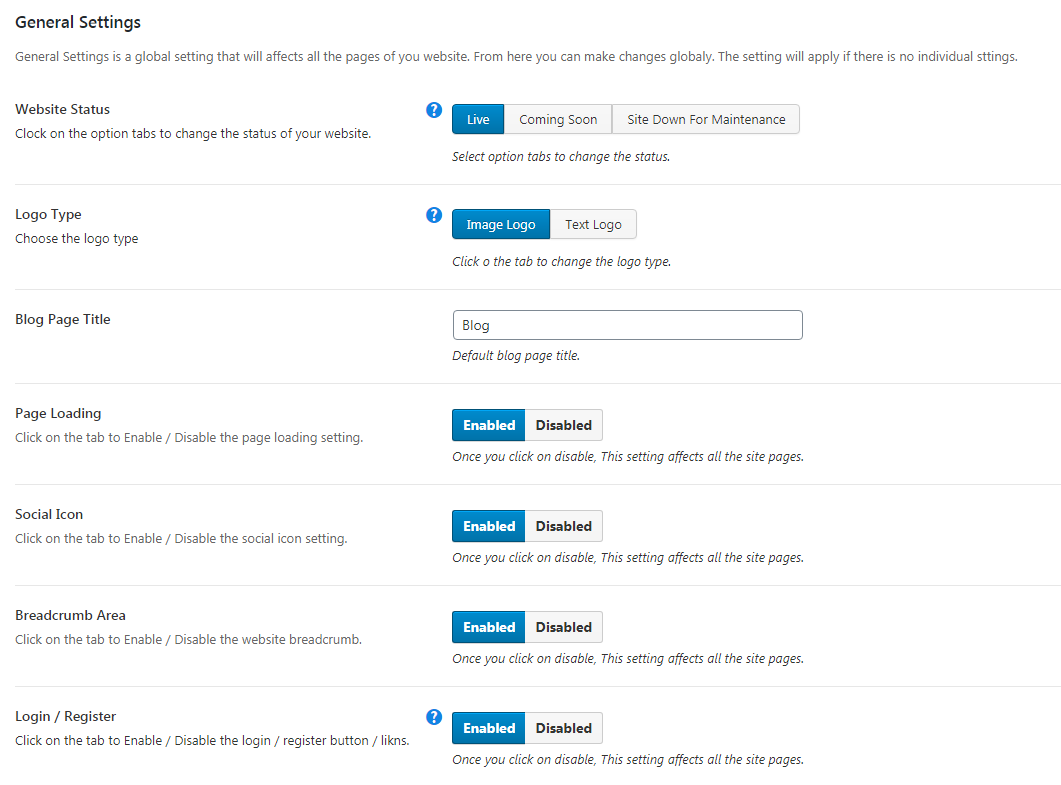
You can set default general settings for the theme, go to Theme Options > Theme General Setting,
The output will look like the below
You can set default logo settings for the entire theme, go to Theme Options > Logo Setting,
![]()
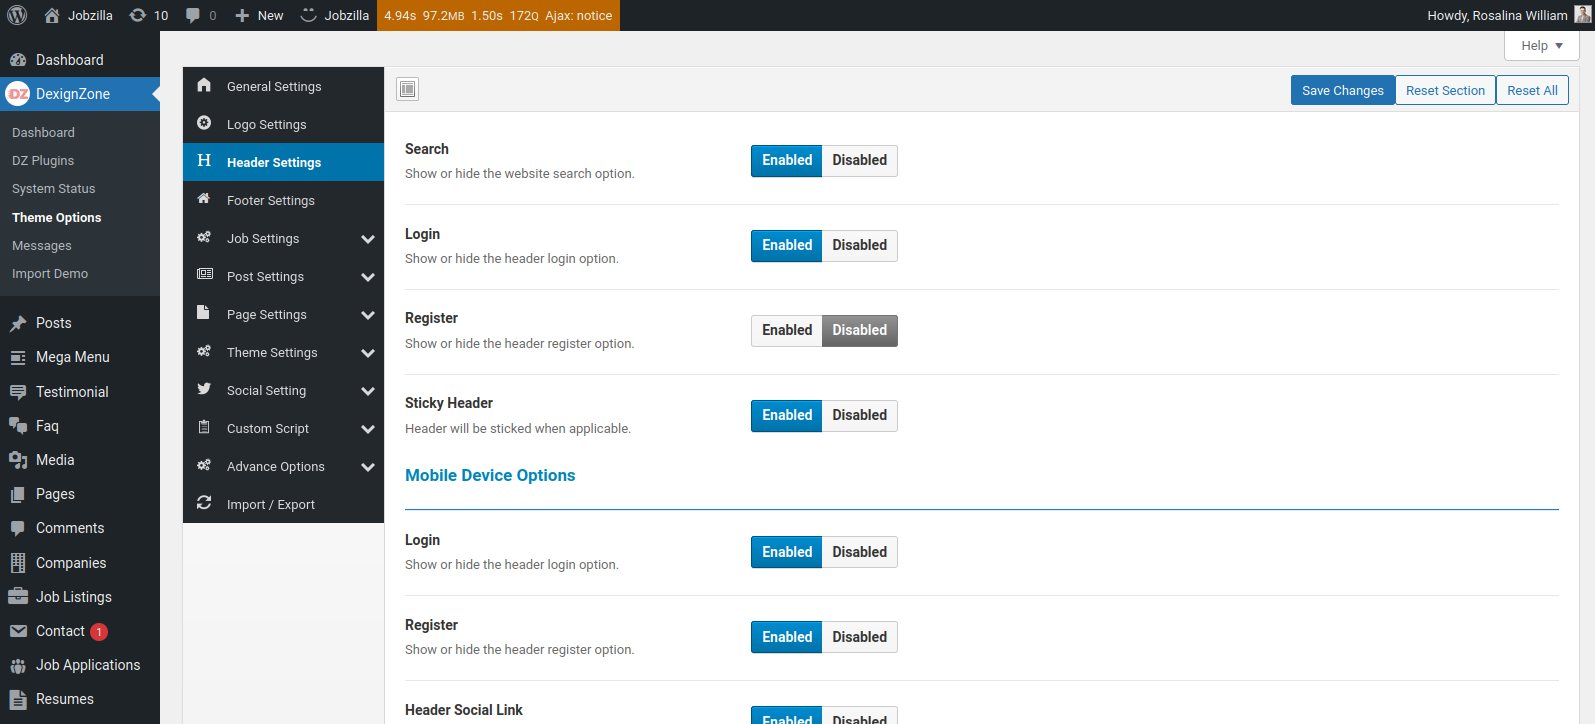
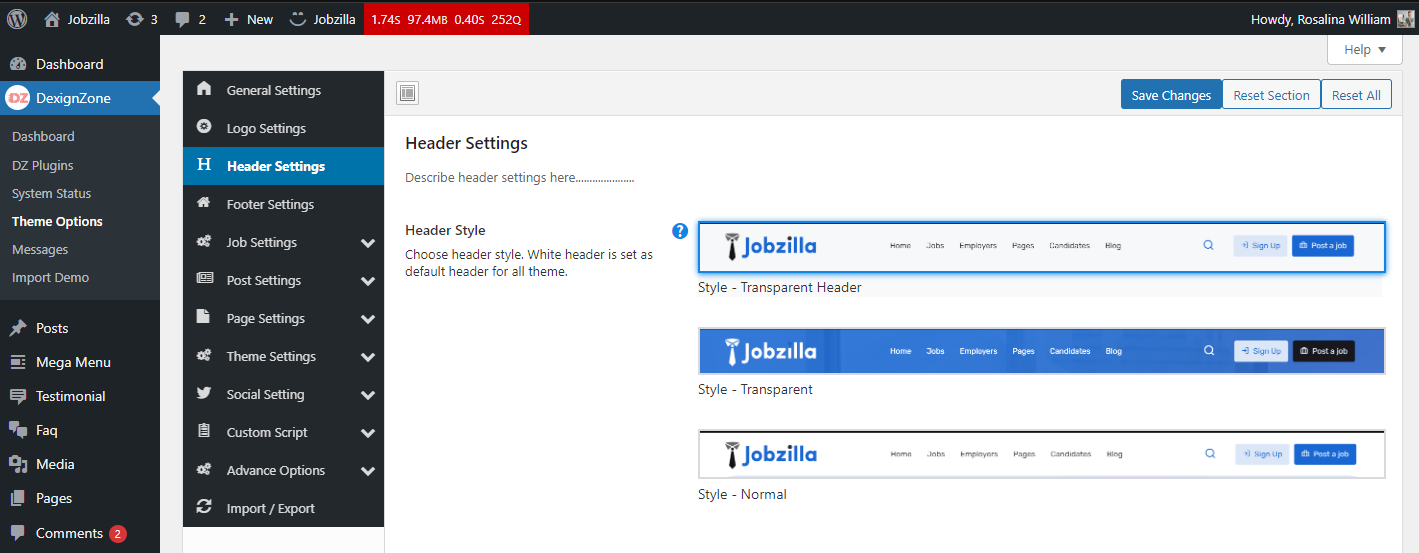
You can set default header settings for the entire theme, go to Theme Options > Header Setting,
Note: You can also customize these settings in page level
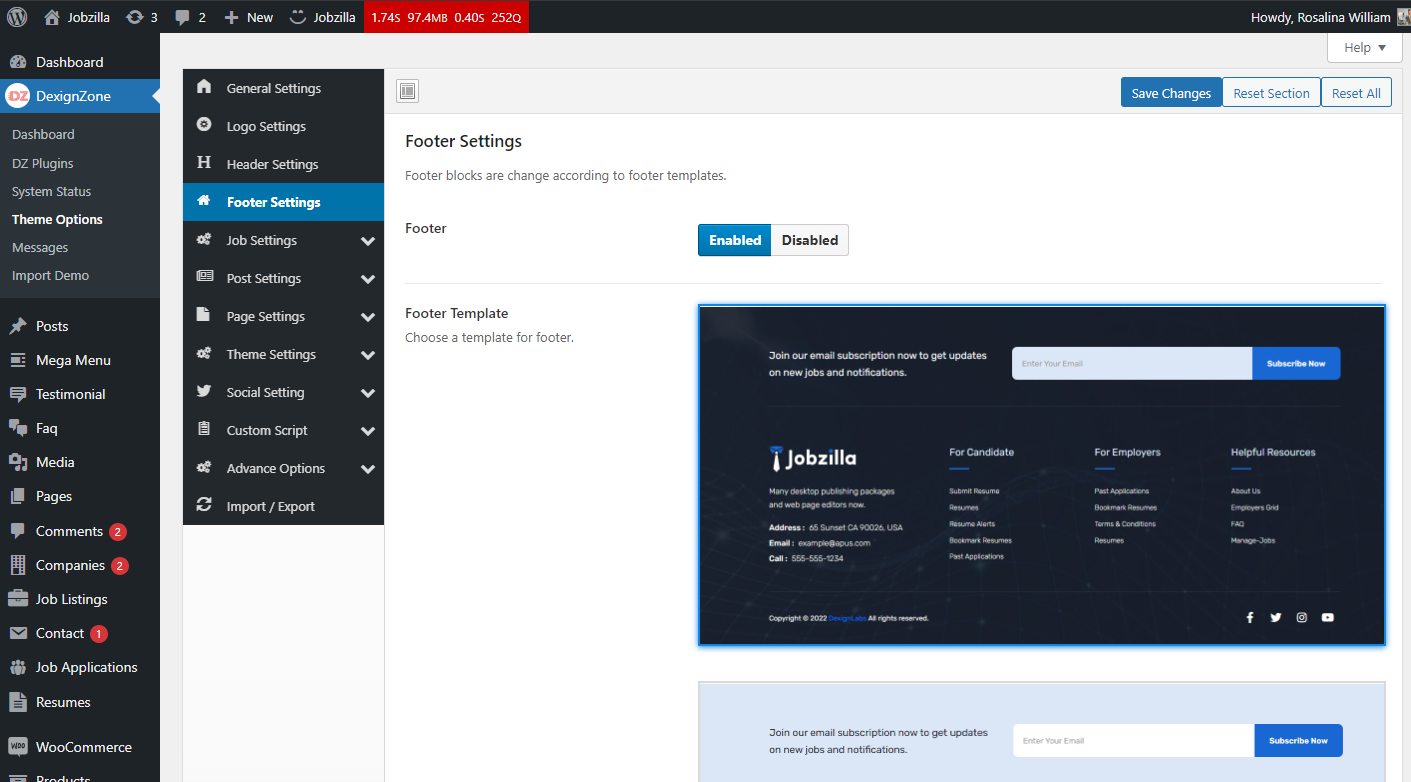
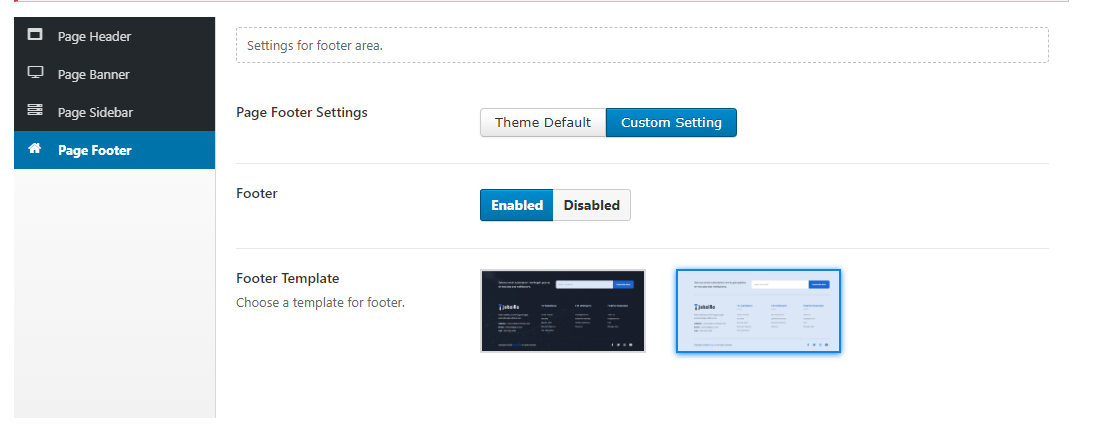
You can set Trending items in footer area, go to Theme Options > Footer Settings,
Note: You can also customize these settings in page level
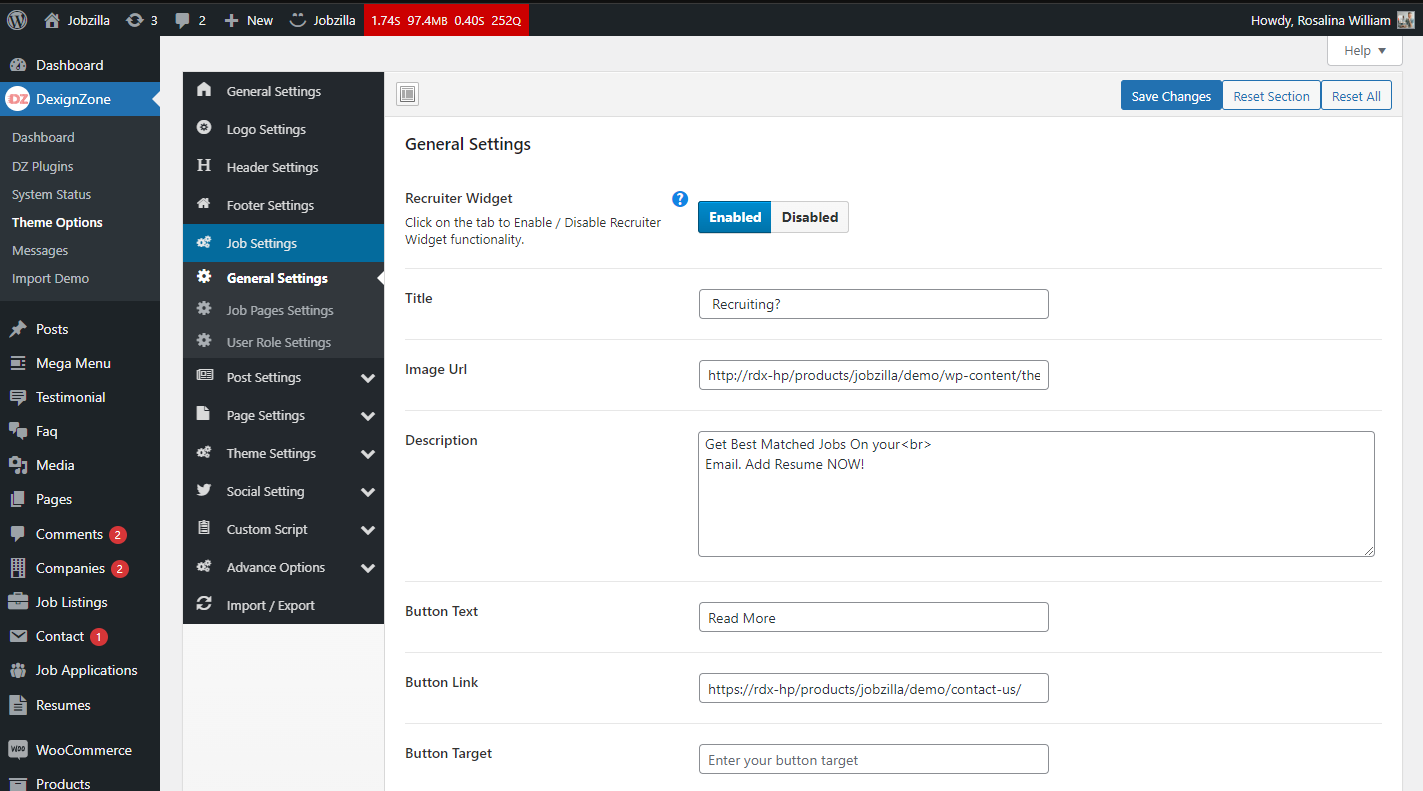
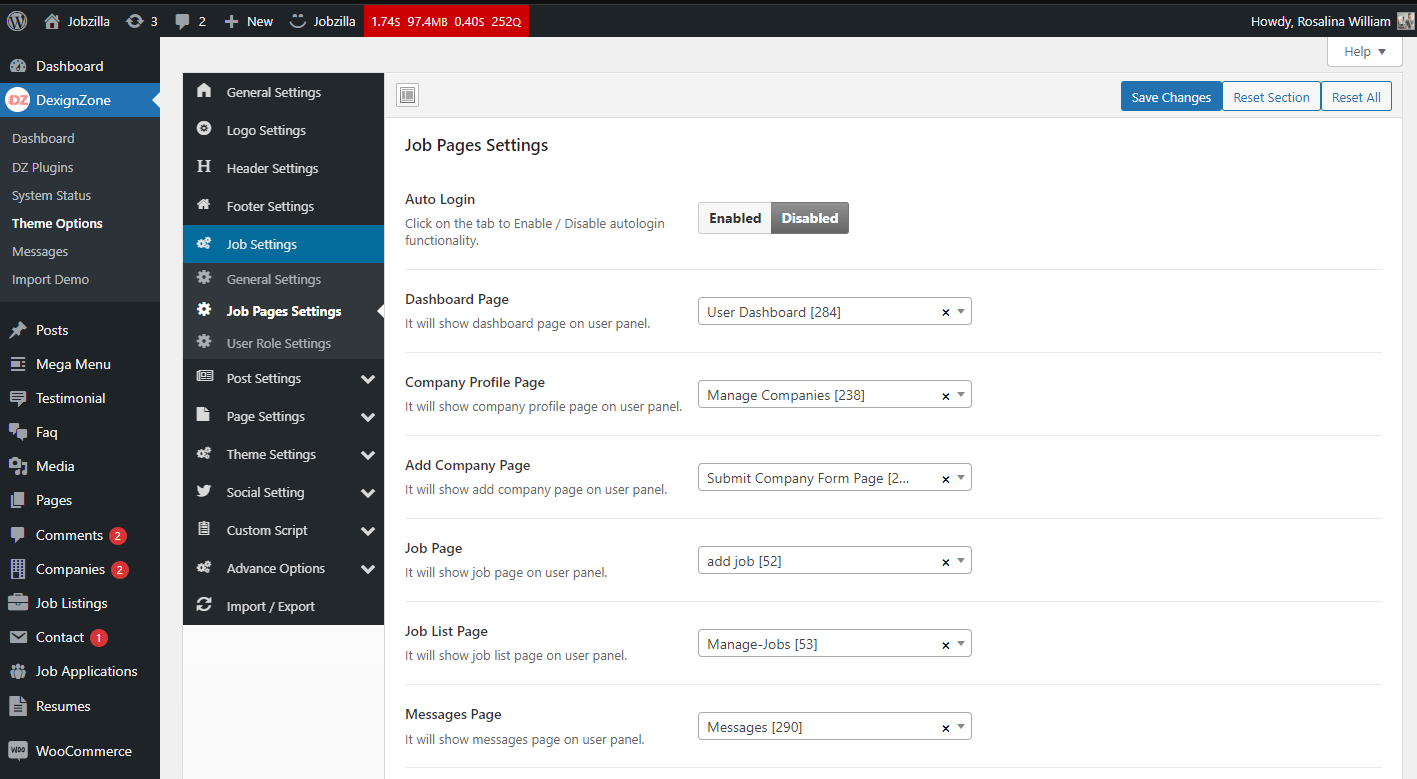
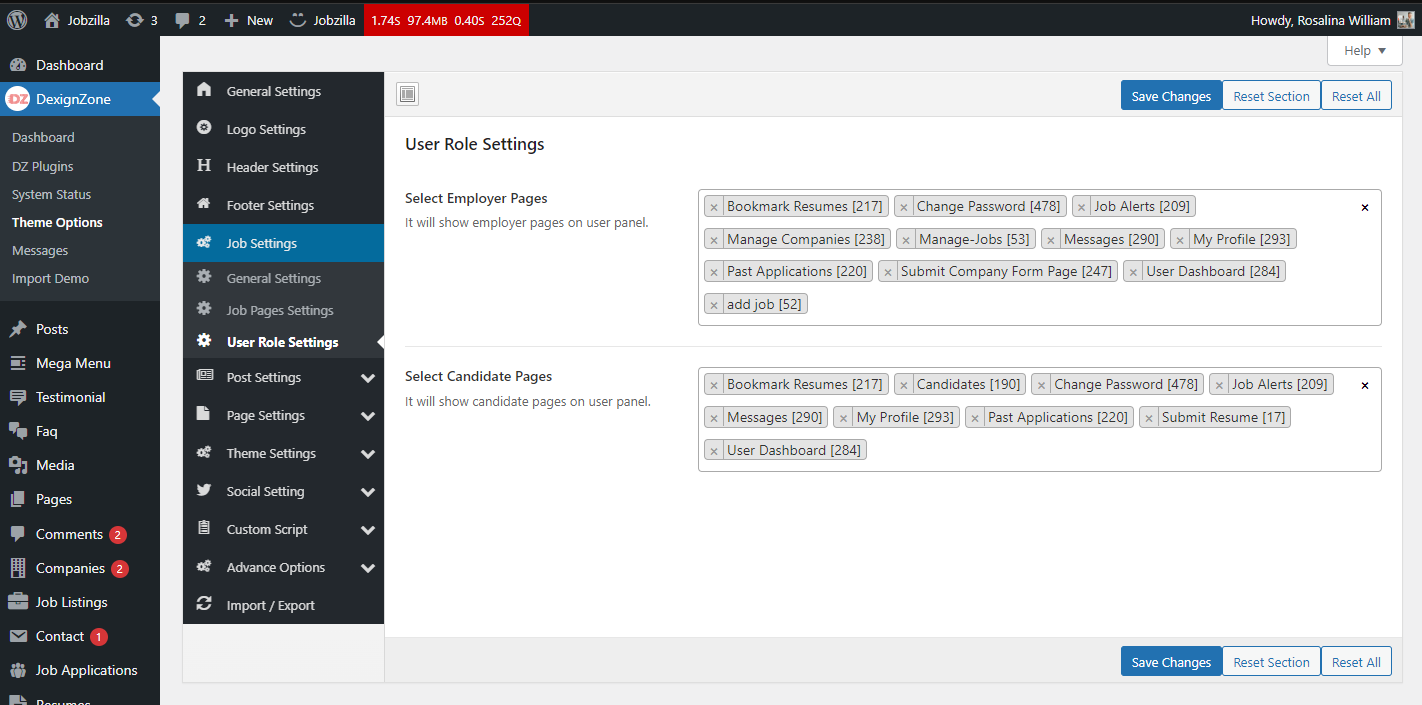
You can set Job Settings, go to Theme Options > Job Settings
General Settings
Job Page Settings
User Role Settings
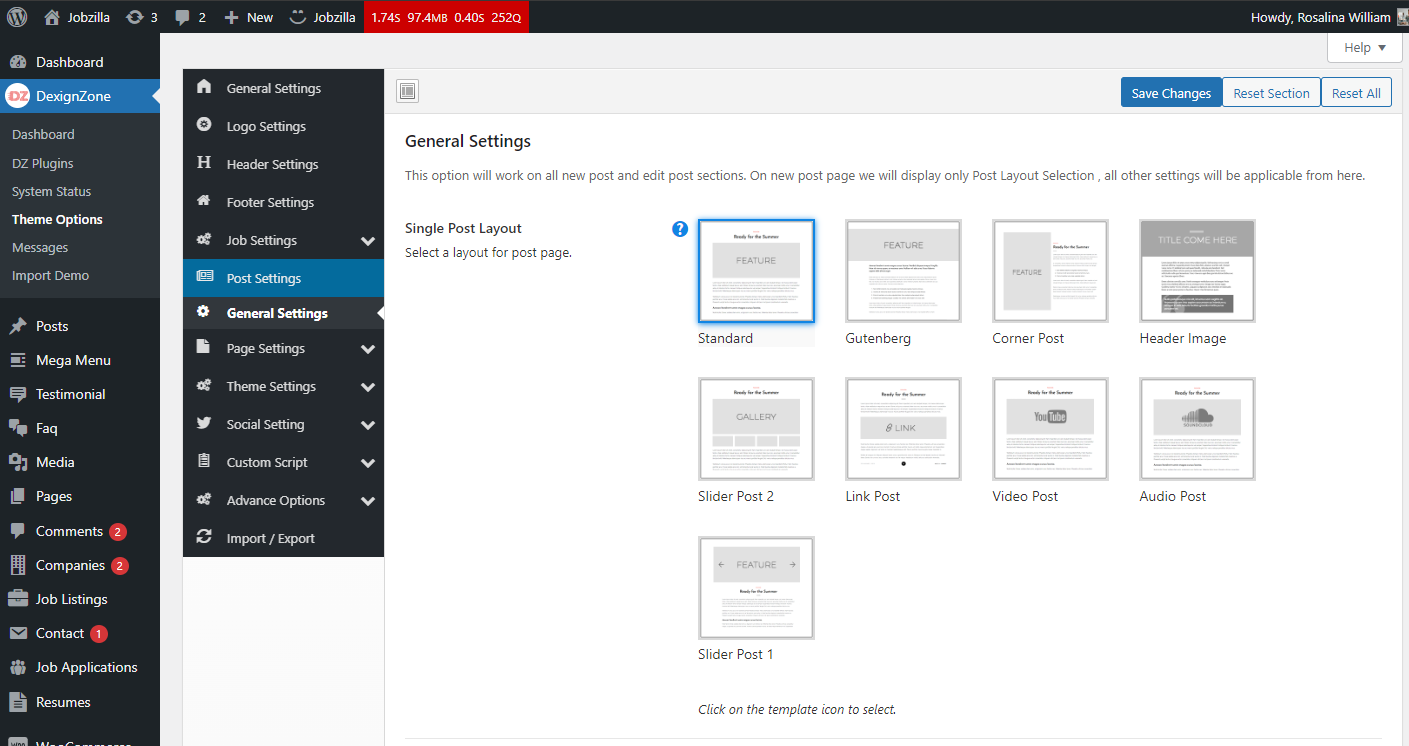
The post related setting will be set here, go to wp-admin > Theme Options > Post Setting.
The page related setting will be set here, go to wp-admin > Theme Options > Page Setting.

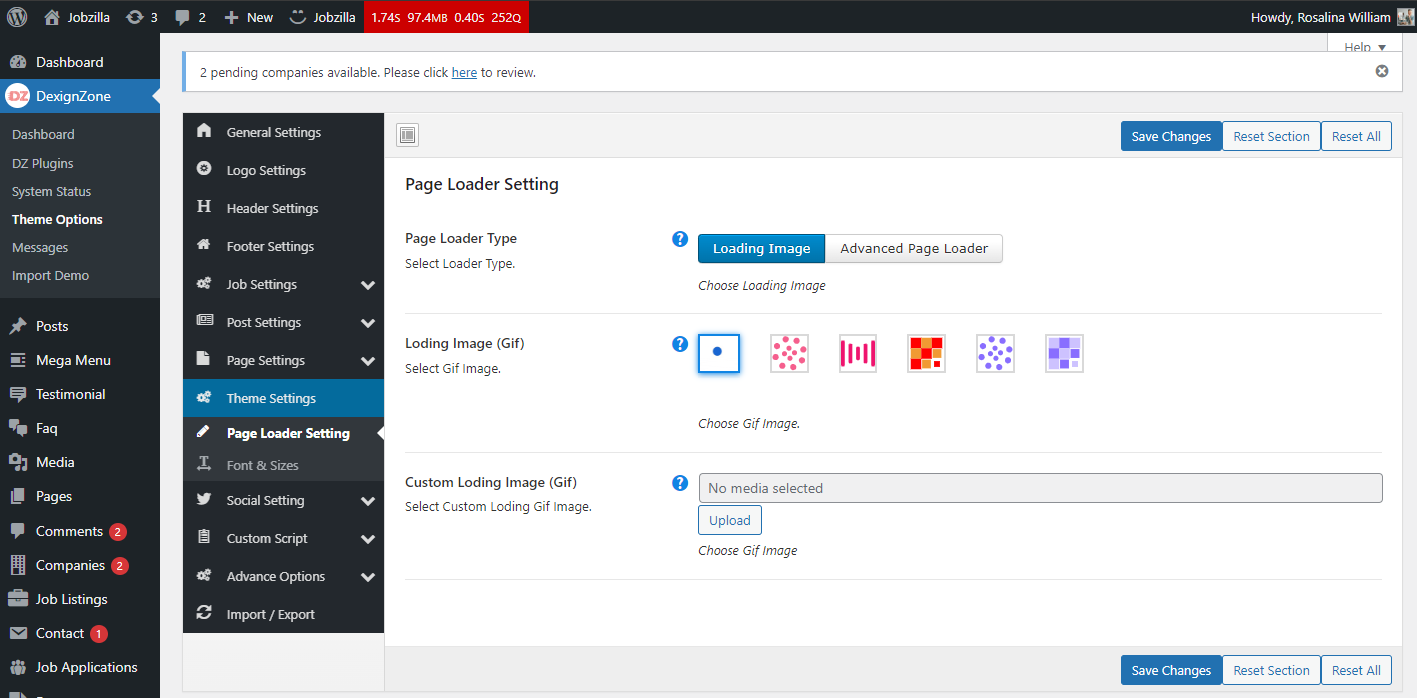
go to Theme Options > Theme Setting,
go to Theme Options > Map Settings > Other Street Map,
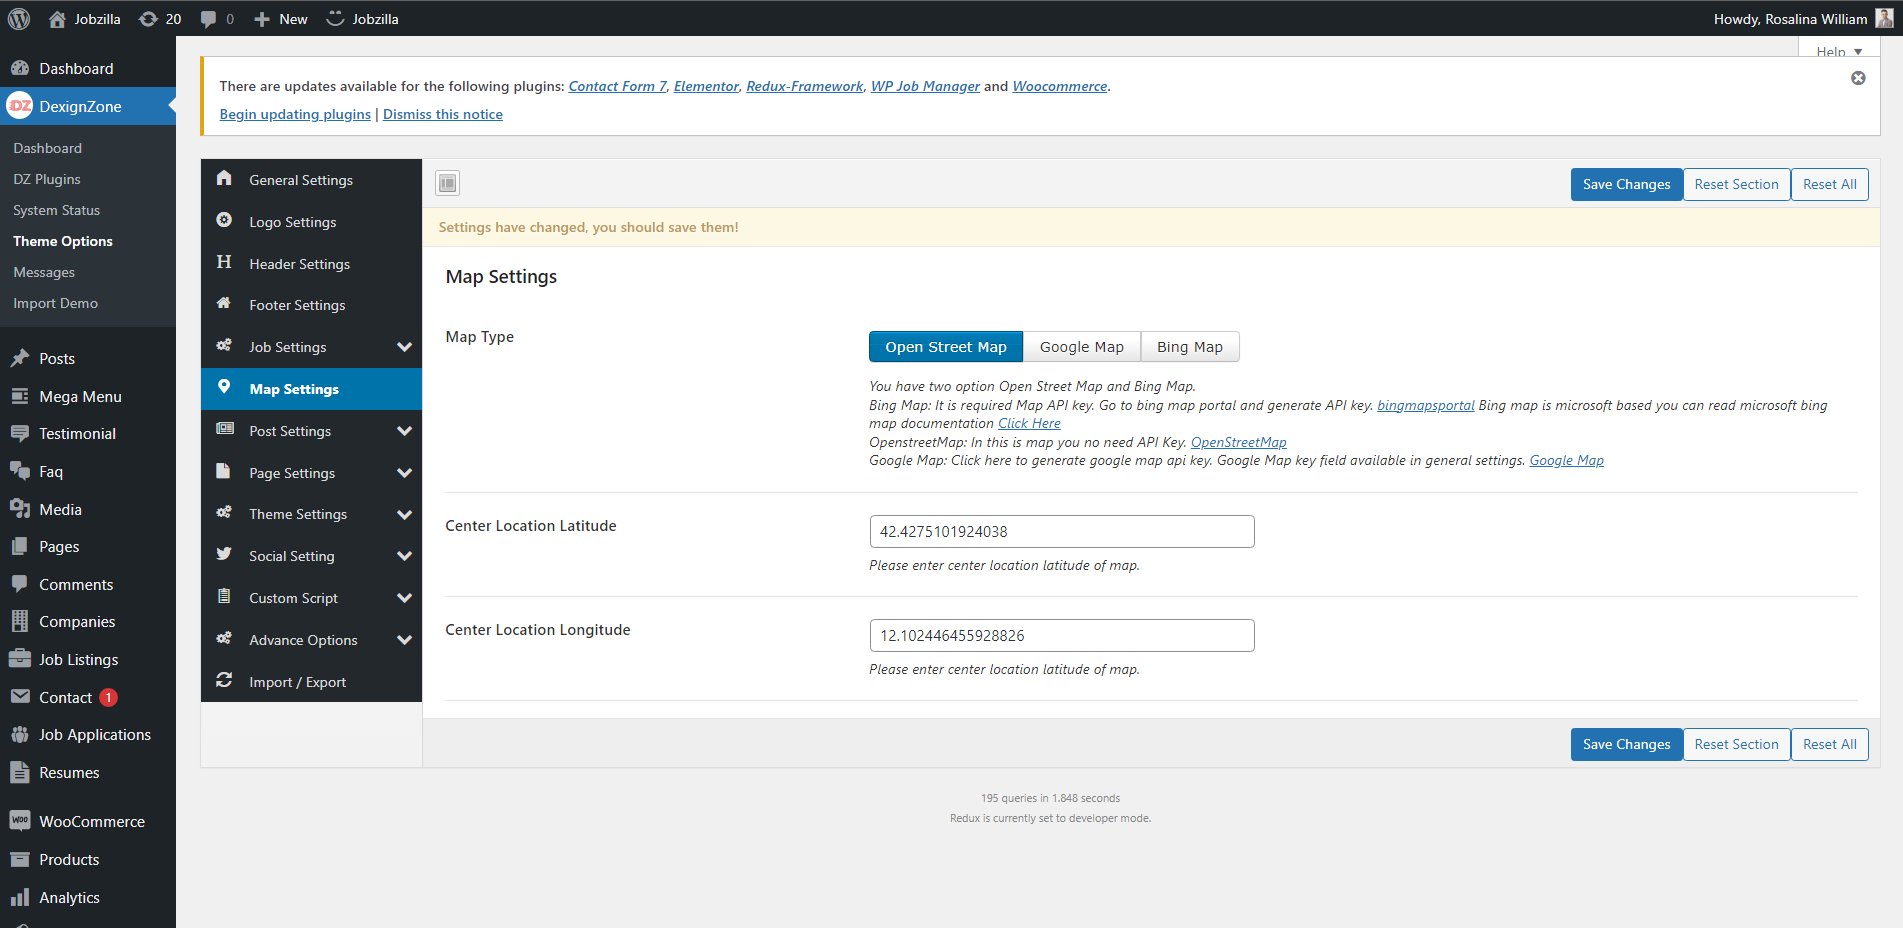
go to Theme Options > Map Settings > Google Map,
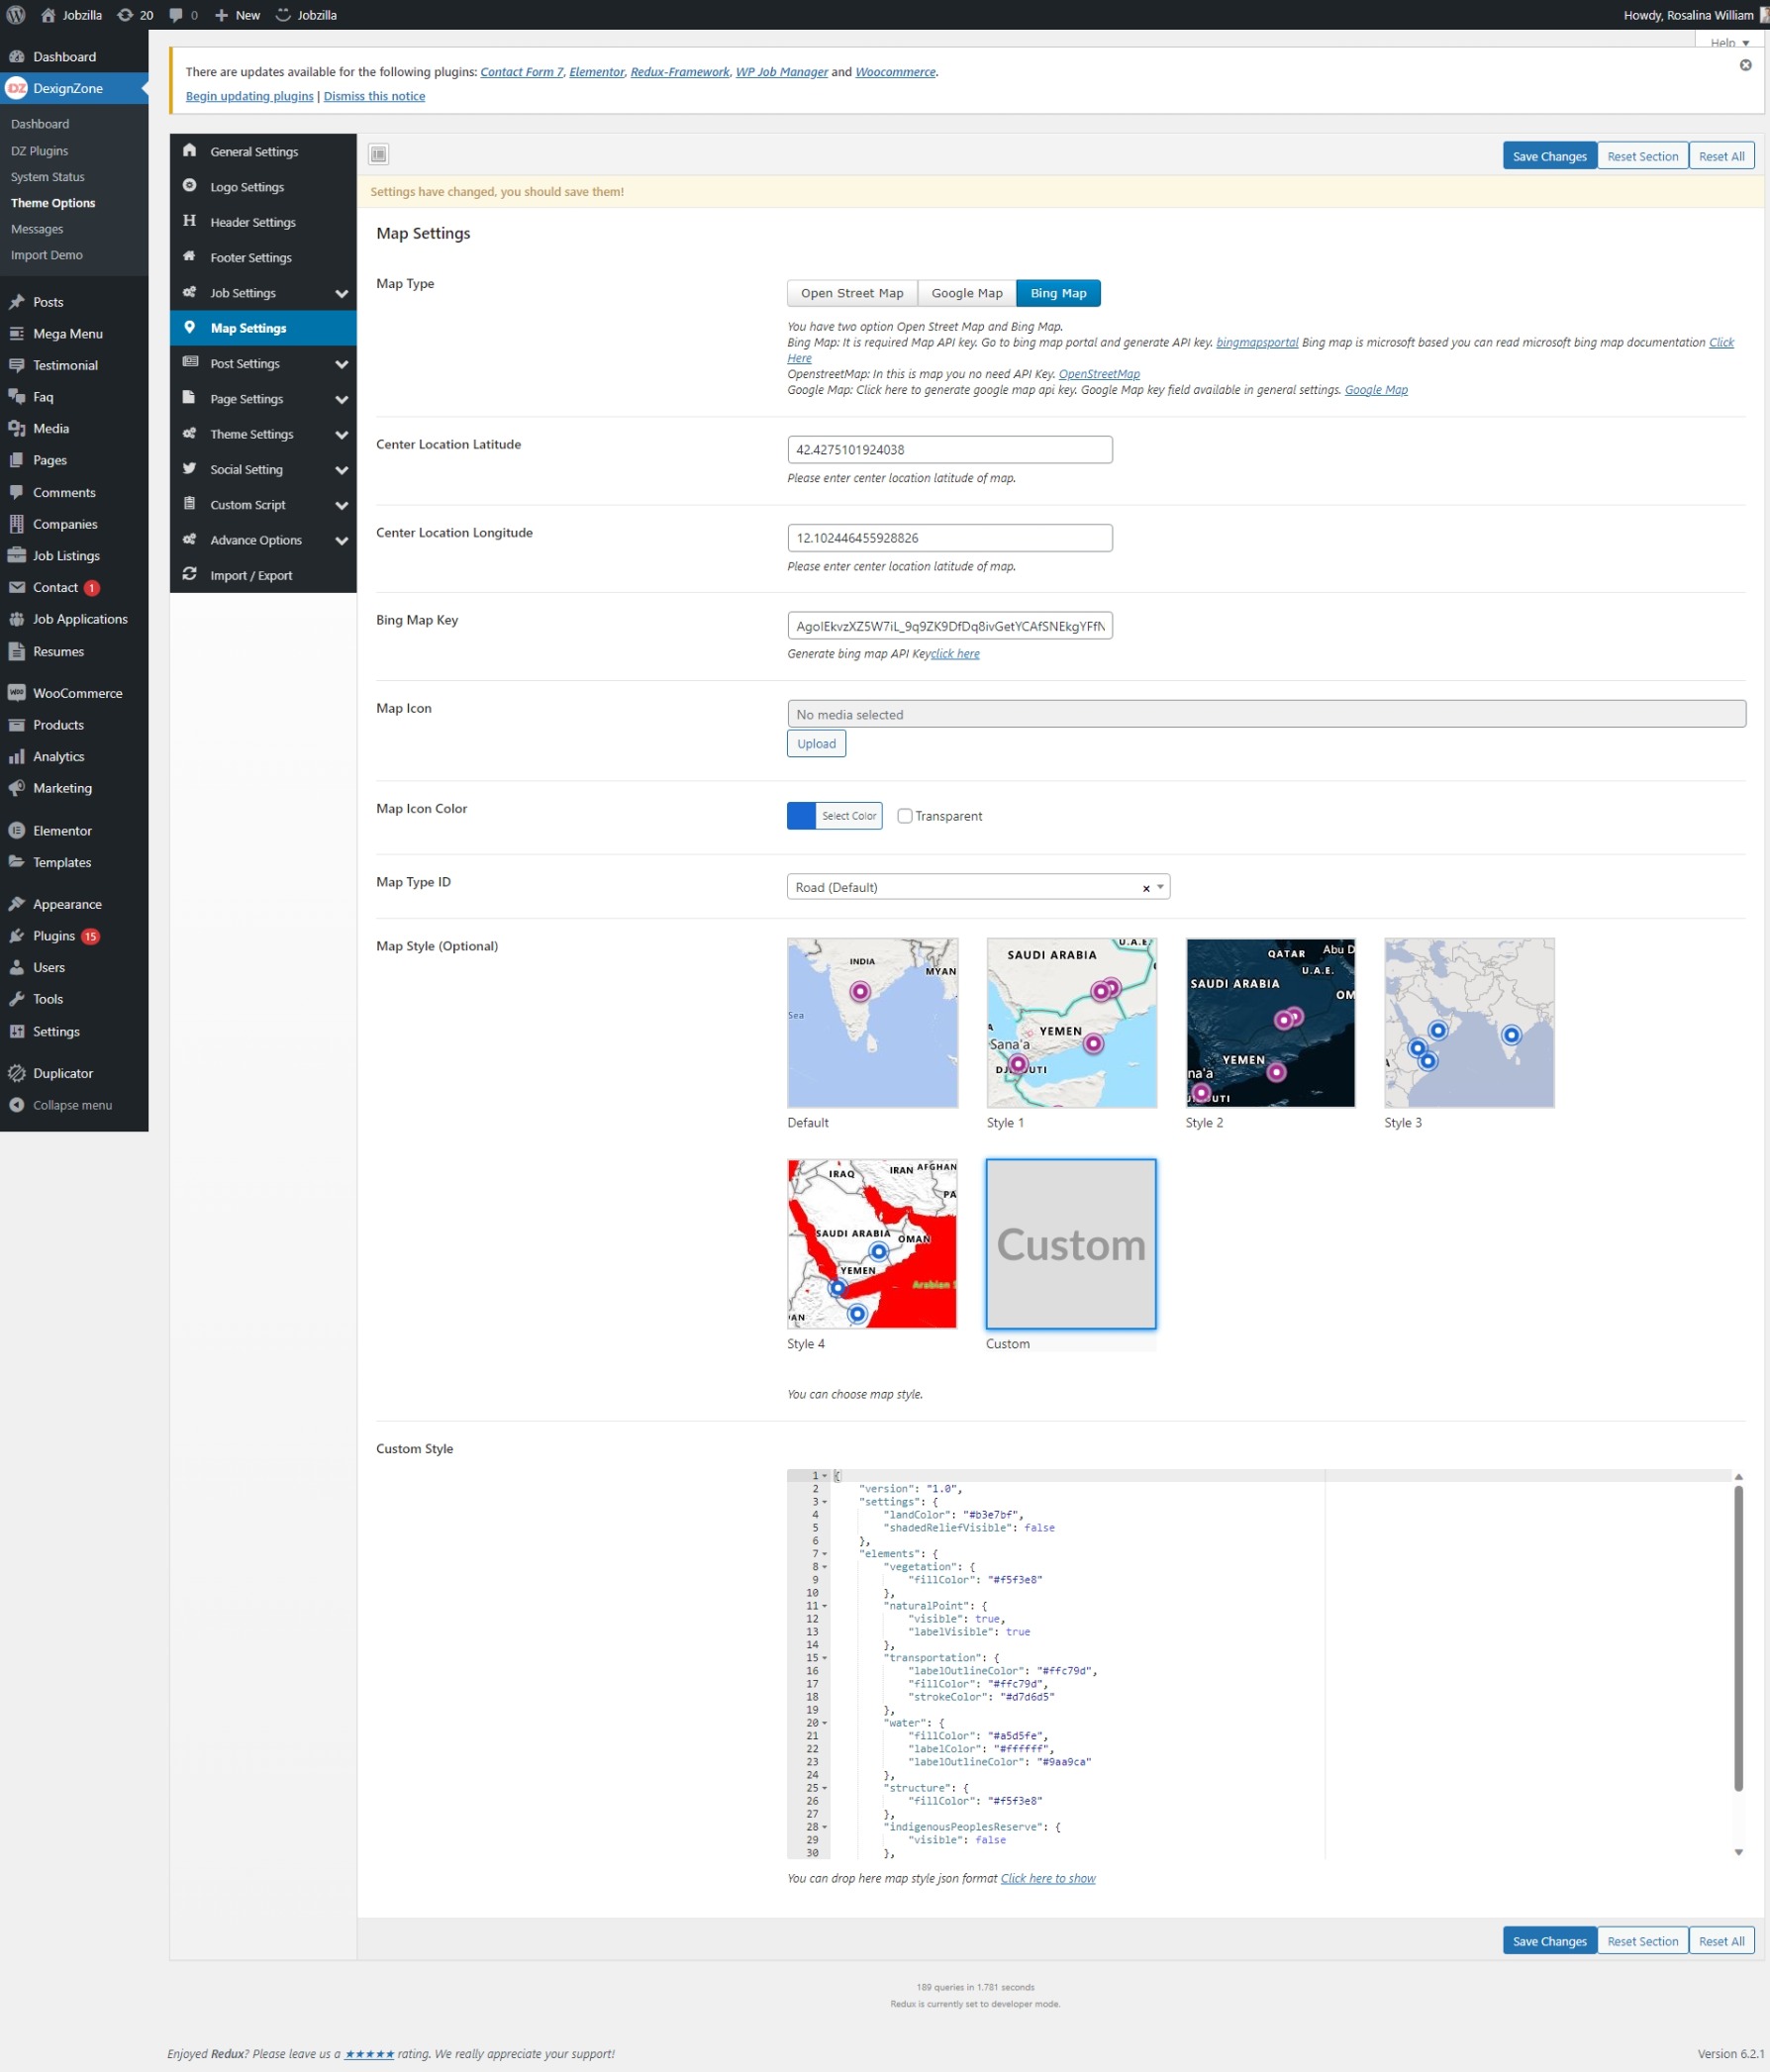
go to Theme Options > Map Settings > Bing Map,
You can social settings on theme, go to Theme Options > Social Settings,
![]()
First you make sure after installing and activating Elementor that these below checkboxes are checked for the theme.
The page related setting will be set here, go to wp-admin > Pages > Add New/ edit page.
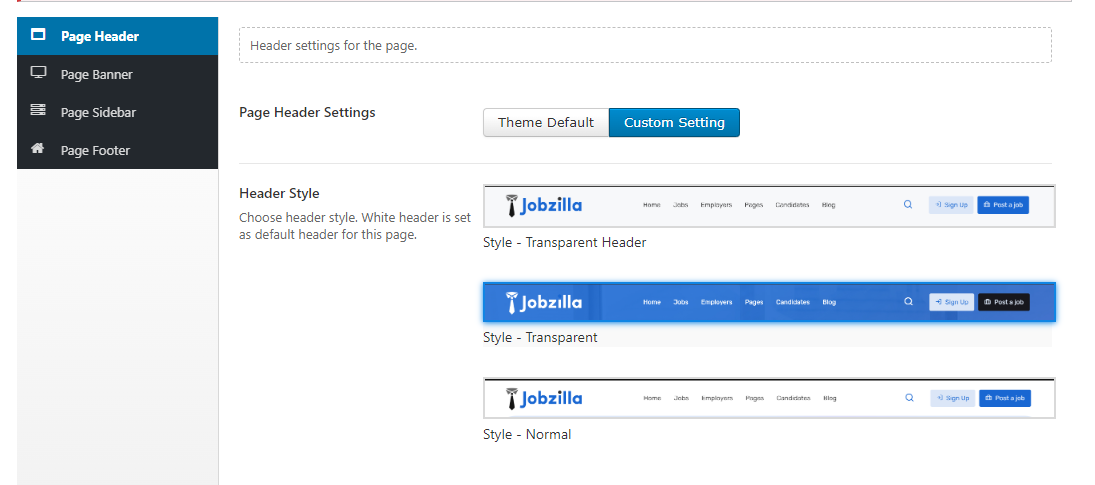
Page Header Setting.
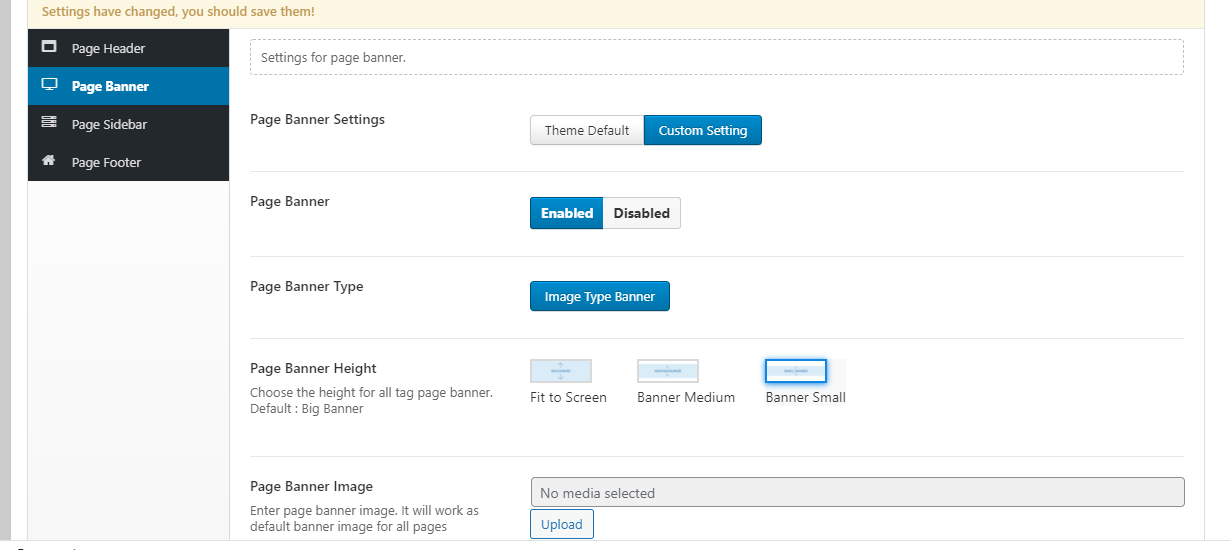
Page Banner Setting.
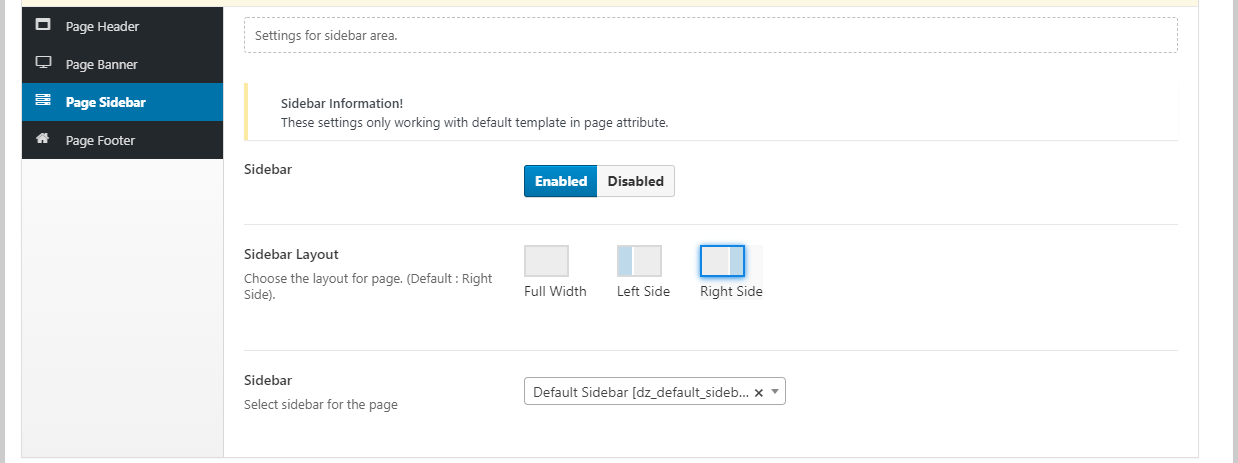
Page Sidebar Setting.
Page Footer Setting.
The post related setting will be set here, go to wp-admin > Posts > Add New/ Edit post.
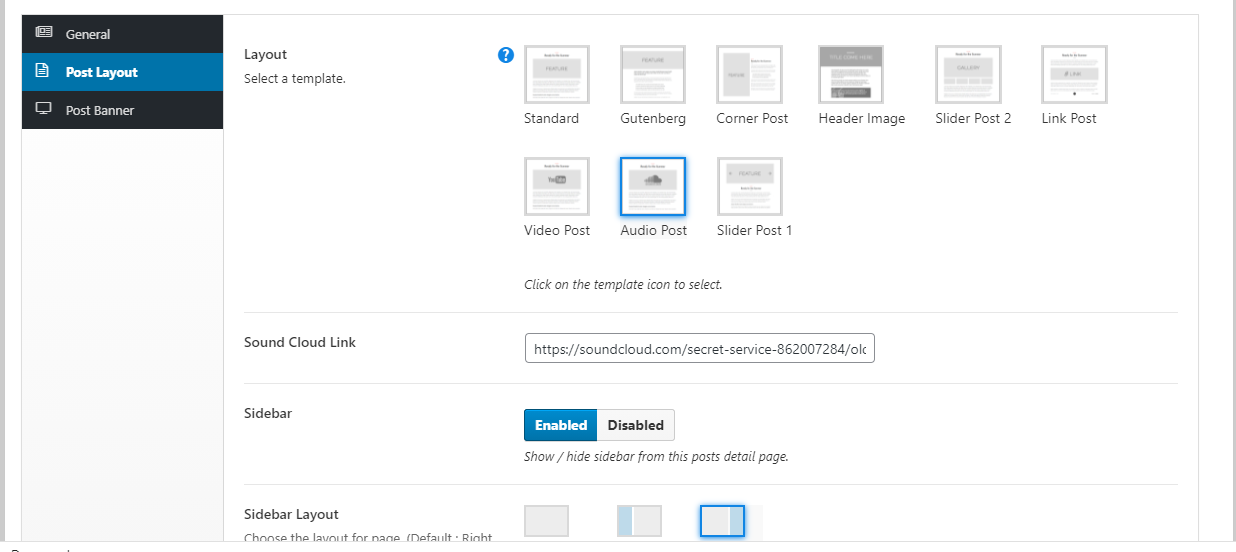
Post Layout Setting.
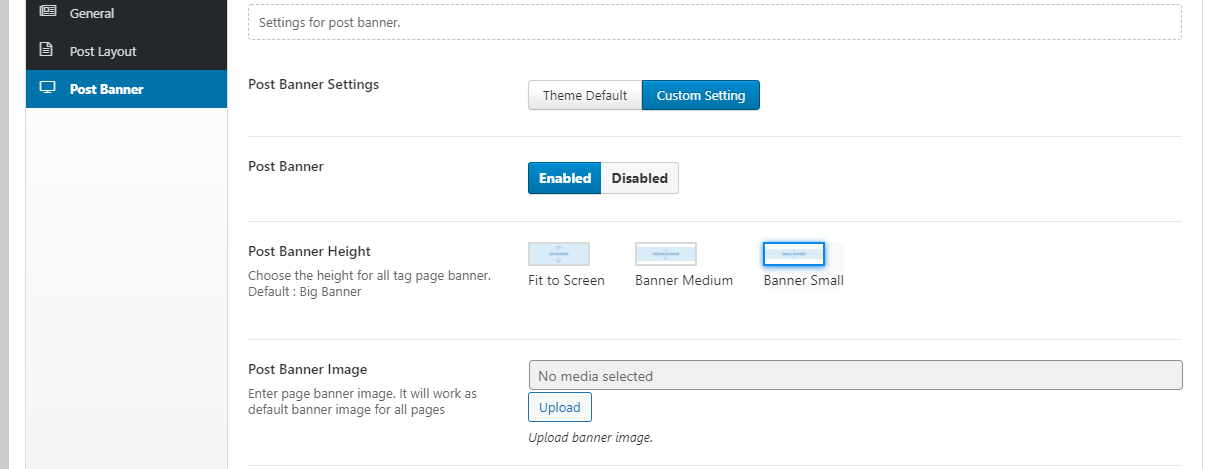
Post Banner Setting.
WPML - #back to top
The WPML plugin will help you to translate your website to different languages. Follow the steps described in this article to set up the plugin.
Activate the WPML plugin. Follow Dashboard > Plugins and click Activate under the WPML items.
After that click on Configure WPML to finish the plugin installation.
To manage languages, go to WPML > Languages.
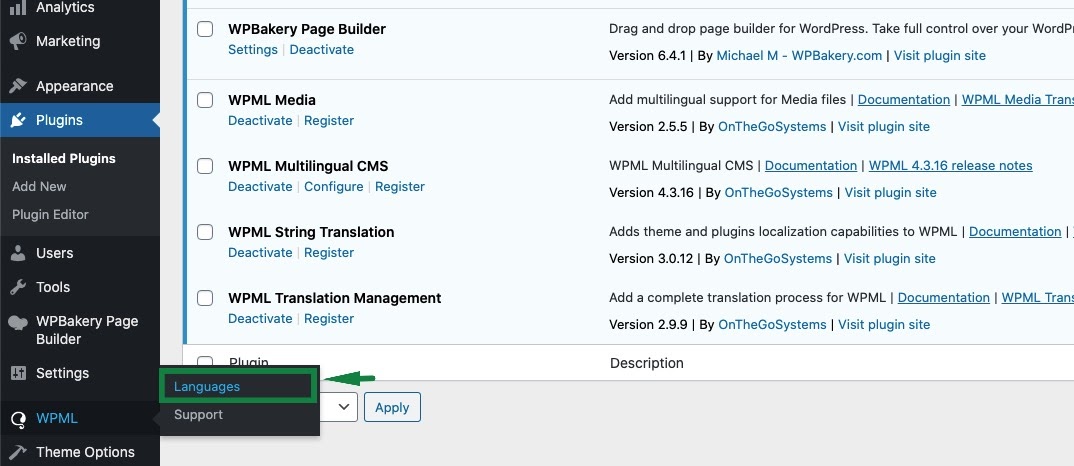
The languages section allows you to make a WordPress site multilingual.
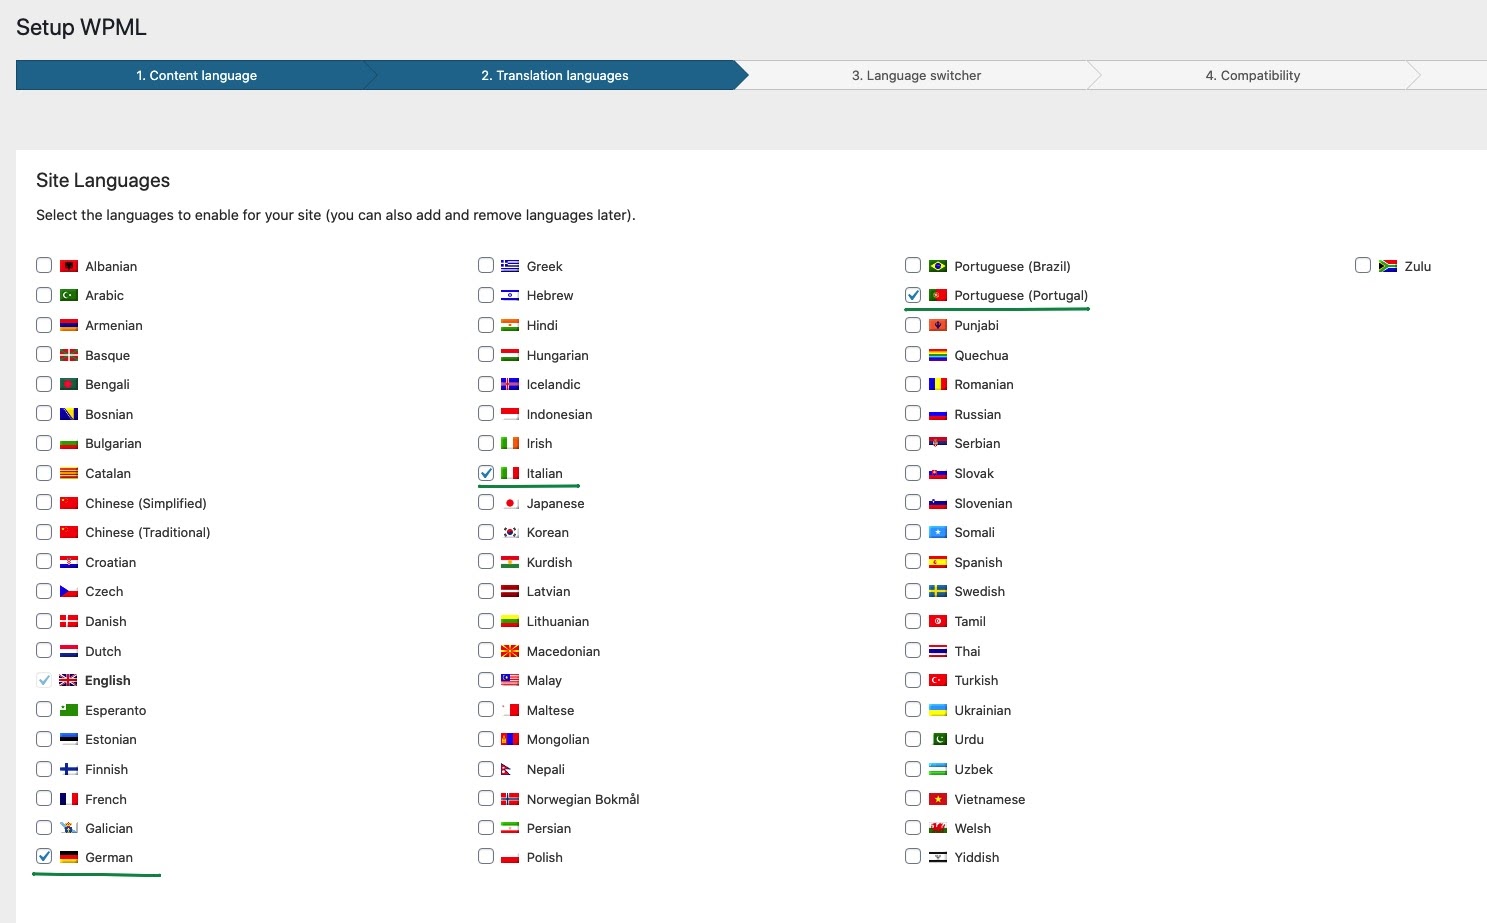
When you configure WPML for the first time, you need to choose the language of existing content. Select the language of your current website content in the Current Content Language section.

In the next step (Translation languages) add more languages to the site. Mark the languages you want to add. Then click on the Next button.
In order to let site visitors select their language, you can add a language switcher to the theme.
WPML’s standard language switchers include a drop-down languages list, a list of languages for the site’s footer, and a language switcher for the menu.
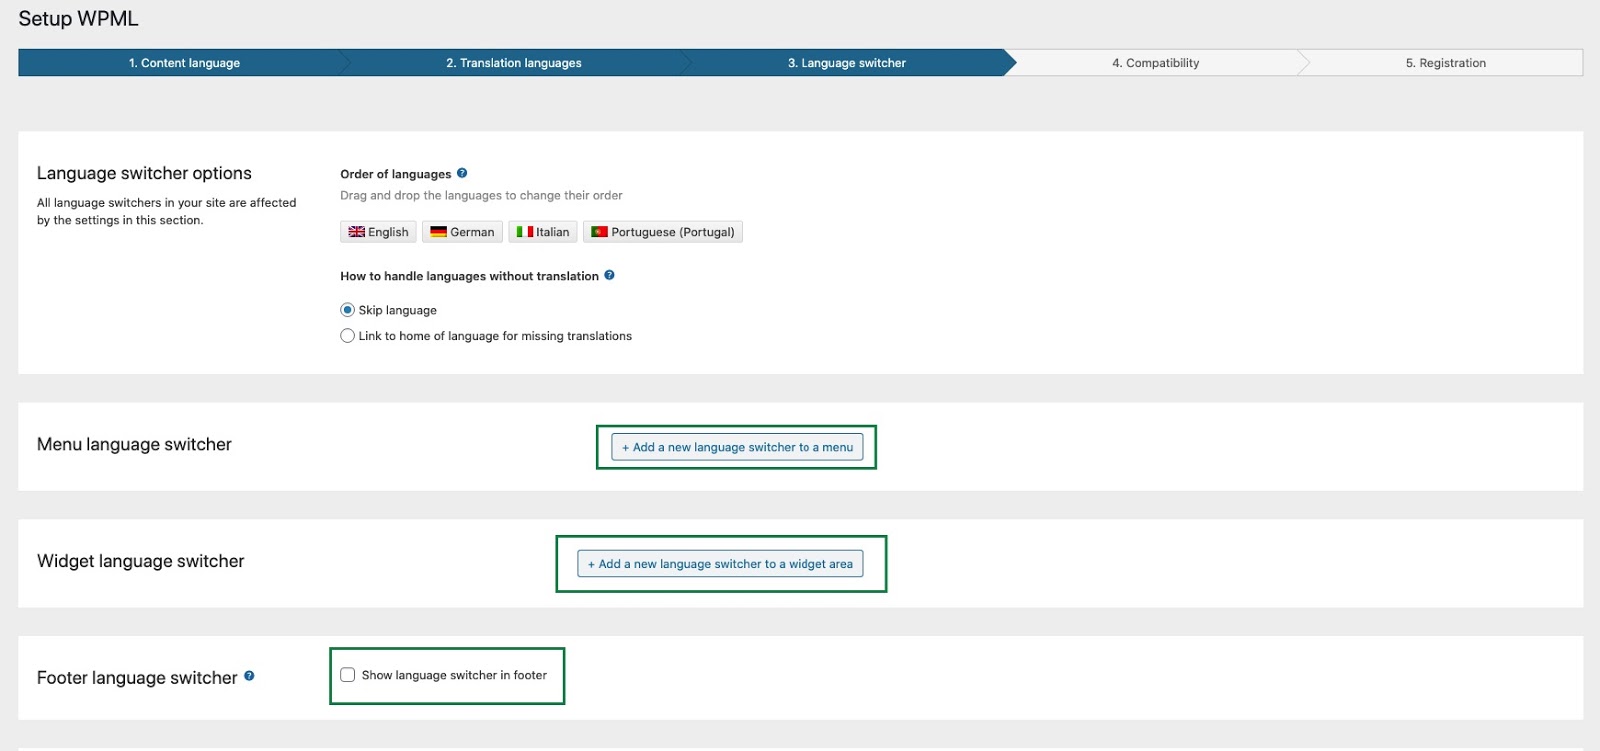
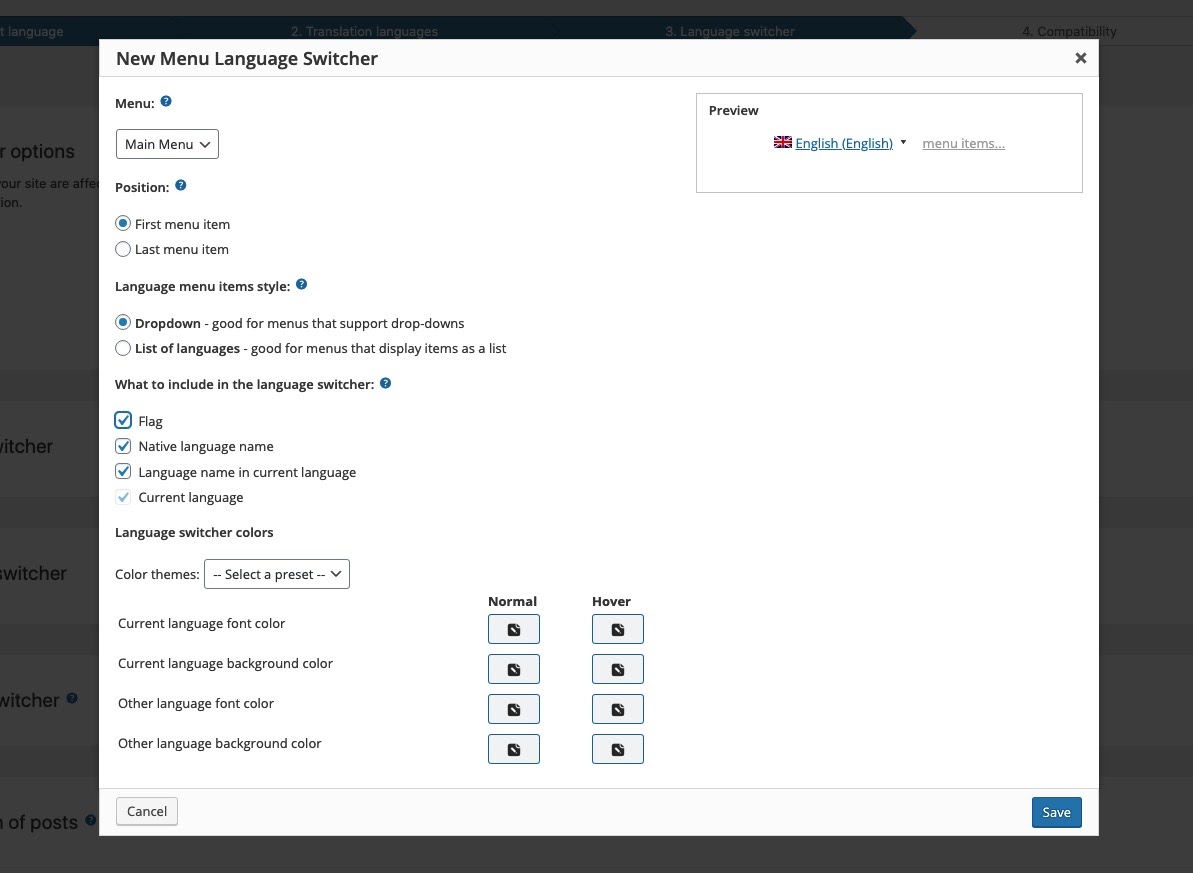
Click the “Add New Language Switcher to Menu” button to add the language switcher to the menu.
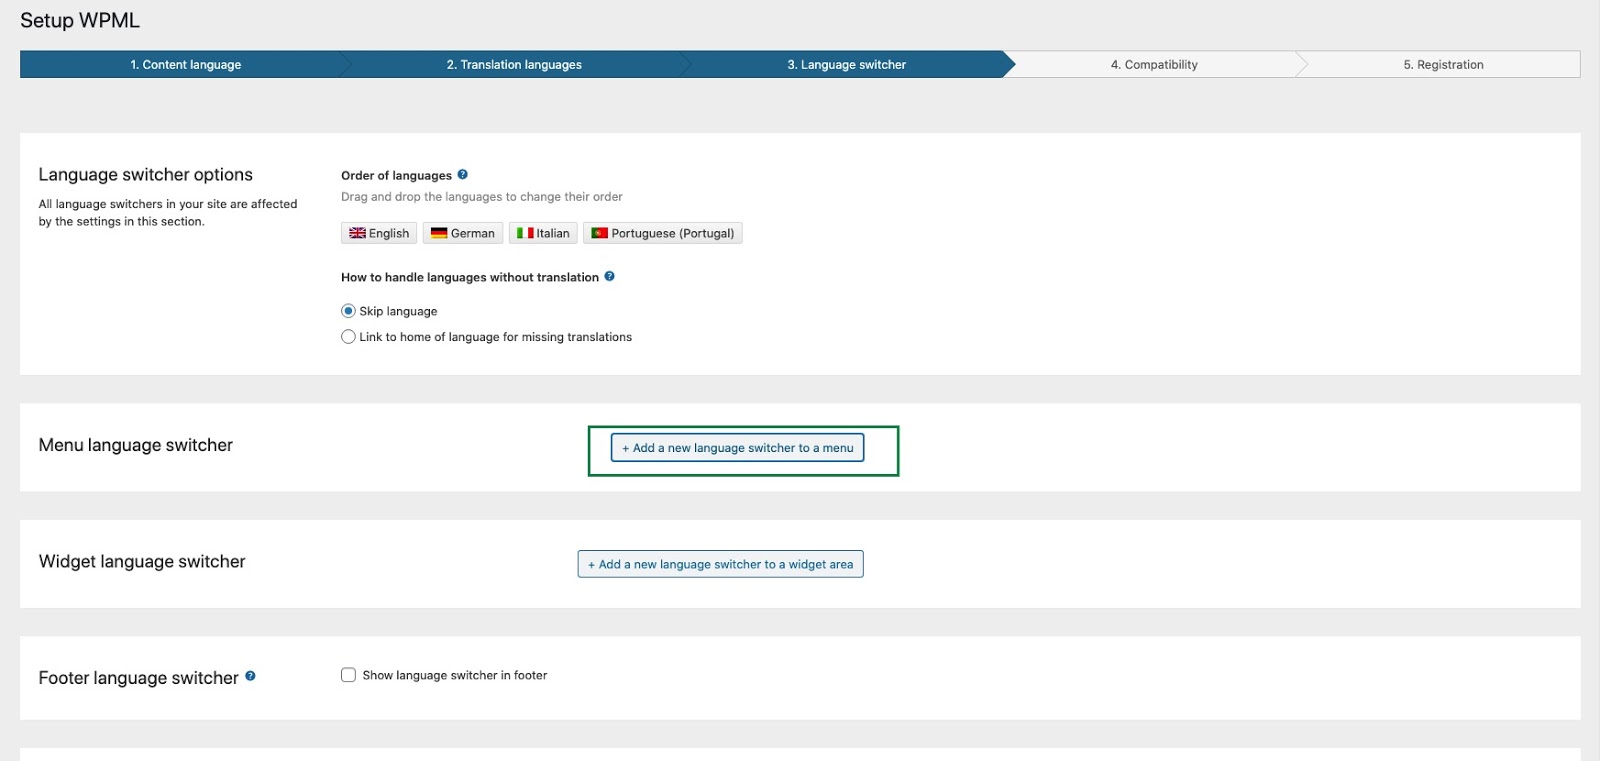
On the screen New Menu Language Switcher, select the position, style of menu items, specify what to add to the language switcher and choose the colors. Then click the "Save" button.
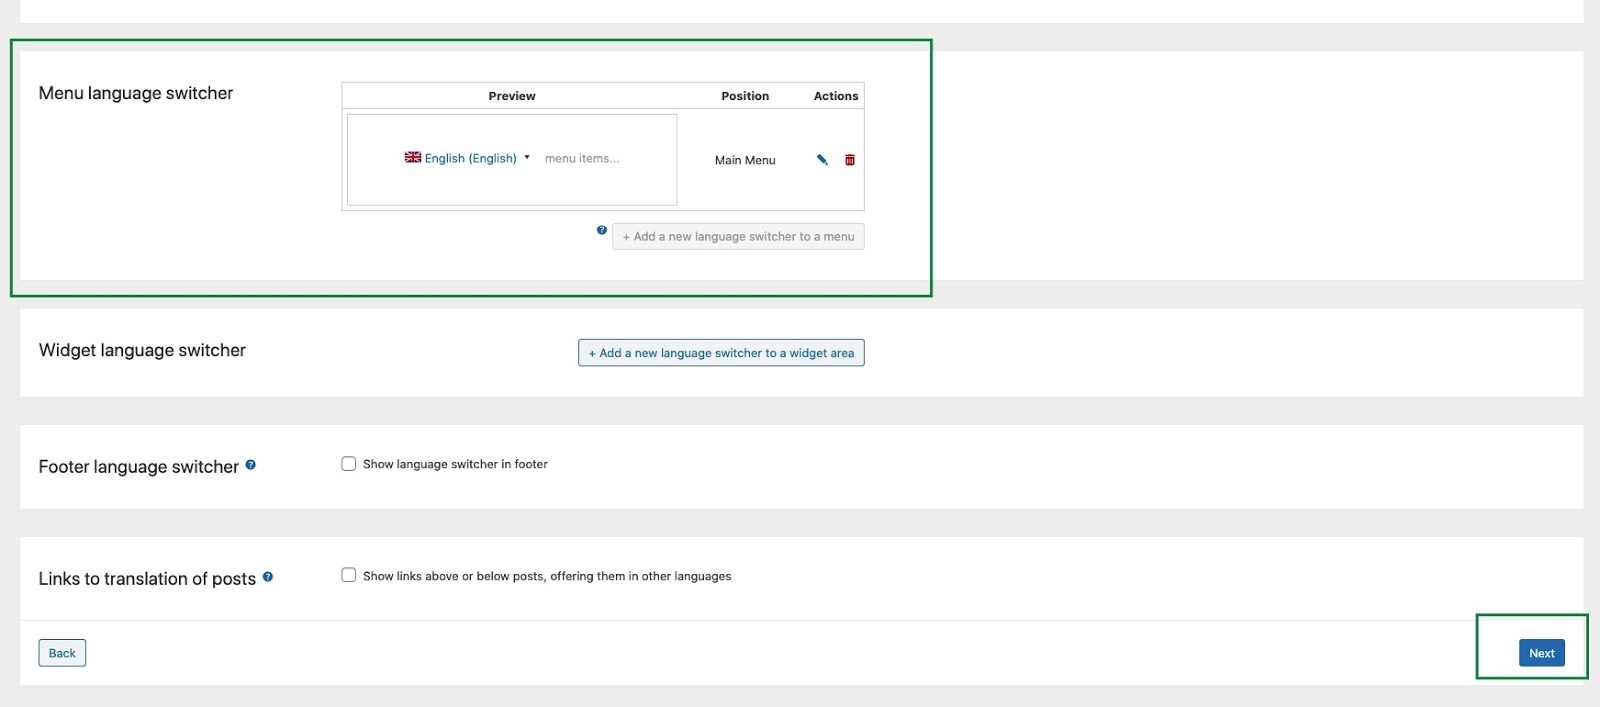
Here you can see a preview of your menu and position and you can manage them at any time. Click on the Next button to proceed to the further step.
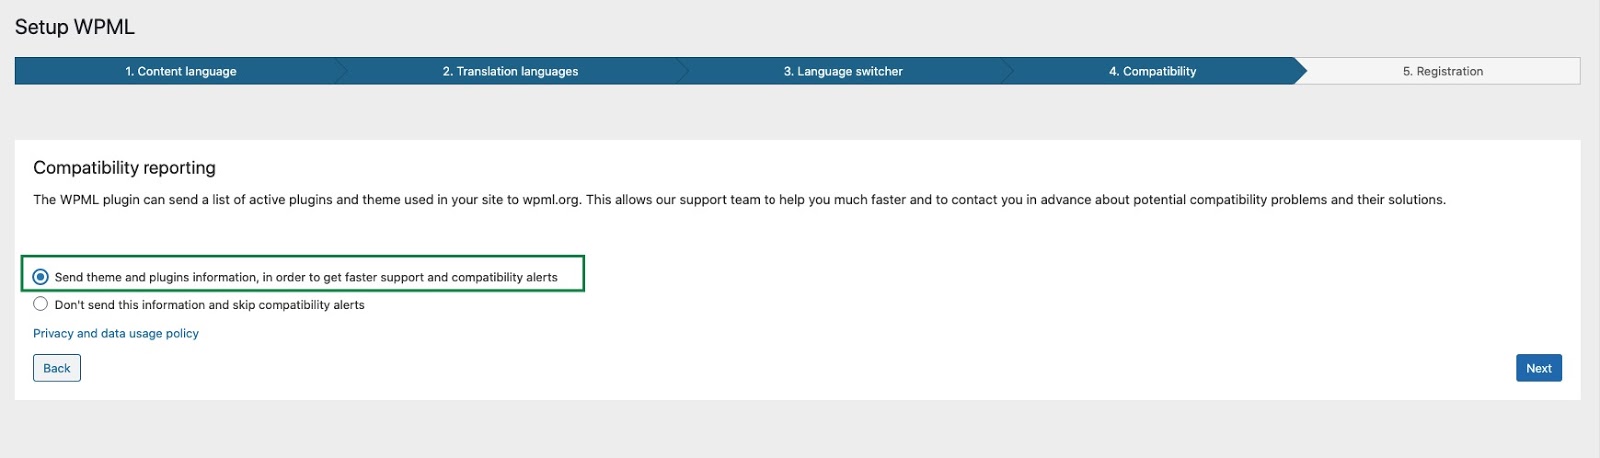
Select the first option for the compatibility reporting.
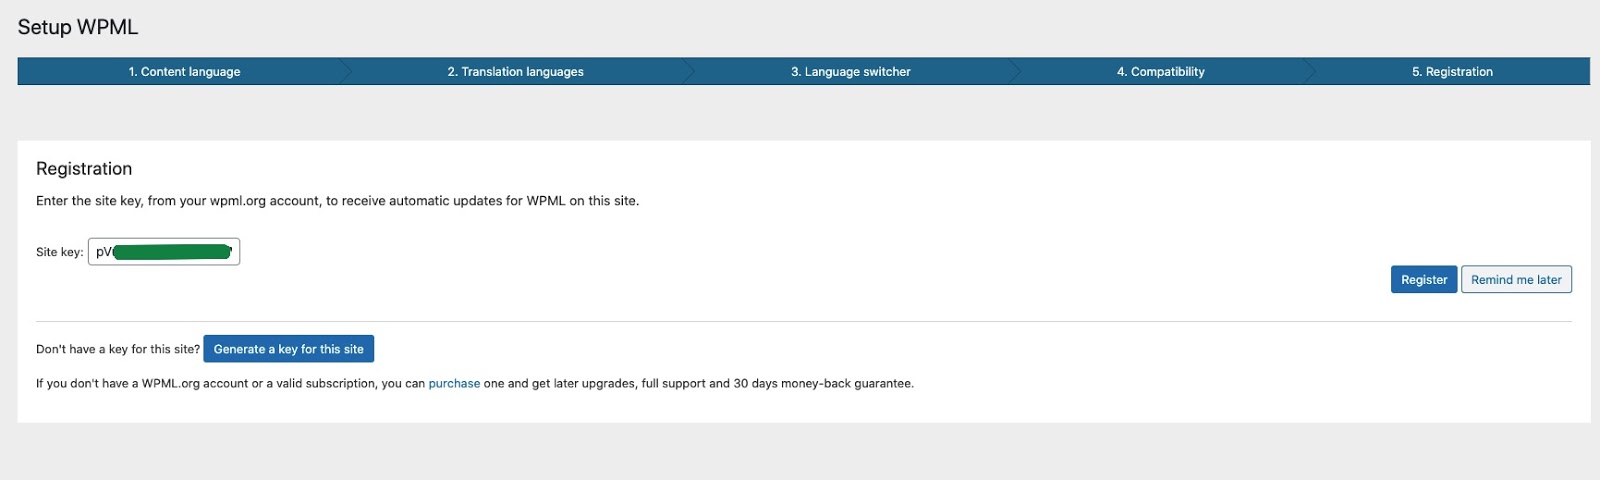
Paste the site key that you can find on your wpml.org account page and click the Register button. if you don't have a site key, then click the button to generate a key for this site.
WPML String Translation
WPML’s String Translation module is part of the Multilingual CMS account type. To enable it, you first need to download and install it from your WPML.org account, under the Downloads section.
Then, navigate to WPML → String Translation.
For More Information... https://wpml.org/documentation/getting-started-guide/string-translation/.
Theme Update - #back to top
General Method –
1. Log into FTP Account using FileZilla or similar program.
2. Go to wp-content/themes directory
3. Move to the theme directory that you want to update.
4. Now, download the latest version of theme from ThemeForest.net/downloads
5. If you have downloaded the zip, extract it. Find the theme folder. It generally has style.css file in it.
6. Upload all files in that folder to the directory on FTP we found in step.
Envato Market Plugin Method –
Summary – How to Update Envato ThemeForest Themes
Here’s a quick summary of steps required to update Envato ThemeForest themes.
1. Download and Install the Envato Market plugin.
2. Activate the plugin and go to the Envato Market tab to configure the plugin.
3. Click on the link to generate an Envato API Personal Token. Copy-paste the token and save changes.
4. You should now see all of your Envato purchases including ThemeForest themes that you can install and update.
Installing Envato Market Plugin to Update WordPress Themes
Unlike other WordPress plugins, the Envato Market plugin is not available to install from the official WordPress plugins repository. So, you won’t be able to search and install from your Plugins page within the WordPress dashboard.
The Envato Market Plugin is hosted on GitHub and you can download the plugin from this Envato plugin page.
Step 1 : Use the plugin download link on the this Envato Market plugin page.
Although hosted on Github, the plugin authors do not recommend downloading directly from Github repository “Download ZIP” as Github does not package the plugin correctly.
Step 2 : Save the Envato Market Plugin archive.

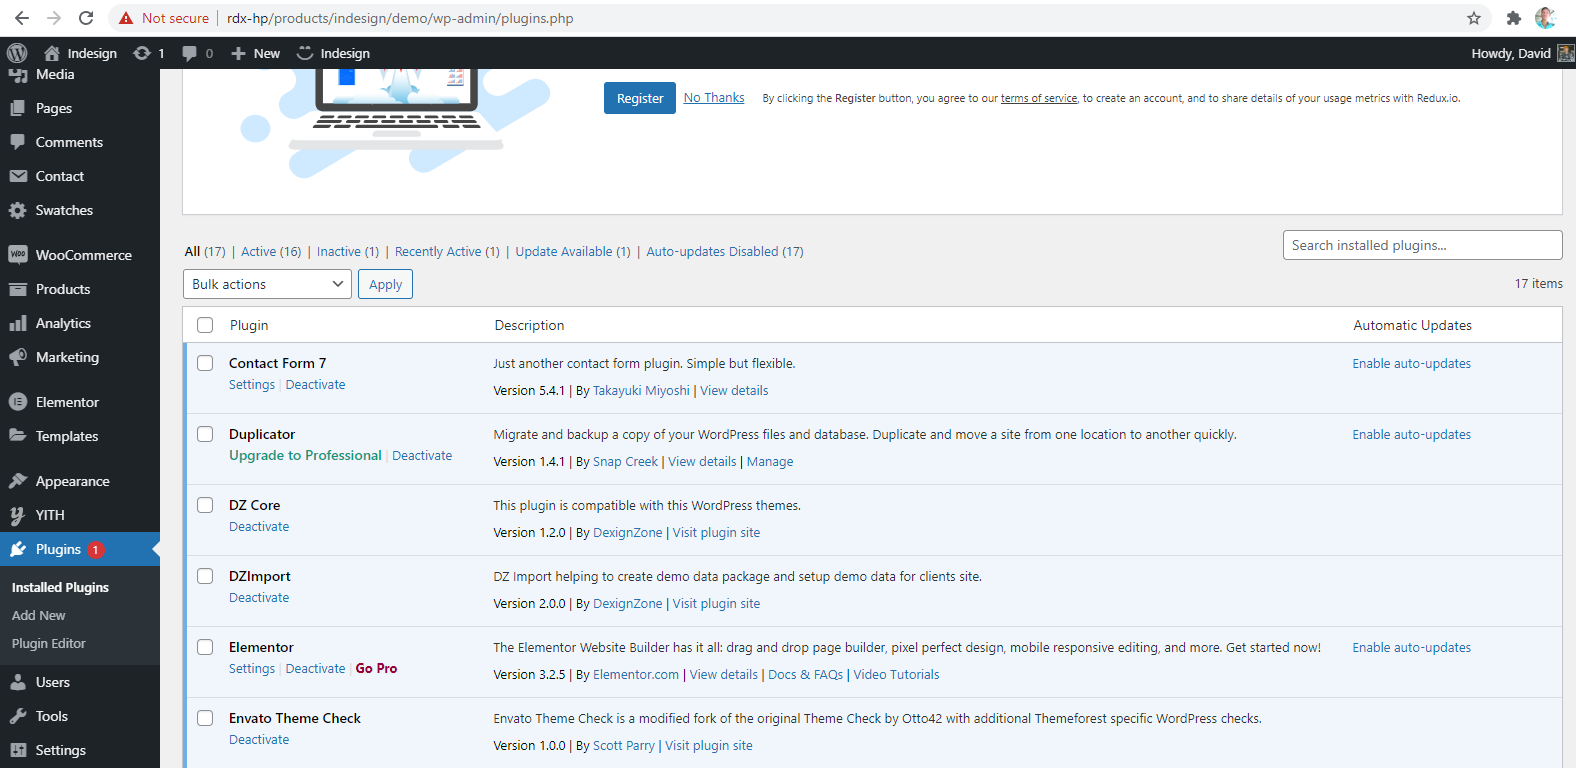
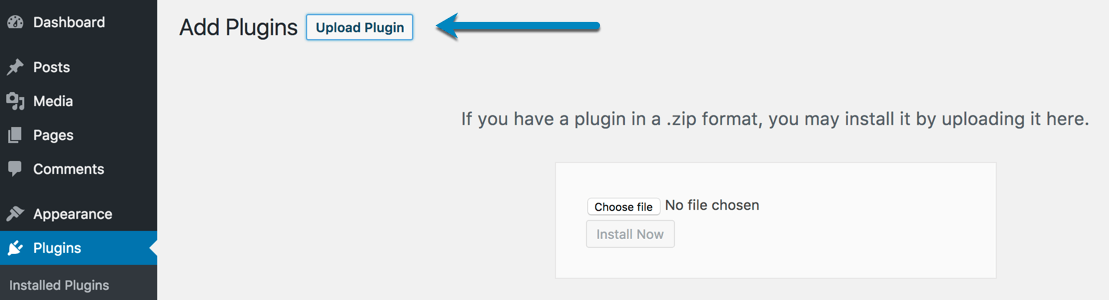
Step 3 : Go to Plugins > Add New > and click on Upload Plugin at the top.
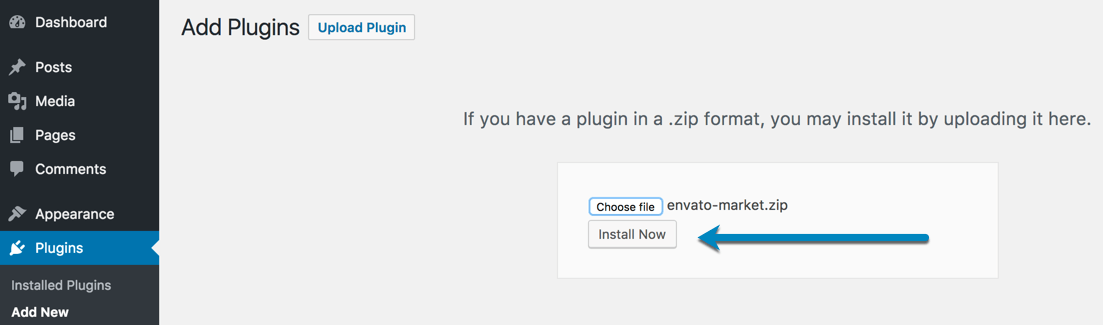
Step 4 : Click on Choose File and select the envato-market.zip file from where you saved and click on Install now.
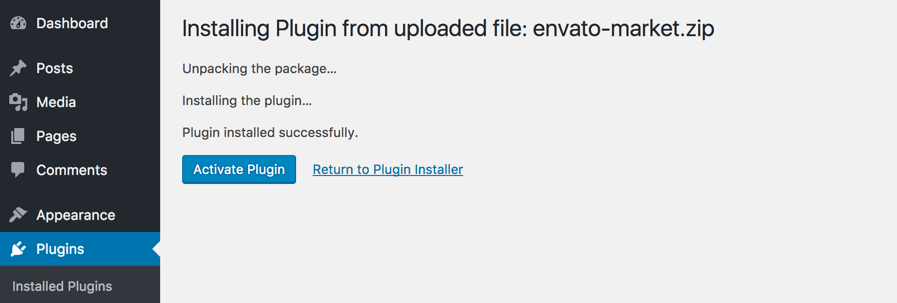
Step 5 : Click on Activate Plugin to activate the Envato Market Plugin.
You can also install the plugin by unzipping the archive and uploading the envato-market folder to the /wp-content/plugins/ directory using an FTP program.
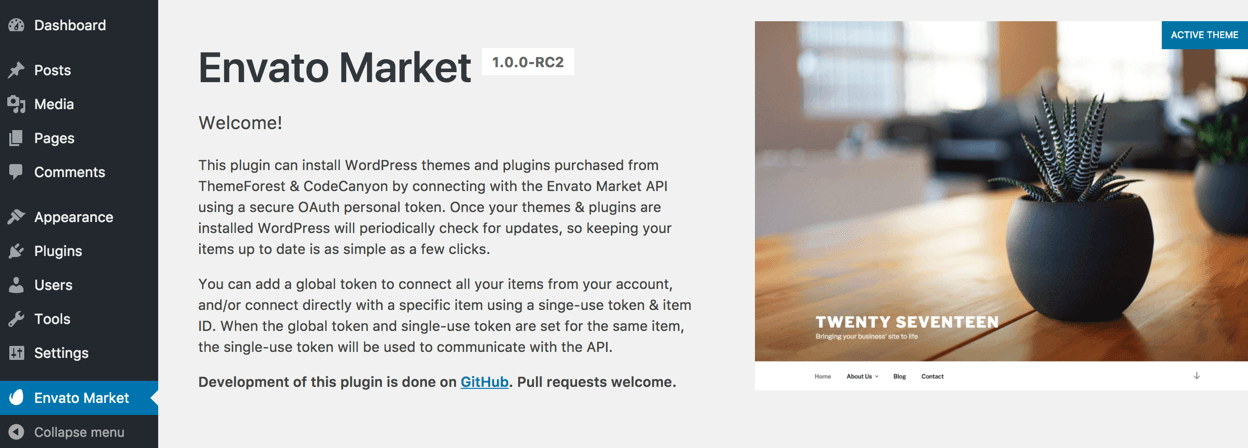
Step 6 : After the plugin is active, go to Envato Market tab from your WordPress dashboard.
Step 7 : You will need to configure the plugin by adding an Envato API Personal Token. Click the suggested link in the instructions to generate a personal token. (You can find the link to generate a personal token with required instructions on this page).
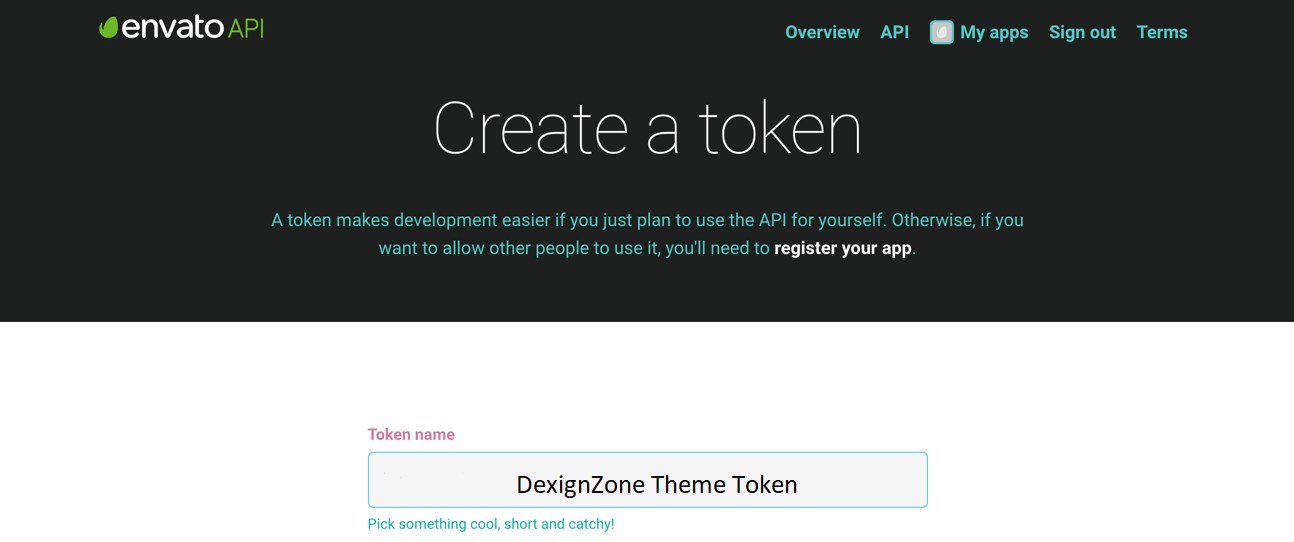
Scroll down on the page with all the required permissions selected and click on Create Token at the end of the page.

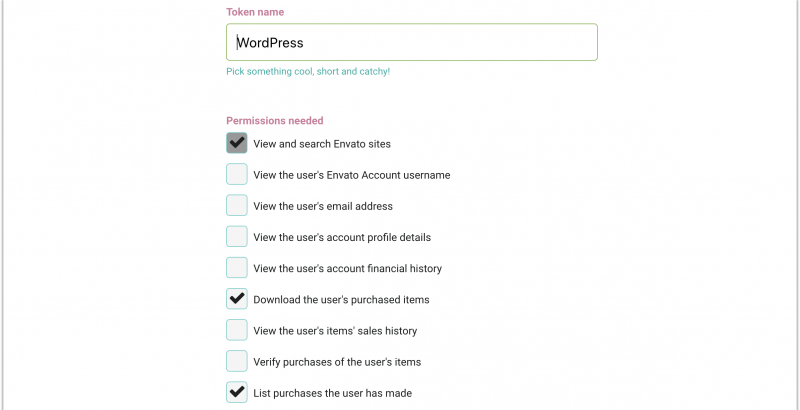
Make sure you only enable the required permissions including;
- 1. View and search Envato sites
- 2. Download your purchased items
- 3. List purchases you’ve made
See the screenshot below for enabling the required permissions.
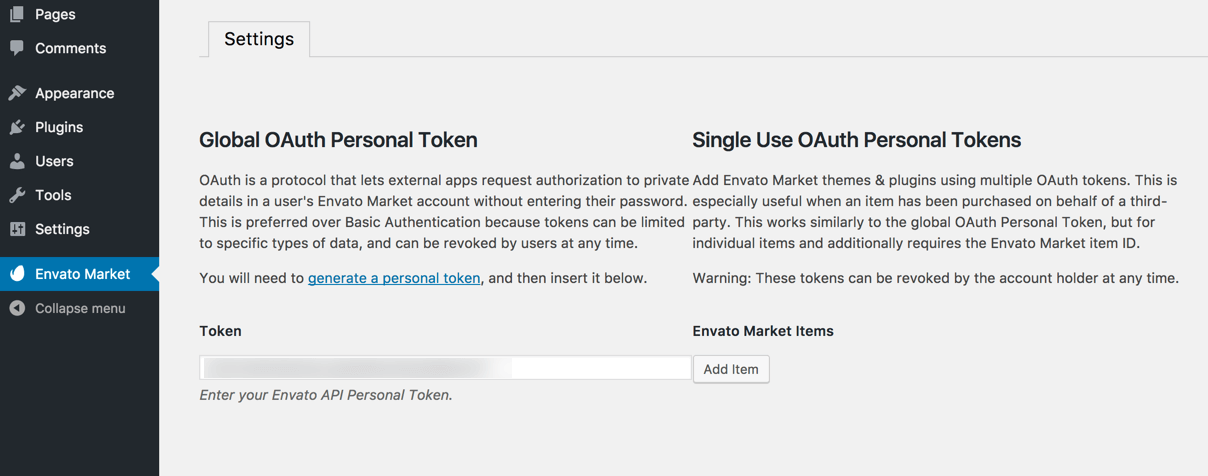
You can either use a Global OAuth Personal Token or a Single Use OAuth Personal Tokens.The difference is clearly explained on the page.
Step 8 : You will see a success page with an option to copy your secret token key. Copy the key and confirm that you have copied the key from the page.
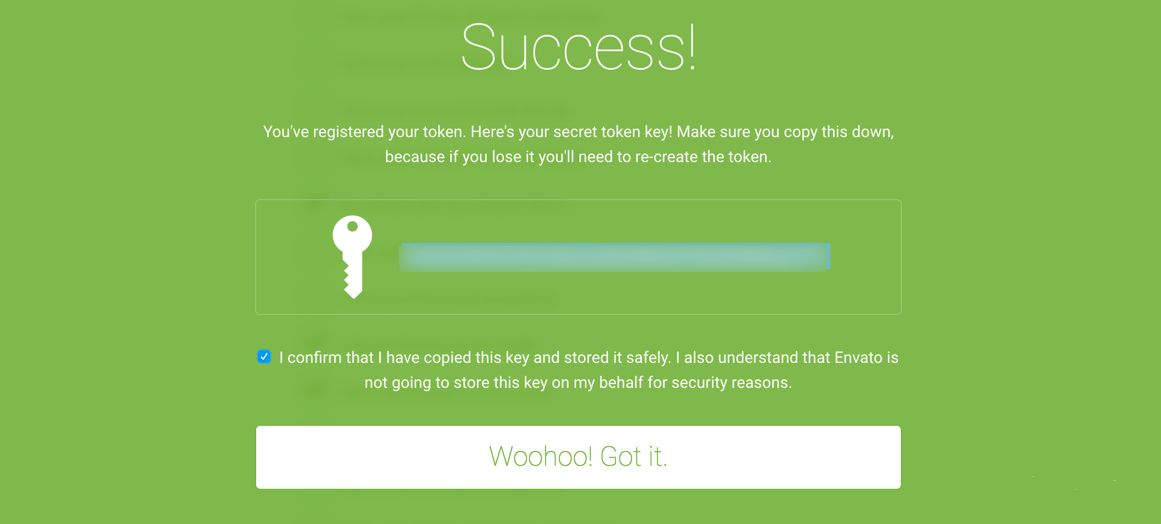 Envato will not save the secret token key and if will have to generate a new key if you lose it.
Step 9 : Enter the Envato API Secret token key and click on Save Changes.
Step 10 : You should now see all of your purchased WordPress themes from your ThemeForest account.
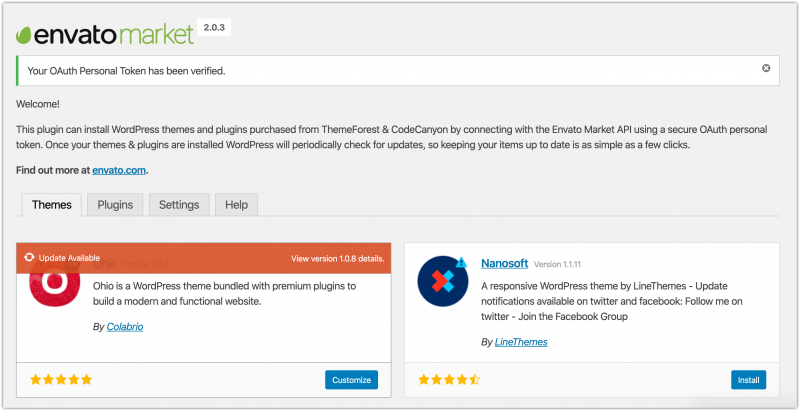
Click on Install Now to install any of your purchased WordPress themes from your ThemeForest account.
You can also see if any updates are available for your currently installed and active WordPress themes from this page.
MailChimp Options - #back to top
More Info: https://docs.oceanwp.org/article/520-get-your-mailchimp-api-key-and-list-id
For API Key: https://mailchimp.com/help/about-api-keys/#API_key_security
For List ID: https://mailchimp.com/help/find-audience-id/
Creating API Key and List ID
Get API Key:
1. Login to your MailChimp account.
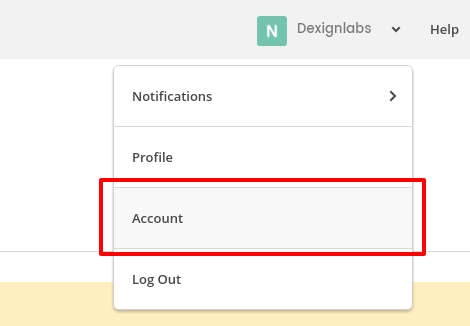
2. Under the user menu dropdown at the top left side, click on Account link.
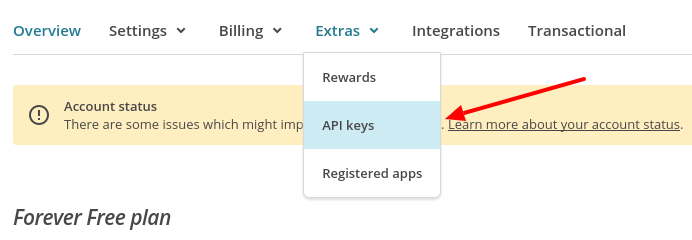
3. Go to the Extras » API Keys from the top navigation menu.
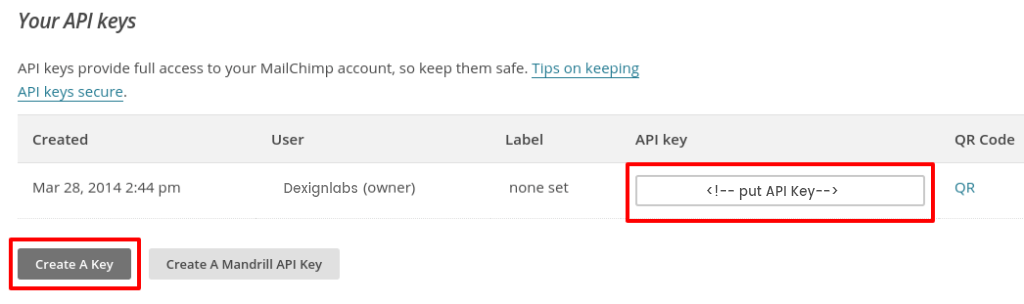
Under the Your API keys section, create an API Key by clicking on Create A Key button. Once generated, copy API key for later use in PHP script.
Get List ID:
1. Choose a list in which all the subscriber’s information would be stored. In that case, you need to create a list in the Lists page.
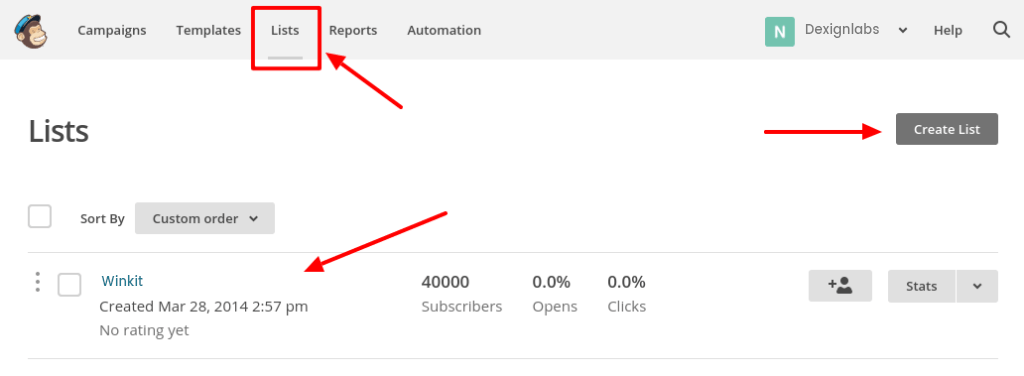
Enter into your created list and navigate to Settings » List name and campaign defaults.
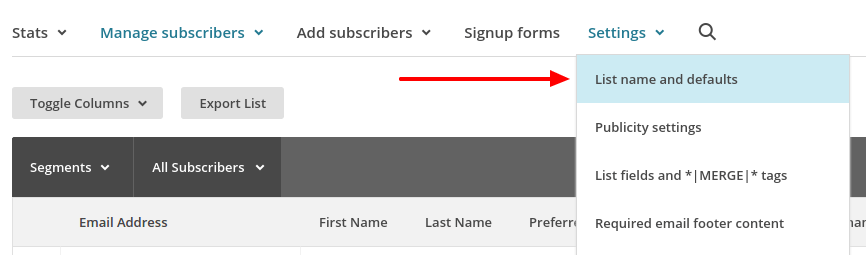
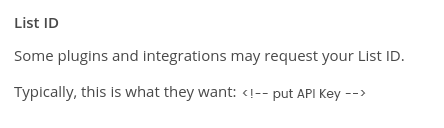
Under the List ID label you will find the List ID. Copy List ID for later use in PHP script.
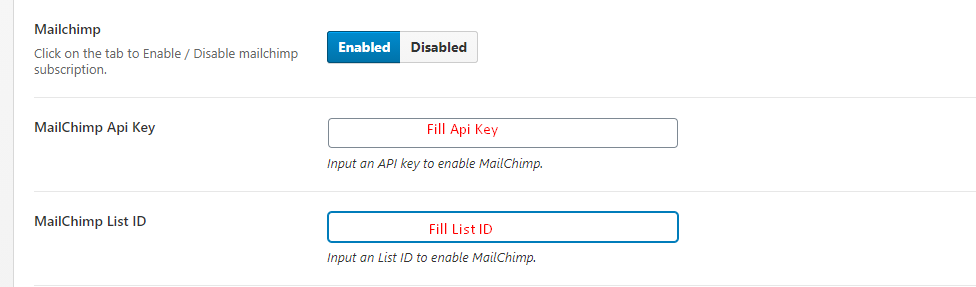
Then, you just need to click on Theme Panel, and the Integrations tab to add your API and List ID.
Page Speed Options - #back to top
First you have install and activate LiteSpeed Cache and Smush plugin

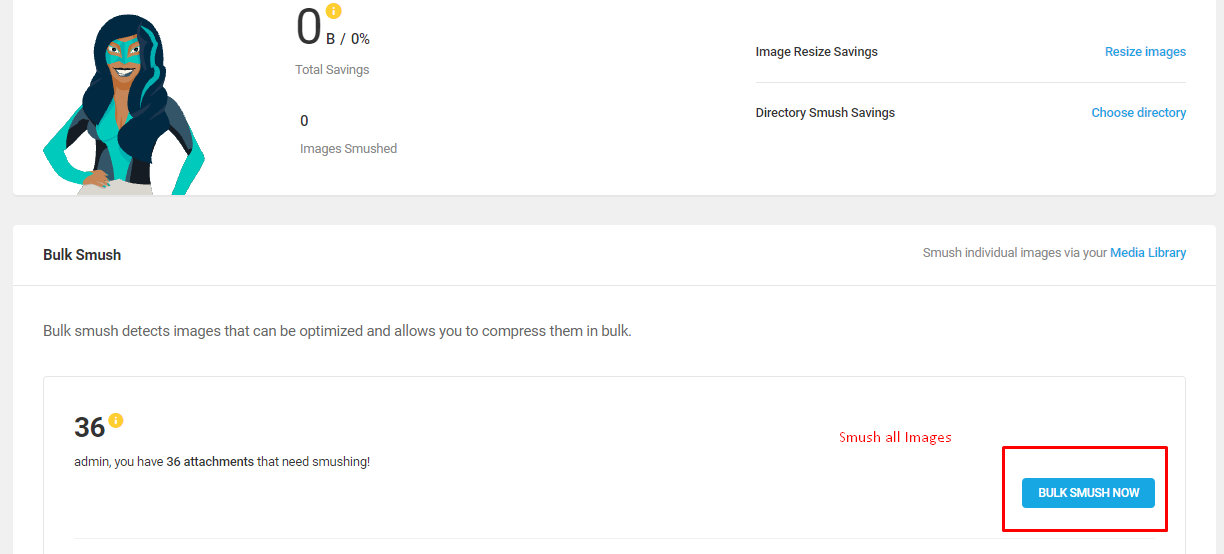
Disable the lazy loading setting in Smush Plugin : smush -> lazy load -> Deactivate and click bulk smush now
Go to LiteSpeed Cache Plugin :
1 : General setting -> guest mode ON
2 : Cache setting -> Purge Tab -> Select the page for which you want to enable caching
3 : Cache setting -> Purge Tab -> Serve Stale ON
4 : Cache setting -> Object Tab -> Object Cache ON
5 : Image optimization -> Image optimization setting Tab -> WebP For Extra srcset ON
6 : page optimization -> css setting Tab -> CSS Minify and Load CSS Asynchronously ON and CSS Combine External and Inline Off
7 : page optimization -> js setting Tab -> JS Minify ON
8 : page optimization -> HTML setting Tab -> HTML Minify ON
9 : page optimization -> media setting Tab -> Lazy Load Images and Responsive Placeholder and Add Missing Sizes ON
Theme Custom Work - #back to top
1. Child Theme Name Change :-
If you want to change theme name, you have to go through with some following steps:-
-
Step 1. You go to style.css and change theme name and text domain like this:
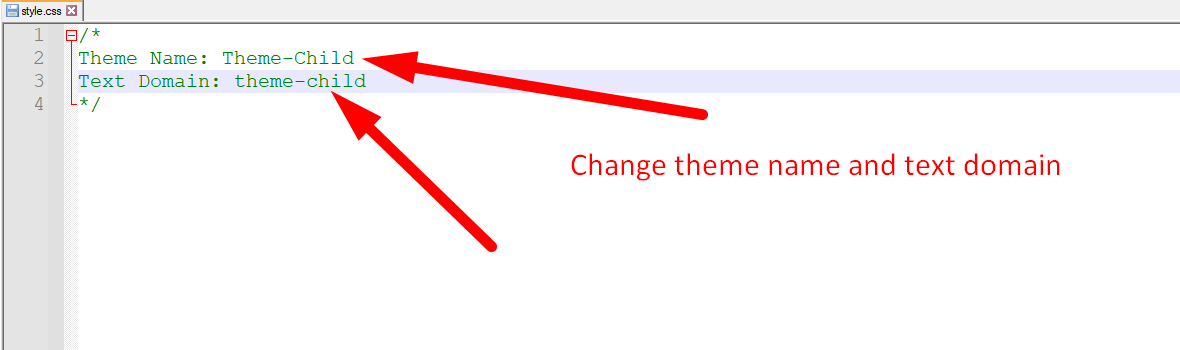
-
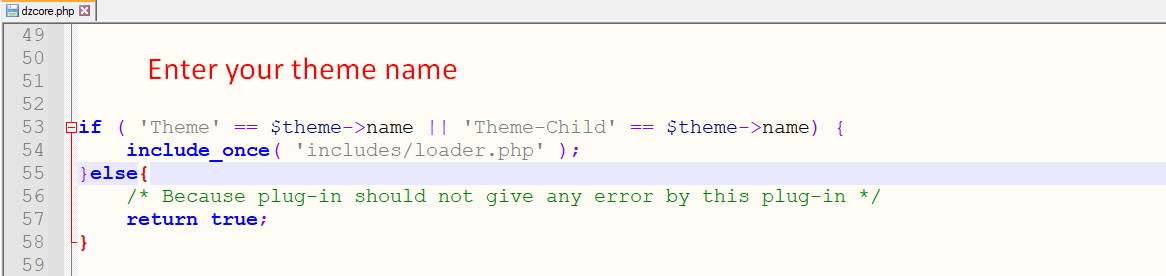
Step 2. Now, you go to dz-core plugin and open dz-core.php file and change theme name :
2. Taxonomy name change :-
If you want to change taxonomy name, you have to go through with some following steps:-
-
Step 1: Change taxonomy name and slug in the taxonomies.php file.
File Name: taxonomies.php
File Path: plugins\dzcore\includes\helpers
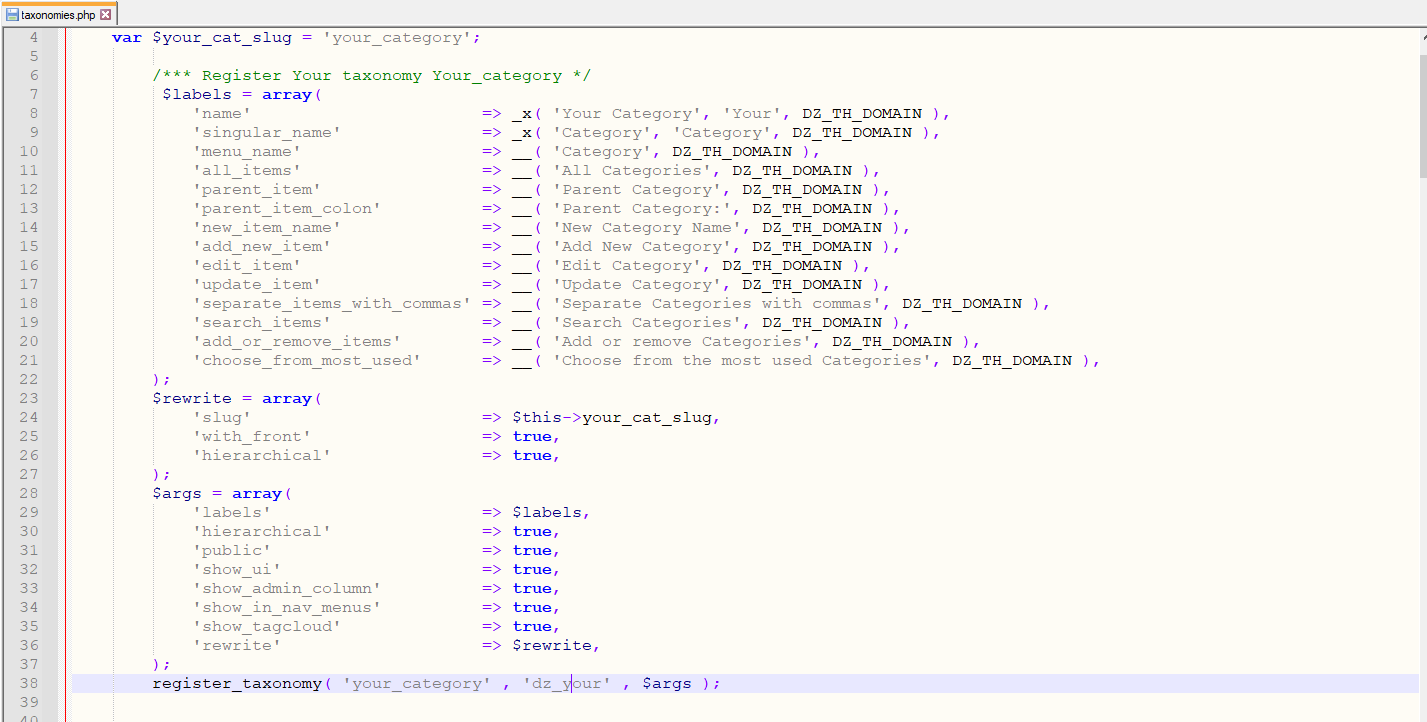
Step 2: Find the last slug and change it with a new slug, in the theme and the dzcore plugin
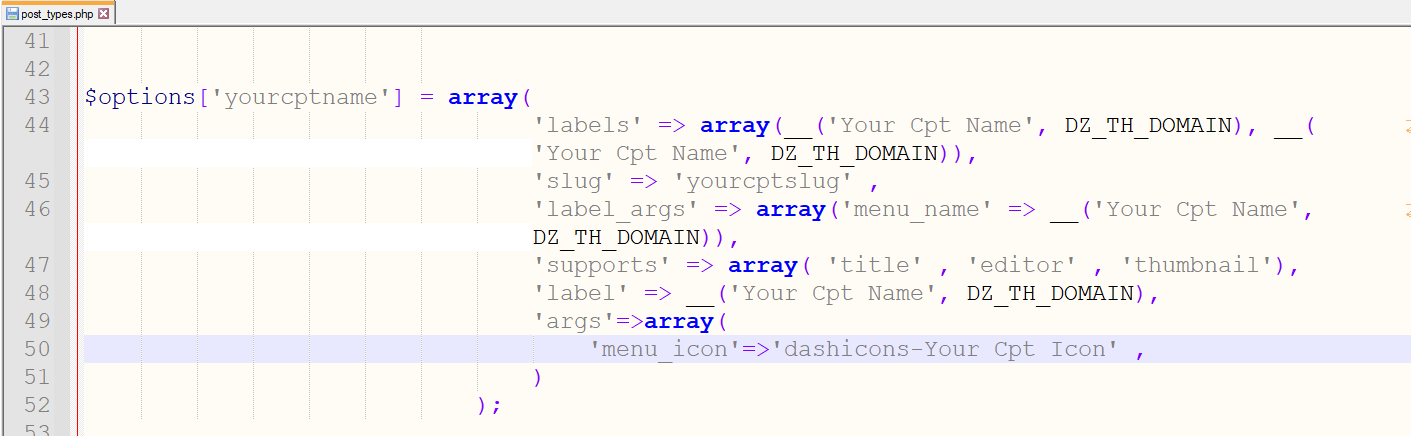
3. Custom Post Type name change :-
If you want to Custom Post Type name change you follow given steps:-
-
Step 1: Change CPT name in the post_types.php
File Name: post_types.php
File Path: plugins\dzcore\includes\resource
Step 2: Find the last slug and change it with a new slug, in the theme and the dzcore plugin
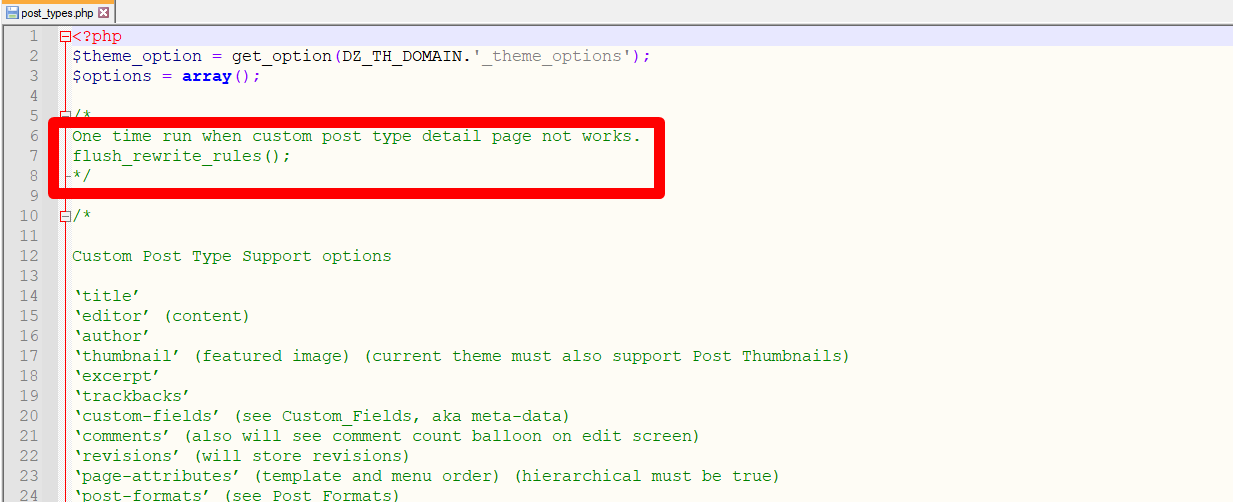
Note: You must run a function once whenever you change the taxonomy or CPT name.
flush_rewrite_rules()
Blog — Writing New Posts - #back to top
To start adding posts to your blog, navigate to Posts → Add New.
1. Start filling in the blanks: enter your post title, write your actual body content in the
main post editing box below it.
2. As needed, select a category, add tags, and make other selections from the sections below the post.
3. When your post is ready, click Publish.
Deep Diving: Since creating and editing pages requires basic WordPress knowledge, we won't cover it in detail. If you're new to WordPress, you may find the following resources valuable: How to Create a new Post How to Edit and Existing Post Using Categories and Tags
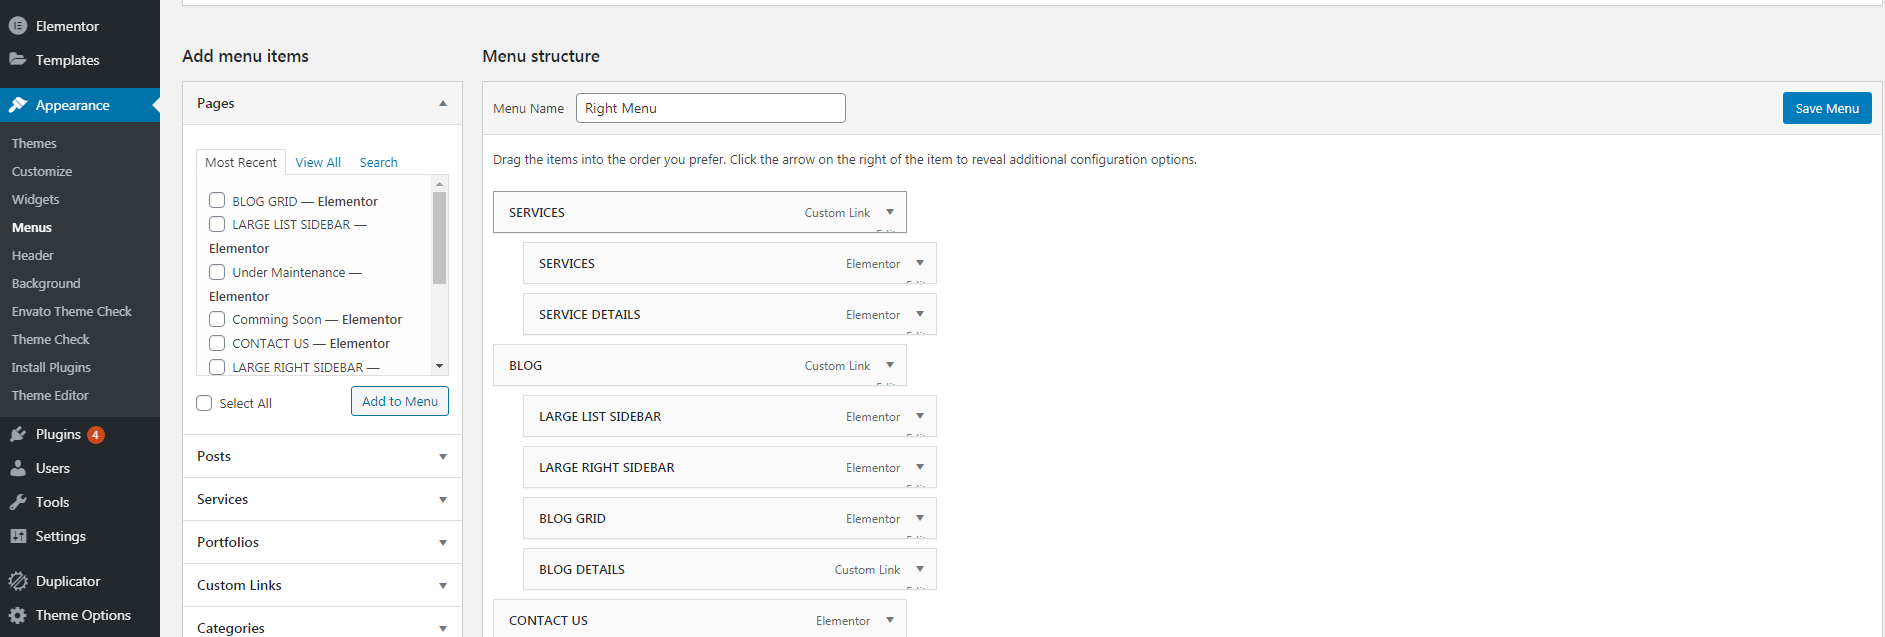
Setting & Setup Menu - #back to top
After installation the Jobzilla and after dummy-content export, you need to select our main menu from WordPress admin > menus > theme locations please check below image and learn how to do.
Theme Options - #back to top
We listed below all our theme options. You can learn how we used Woodex WordPress theme options in below;
In THEME GENERAL SETTINGS; Enter Google Map Api Key, Choose Page Preloader option and date format for the theme. In LOGO SETTINGS; You can change logo and favicon icon In HEADER SETTINGS; Choose header styles according to the theme. In FOOTER SETTINGS; Choose footer settings for trending items, copyright. In JOB SETTINGS; It has Single job page option In POST SETTINGS; It has Single post page option In PAGE SETTINGS; Choose General(default settings when no other setting applied) and other common pages like (Tag, Category, Search, Archive, Author, 404) pages settings for banner title, banner height, banner image, sidebar, page layouts and pagination by ajax or not. In SOCIAL SETTINGS; Here social network links are added like facebook, google, linkdin, instagram, twitter, youtube, etc. In CUSTOM SCRIPT; You can add custom CSS, Javascript here. In ADVANCE OPTIONS; You can add dyanamic Sidebar here. In IMPORT/EXPORT; Easily Import the file and url as well as export also through copy the data.
Support Help - #back to top
Please remember you have purchased a very affordable theme and you have not paid for a full-time web design agency. Occasionally we will help with small tweaks, but these requests will be put on a lower priority due to their nature. Support is also 100% optional and we provide it for your connivence, so please be patient, polite and respectful.
Please visit our support forum or ask question @dexignzone
Support for my items includes:- * Responding to questions or problems regarding the item and its features
- * Fixing bugs and reported issues
- * Providing updates to ensure compatibility with new software versions
- * Customization and installation services
- * Support for third party software and plug-ins
- * Make sure your question is a valid Theme Issue and not a customization request.
- * Make sure you have read through the documentation and any related video guides before asking support on how to accomplish a adviso.
- * Make sure to double check the theme FAQs.
- * Try disabling any active plugins to make sure there isn't a conflict with a plugin. And if there is this way you can let us know.
- * If you have customized your theme and now have an issue, back-track to make sure you didn't make a mistake. If you have made changes and can't find the issue, please provide us with your changelog.
- * Almost 80% of the time we find that the solution to people's issues can be solved with a simple "Google Search". You might want to try that before seeking support. You might be able to fix the issue yourself much quicker than we can respond to your request.
- * Make sure to state the name of the theme you are having issues with when requesting support via ThemeForest.
Version History - #back to top
v2.0.1 - 14 Aug 2025
- * Fixed: CSRF Security Patch and Vulnerability issue resolved.
v2.0 - 23 May 2025
- * Fixed: Various theme bugs to improve stability and user experience
- * Improved: Compatibility with WordPress 6.8.1
- * Updated: WooCommerce templates and support for WooCommerce 9.8.5
- * Updated: All bundled and recommended plugins to their latest versions
v1.9 - 01 May 2025
- * Resolve bugs in the theme and make it compatible with WordPress 6.8
- * Updated: the WooCommerce plugin to the latest version and ensured theme compatibility
v1.8 - 12 January 2024
- * Added: Job Detail Pages Sidebar Enabled Disabled Option
- * Compatible the theme with PHP 8.2
- * Improving page speed involves optimizing various elements of inwebsite, including both the theme and code.
- * Resolve some bugs in theme and made compatible with WordPress 6.4.2
v1.7 - 25 September 2023
- * Added New 4 Home Page
- * Dashboard, Login, register, Lost-Password, Shortcode Based using Elementor
- * Resolved: Social Login role based registration issue
- * Job Alert Subscribe Cookies time setting
- * Improvement: Change shortcode based element into elementor elements
- * Added: Job Detail Pages Sidebar Enabled Disabled Option
- * Compatible the theme with PHP 8.2
- * Resolve some bugs in theme and made compatible with WordPress 6.2.2
v1.6 - 21 May 2023
- * Added: Job Map Searching Functionality
- * Added: Social Login Compatibility
- * Resolved: remove some bugs of functionality
- * Resolve bugs in the theme and make it compatible with WordPress 6.1.1
v1.5 - 9 May 2023
- * Added: 3 new home pages
- * Resolve bugs in the theme and make it compatible with WordPress 6.1.1
v1.4 - 3 April 2023
- * Added: 3 new home pages
- * Resolve bugs in the theme and make it compatible with WordPress 6.1.1
v1.3 - 13 March 2023
- * Added: 2 new home pages
- * Resolve bugs in the theme and make it compatible with WordPress 6.1.1
v1.2 - 6 March 2023
- * Added: 2 new home pages
- * Resolved: User profile image issue
- * Resolved: Company listing breadcrumb issue
- * Resolved: Category selection issue while importing
- * Resolve bugs in the theme and make it compatible with WordPress 6.1.1
v1.1 - 28 January 2023
- * Added: 3 new home pages
- * Resolve bugs in the theme and make it compatible with WordPress 6.1.1
v1.0 - 27 January 2023
- * Theme Release
You can find the version history (changelog.txt) file on Jobzilla.zip folder or you can check changelog on theme sale page.
Once again, thank you so much for purchasing this theme. As I said at the beginning, I'd be glad to help you if you have any questions relating to this theme. No guarantees, but I'll do my best to assist. If you have a more general question relating to the themes on ThemeForest, you might consider visiting the forums and asking your question in the "Item Discussion" section.
Nextend Social Login and Register - #back to top
Nextend Social Plugin Installed.
Download Plugin:- Click here
Follow Some Steps :- Nextend Social -> Global Settings
Nextend Social Plugin Youtube Video