BeGlide - WordPress Theme

Introduction - #back to top
 We would happily welcome feedback from you on how, if anywhere, you would like this documentation improved. If you would find anything a little bit easier and more helpful if we went into more detail, or explained something a little better - we'd be happy to hear it. We want Beglide to be the best theme! If you have any comments, please mail us via the form on https://themeforest.net/user/dexignzone
Beglide is a Wordpress theme to create a website for any type of Business specially for Construction Business. Beglide comes with powerful features. The Beglide is built with Reveloution Slider, King Composer, Event Plugin and Contact From Seven the popular and flexible plugin in Wordpress. Beglide is a clean responsive wordpress theme comes with two header layouts. It includes premium wordpress plugins Revolution Slider ( worth $19 ) and King Composer plugins ( Worth $30 )) free with theme. The theme comes with the option of contact form to allow users to contact you.
Beglide is fully compatible with latest version of plugins to allow you easy handling. The Beglide comes with one click demo and also more flexible features.
Upload and Activation - #back to top
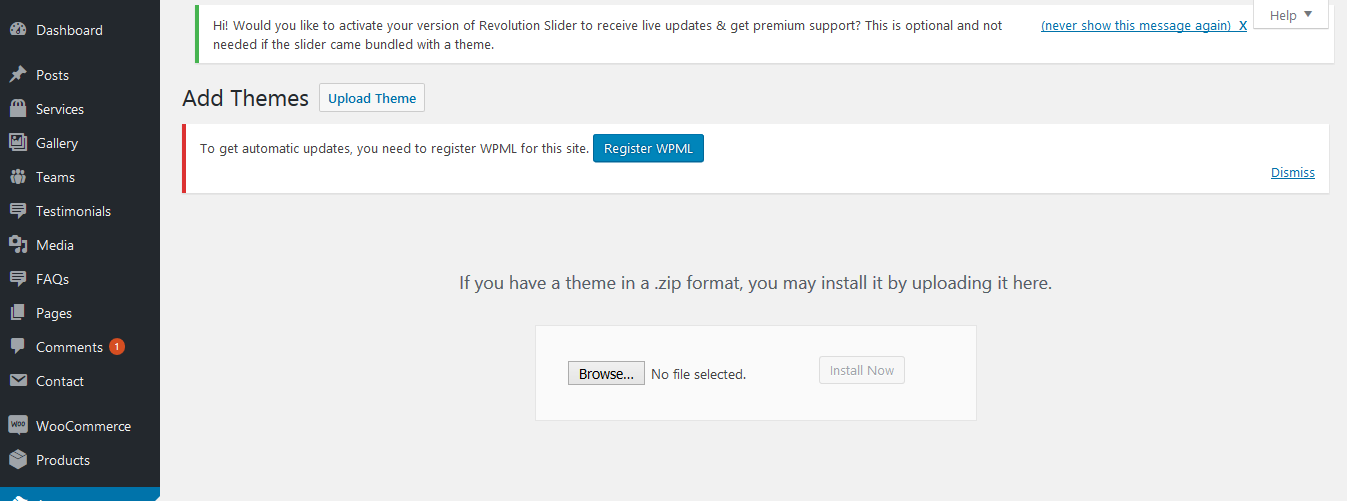
1. Navigate to Appearance → Themes in your WordPress admin dashboard.
2. Click the Add New button at the top of the page then go for the Theme Upload option.
3. For the file upload, pick Theme Files / beglide.zip in the theme package downloaded from ThemeForest and click Install Now.
4. Click Activate once the upload has finished and you're ready for the next step: Installing the Plugins.
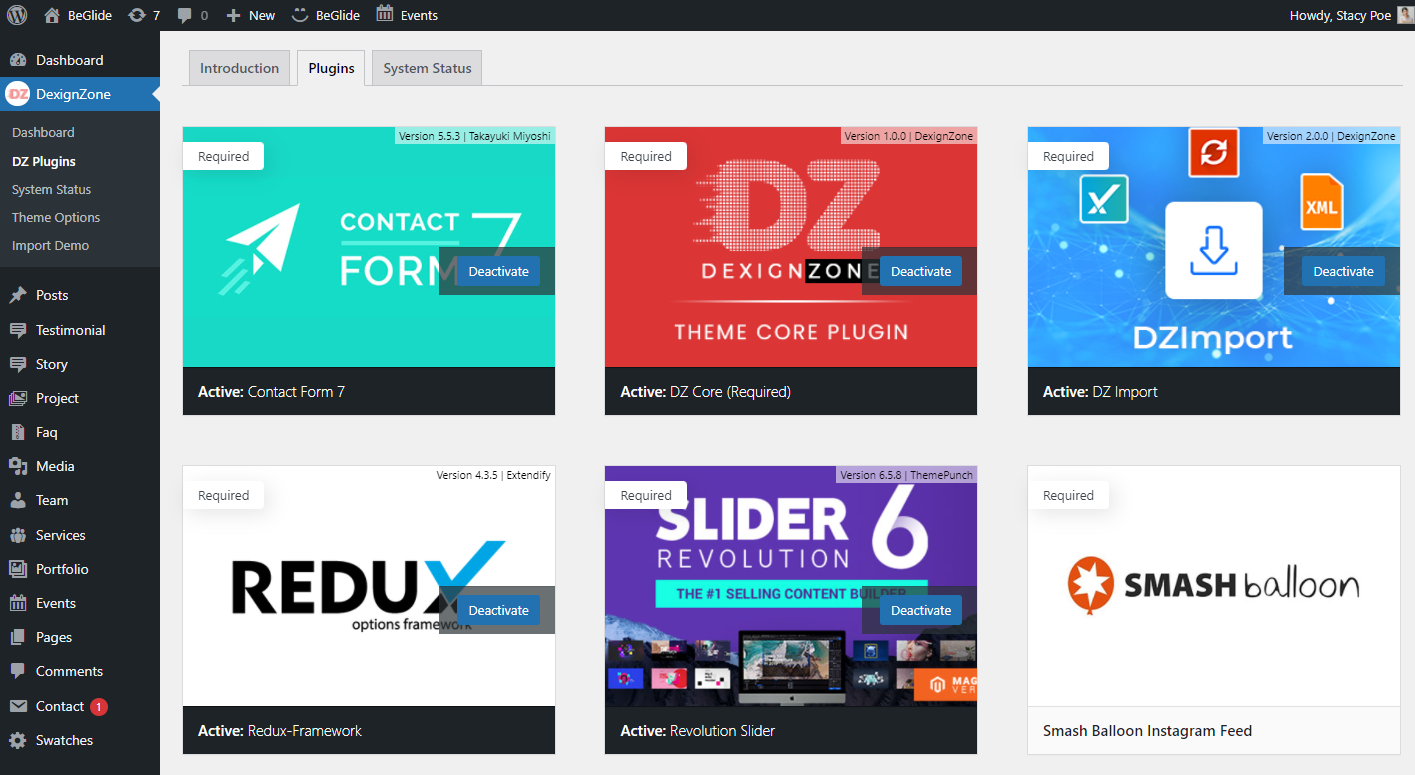
Installing the Plugins - #back to top
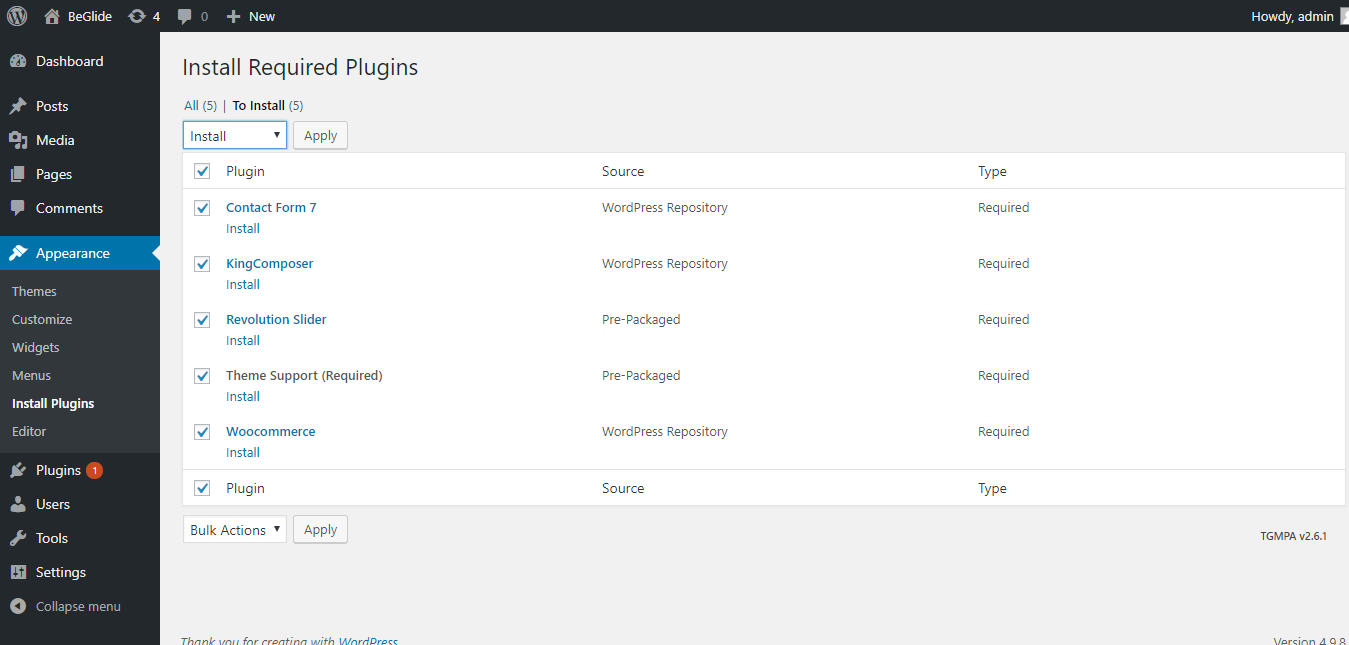 Right after the theme was activated, a notification at the top of the screen will suggest to continue with the installation of the plugins recommended for getting the best our of your theme.
1. Click 'Begin installing plugins' and select all the plugins in the list.
2. Activate the Plugins you just installed.
3. After the plugins are activated, return to Dashboard.
Theme Settings - #back to top
Introduction -
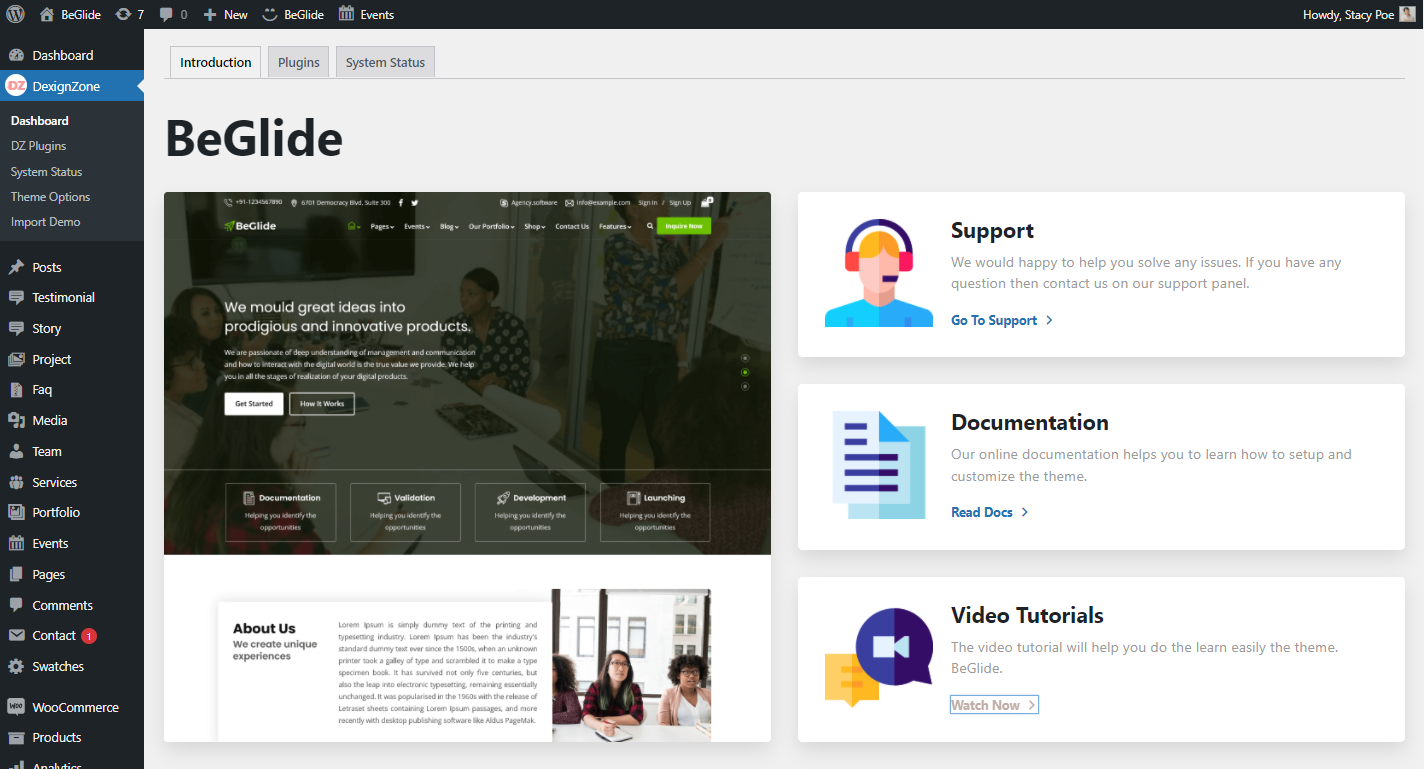
Theme DZ Plugins -
1. Navigate to Appearance → Themes in your WordPress admin dashboard.
2. Click the Add New button at the top of the page then go for the Theme Upload option.
3. For the file upload, pick Theme Install / BeGlide.zip in the theme package downloaded from ThemeForest and click Install Now.
4. Click Activate once the upload has finished and you're ready for the next step: Installing the Plugins.
Dummy Content Import - #back to top
Beglide comes with one click demo installation exactly like the original demo. You just need to verify that you have set the time limit to zero in /wp-includes/functions.php by finding set_time_limit function. Just click on Import button and your demo site is ready.
1. In your Wordpress admin dashboard, navigate to Tools → Import Demo
2. From the page you can see the available options, click Import Demo button
3. Wait until you see the all importing process is completed.
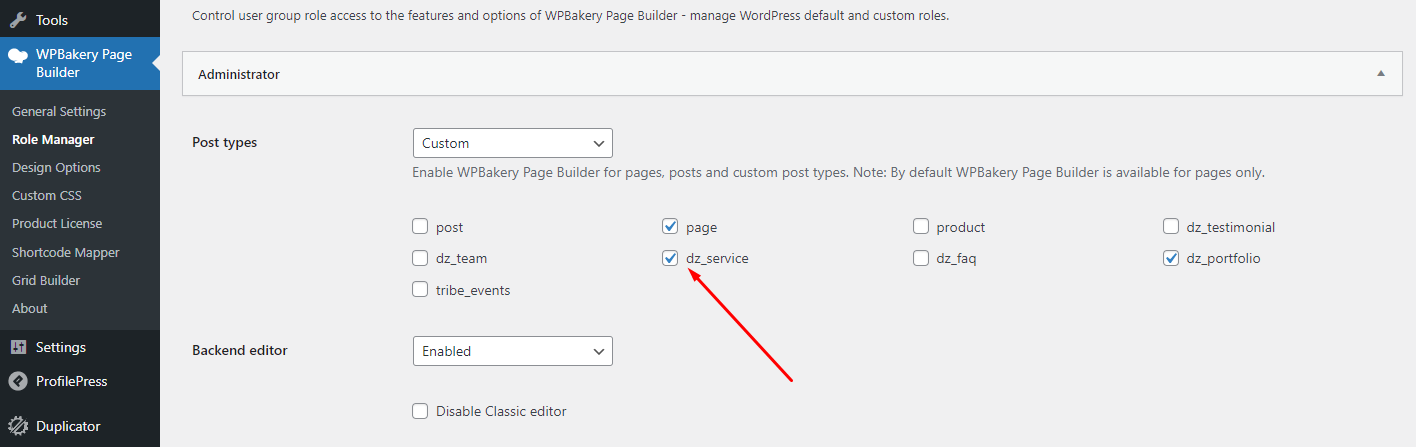
4. Add Page Builder in custom post type :-
Go to WPbakery page builder -> Role Manager
Theme Options - #back to top
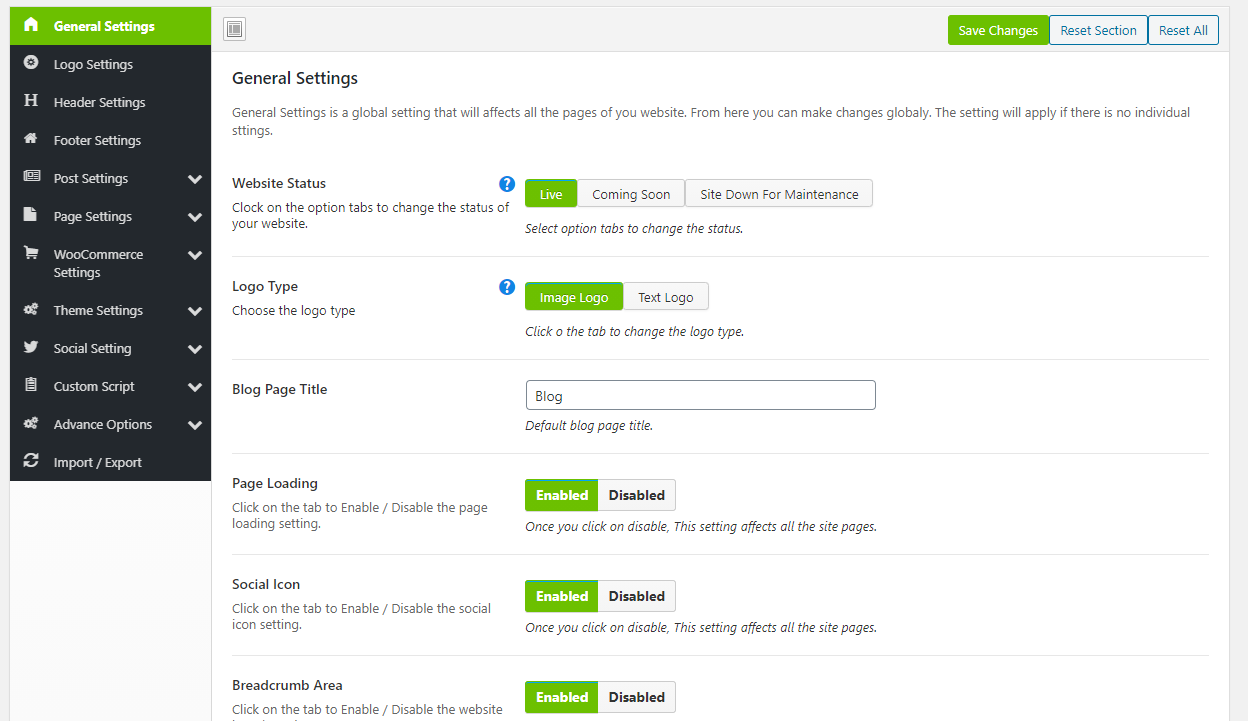
The options panel is home to all of the theme's extensive configuration options. To view the panel, click on Theme Options in the left-hand menu. Here you have the ability to alter many core aspects that make up how your theme looks and behaves. Any of the options that have some ambiguity to them conviently have descriptions to explain their purpose.
Homepage & Blog — Setup - #back to top
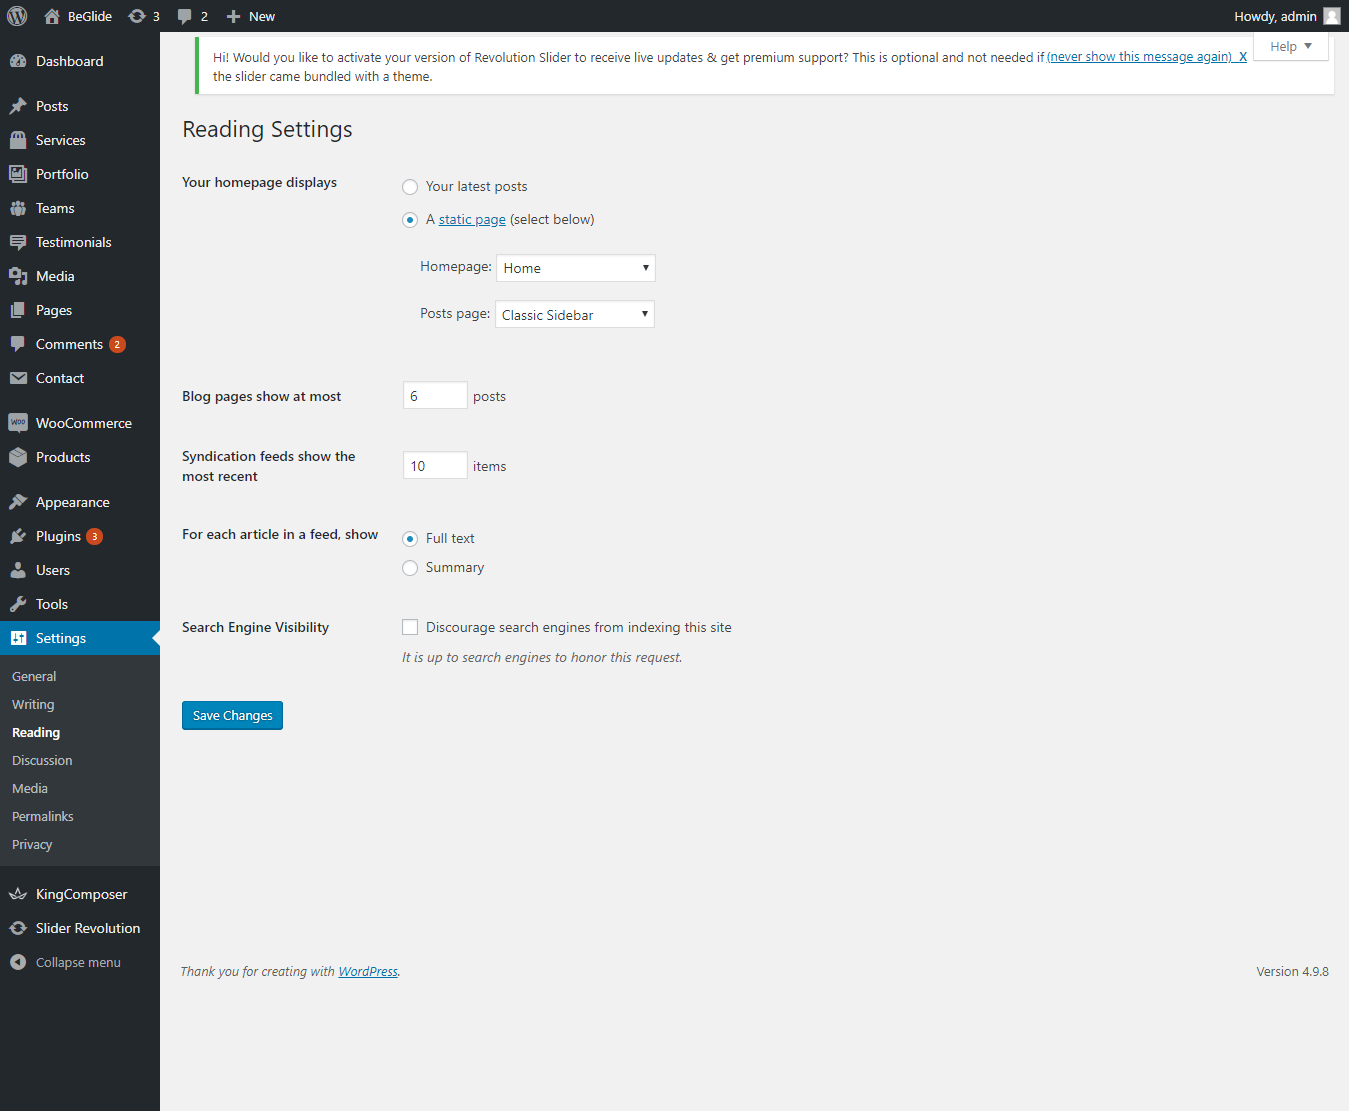 To setup the blog page, in your WordPress admin panel, navigate to Settings → Reading.
Assuming you already have a page named "Blog", for the Front page display, select "A static page" and choose your "Left Image Sidebar" page as the Posts page. This is what you should be seeing on your screen from left side.
To setup the home page, in your WordPress admin panel, navigate to Settings → Reading.
Assuming you already have a page named "Front Page", for the Front page display, select "A static page" and choose your "Home 1" page as the home page. This is what you should be seeing on your screen from left side.
Blog — Writing New Posts - #back to top
To start adding posts to your blog, navigate to Posts → Add New.
1. Start filling in the blanks: enter your post title, write your actual body content in the
main post editing box below it.
2. As needed, select a category, add tags, and make other selections from the sections below the post.
3. When your post is ready, click Publish.
Deep Diving: Since creating and editing pages requires basic WordPress knowledge, we won't cover it in detail. If you're new to WordPress, you may find the following resources valuable: How to Create a new Post How to Edit and Existing Post Using Categories and Tags
Setting & Setup Menu - #back to top
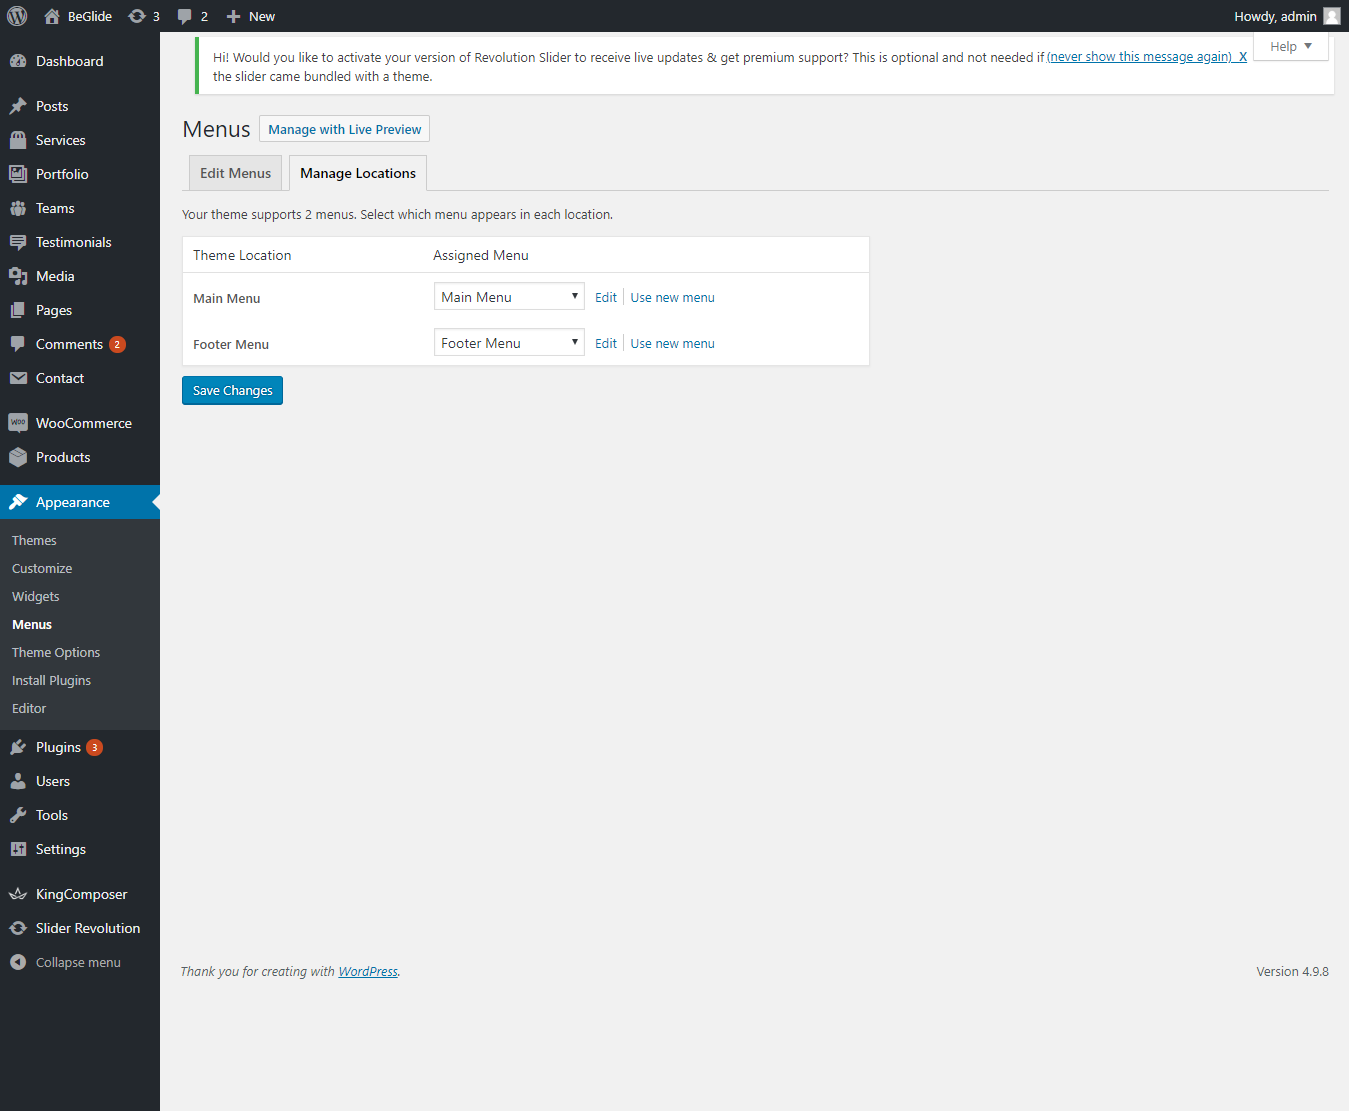
After installation the Beglide and after dummy-content export, you need to select our main menu from WordPress admin > menus > theme locations please check below image and learn how to do.
Theme Options - #back to top
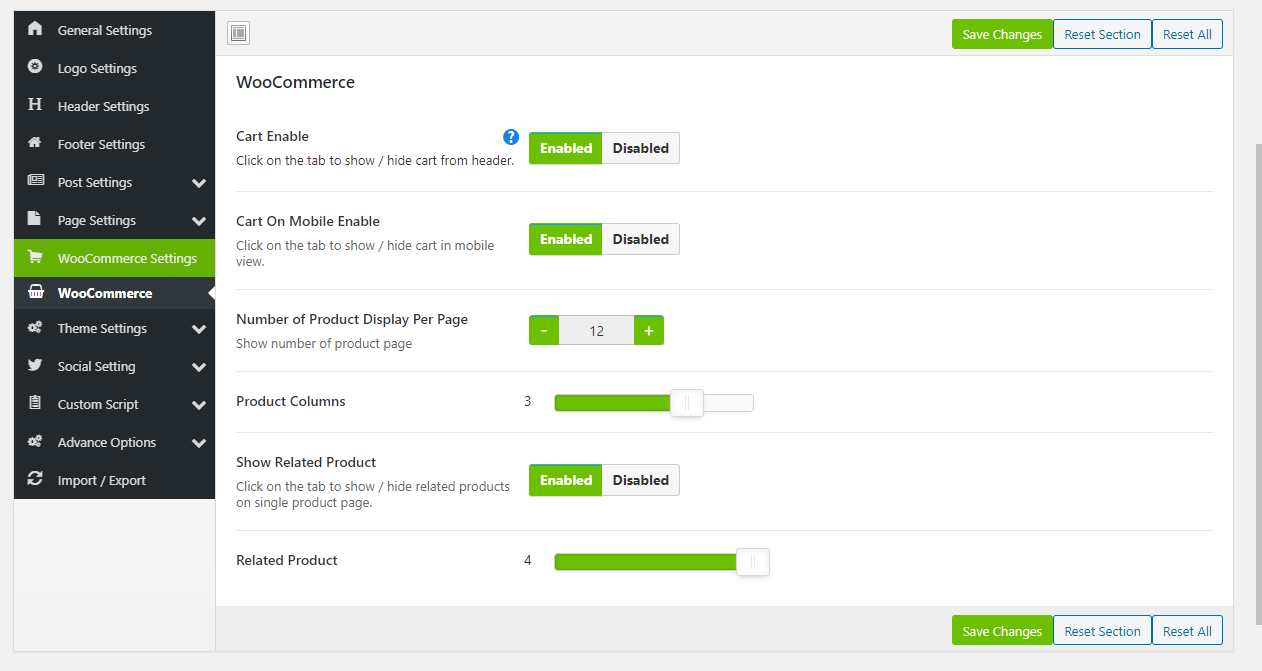
We listed below all our theme options. You can learn how we used Woodex WordPress theme options in below;
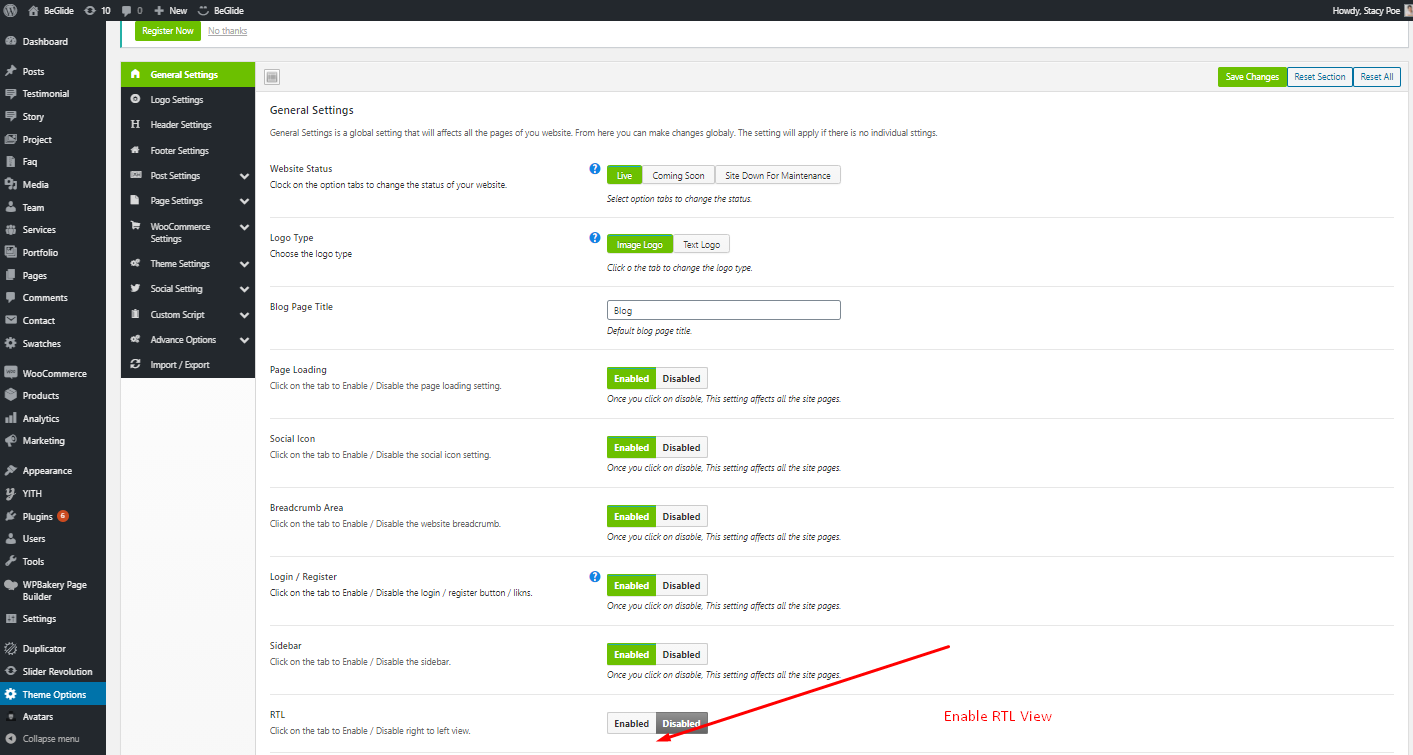
In General Settings Panel; In general setting you will find Toggle button for disable/enable the preloader.
In Map Api Key Settings Panel; In map api key setting you will find text field for google map api key.
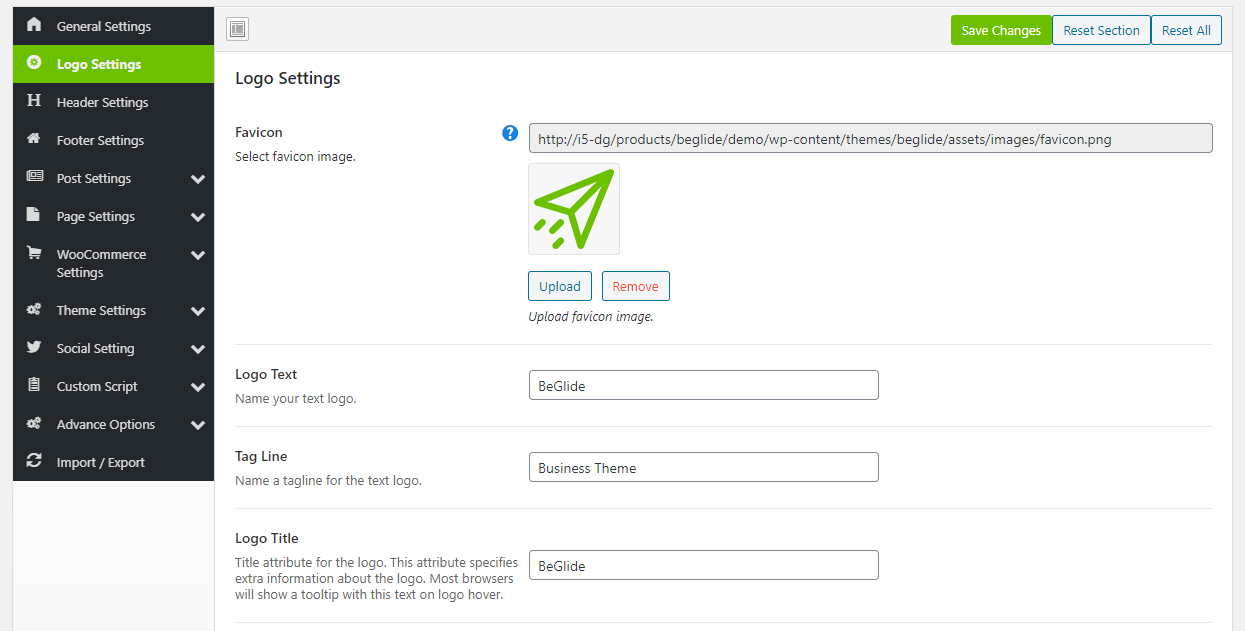
In Logo Settings Panel; In logo settings you will find the upload field for favicon, logo image.
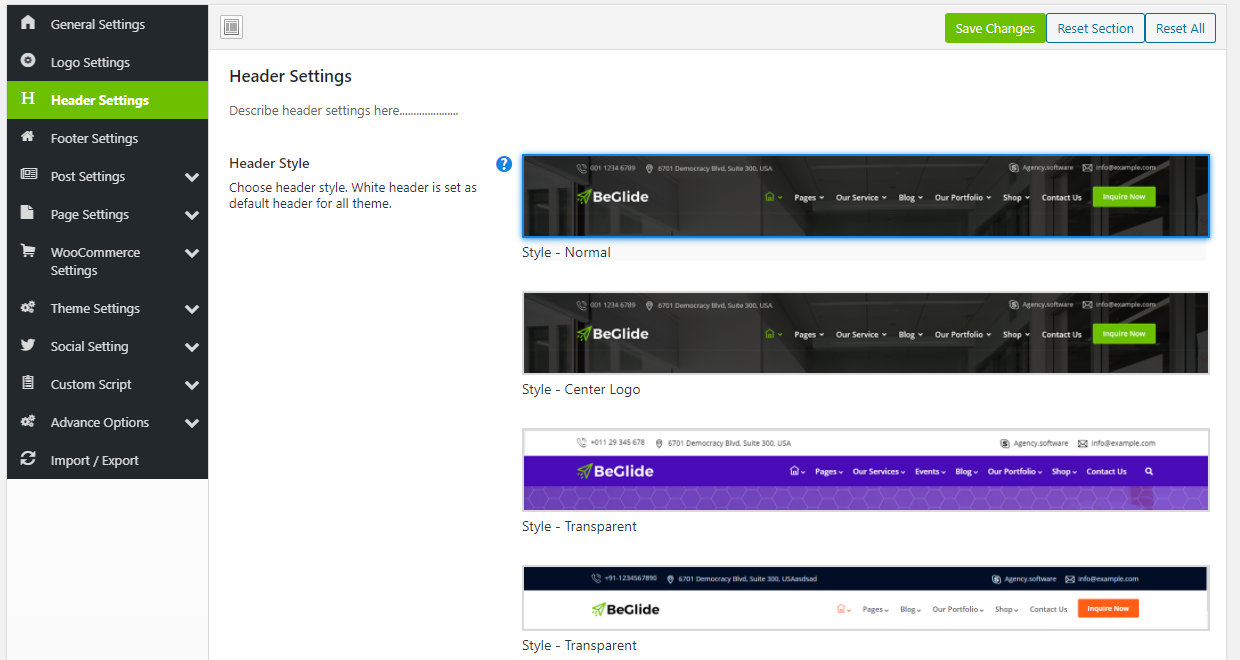
In Header Settings Panel; In header settings you will find the select field for header style, toggle button for disable/enable the header top bar, text field for phone, address, email and toggle button for disable/enable the button.
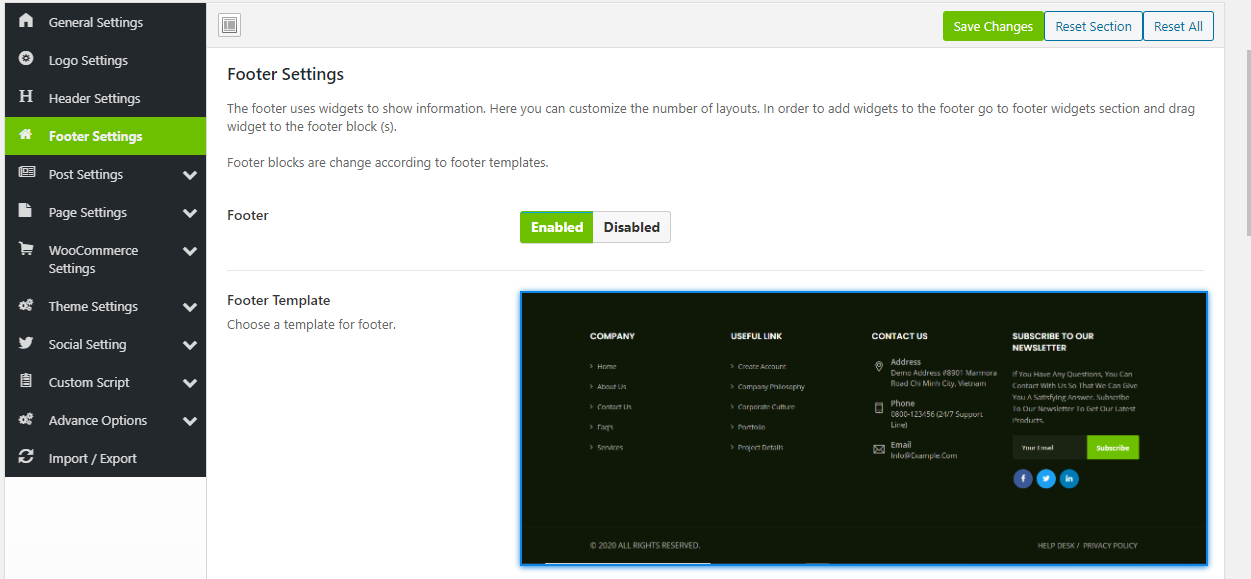
In Footer Settings Panel; In footer setting you will find the toggle button for disable/enable Upper Footer, Bottom Footer, Newsletter Section and Copyright Text and Analytics / Scripts area.
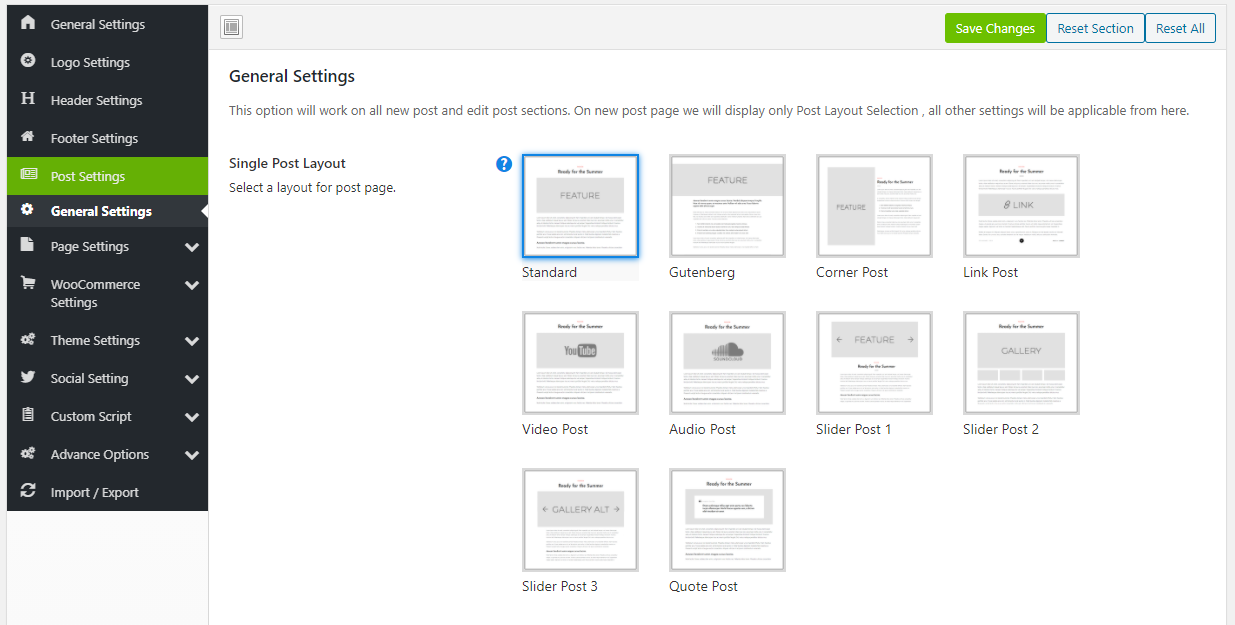
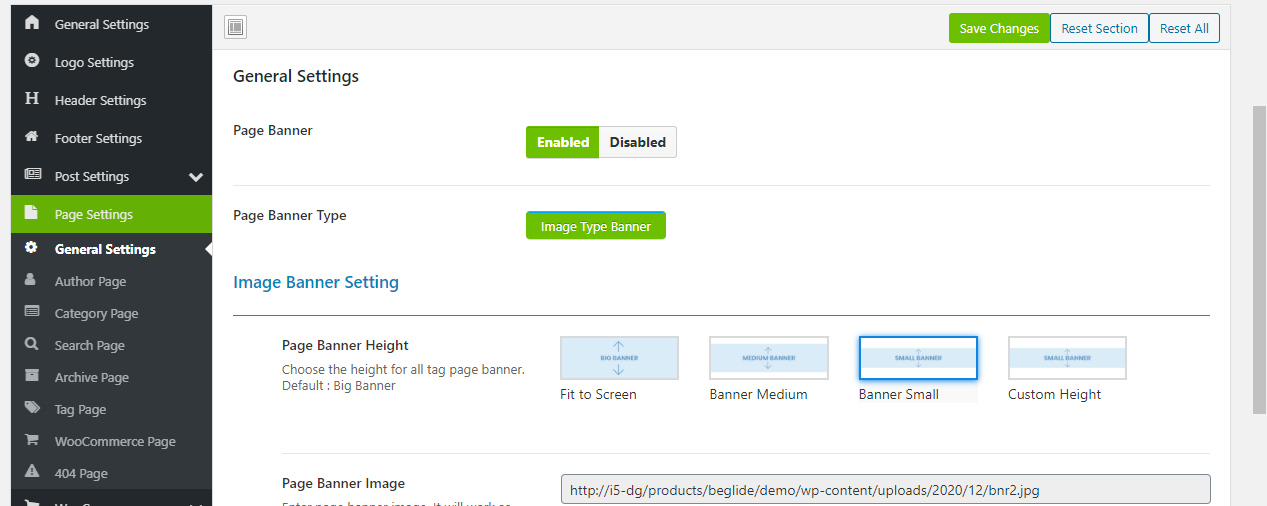
In Page Settings Panel; Control your page structures (layouts), sidebar options and which pages you want to use for search page, archive page, author page and not found page.
In Sidebar Settings Panel; Add unlimited widgets area to the your theme.
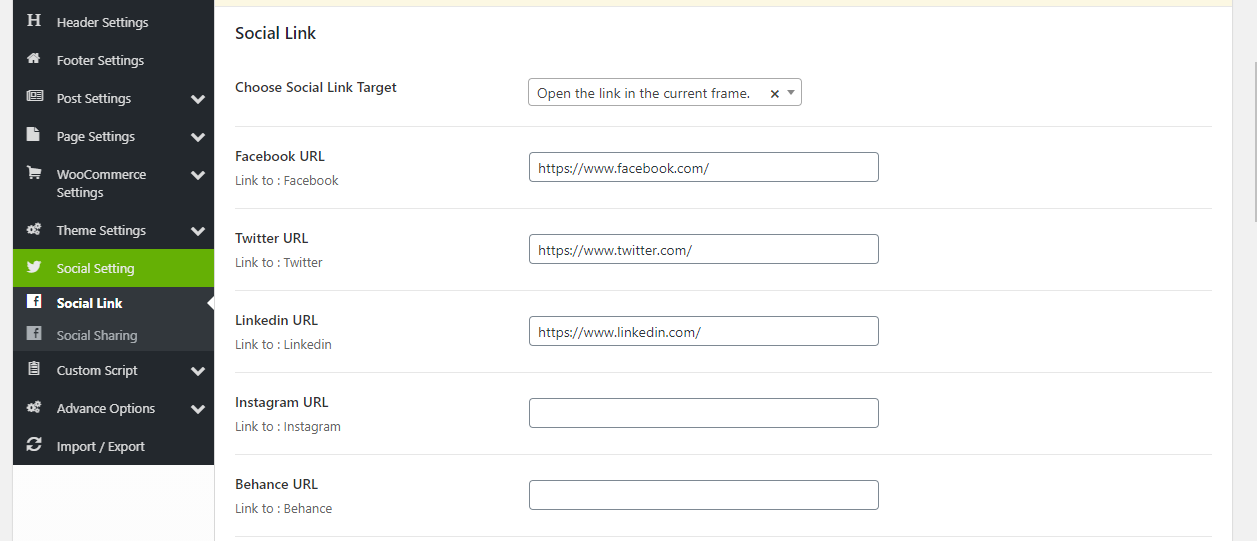
In Social Media Settings Panel; Add your social media profiles and select your social media icons.
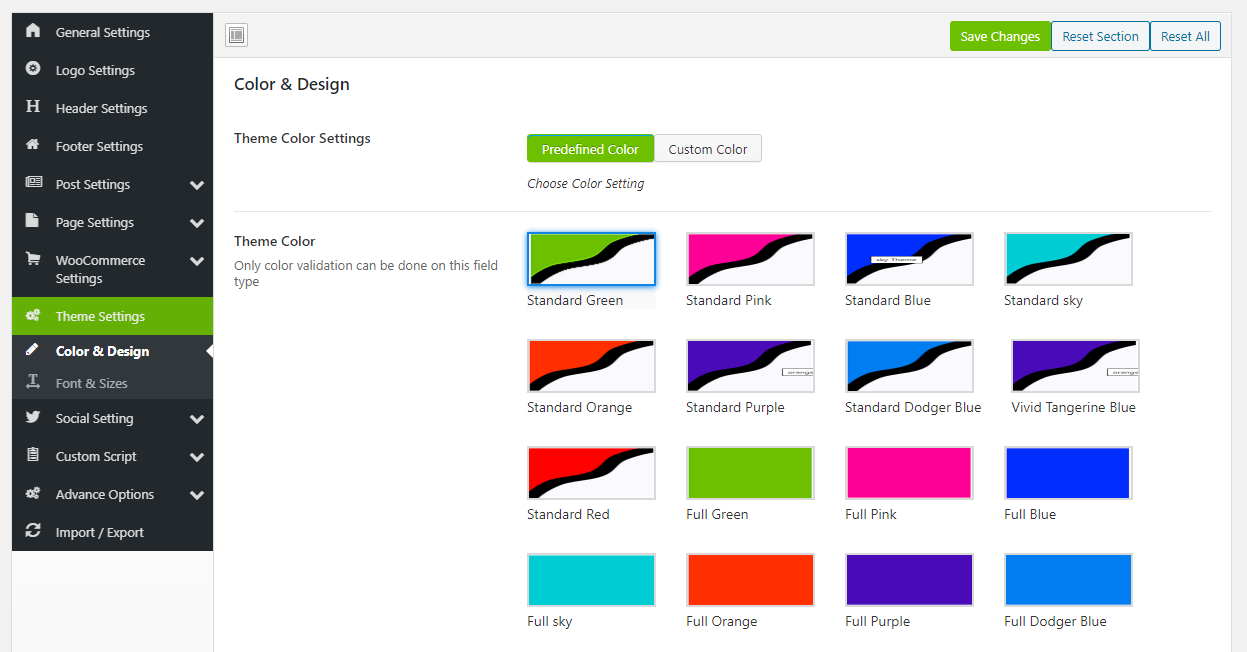
In Font Settings Panel; Control your own typograhy elements for example; body fonts, heading fonts and font sizes.
In Client Settings Panel; Add your client images and external links here.
In Utility Settings Panel; Import export and demo import options here.
Theme Update - #back to top
General Method –
1. Log into FTP Account using FileZilla or similar program.
2. Go to wp-content/themes directory
3. Move to the theme directory that you want to update.
4. Now, download the latest version of theme from ThemeForest.net/downloads
5. If you have downloaded the zip, extract it. Find the theme folder. It generally has style.css file in it.
6. Upload all files in that folder to the directory on FTP we found in step.
Envato Market Plugin Method –
Summary – How to Update Envato ThemeForest Themes
Here’s a quick summary of steps required to update Envato ThemeForest themes.
1. Download and Install the Envato Market plugin.
2. Activate the plugin and go to the Envato Market tab to configure the plugin.
3. Click on the link to generate an Envato API Personal Token. Copy-paste the token and save changes.
4. You should now see all of your Envato purchases including ThemeForest themes that you can install and update.
Installing Envato Market Plugin to Update WordPress Themes
Unlike other WordPress plugins, the Envato Market plugin is not available to install from the official WordPress plugins repository. So, you won’t be able to search and install from your Plugins page within the WordPress dashboard.
The Envato Market Plugin is hosted on GitHub and you can download the plugin from this Envato plugin page.
Step 1 : Use the plugin download link on the this Envato Market plugin page.
Although hosted on Github, the plugin authors do not recommend downloading directly from Github repository “Download ZIP” as Github does not package the plugin correctly.
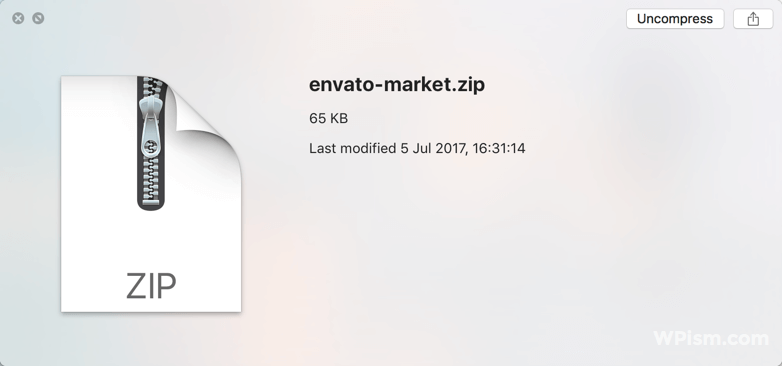
Step 2 : Save the Envato Market Plugin archive.
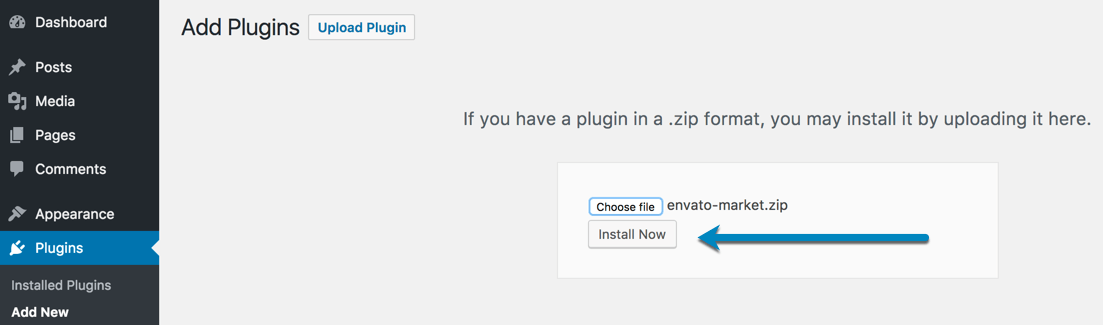
Step 3 : Go to Plugins > Add New > and click on Upload Plugin at the top.
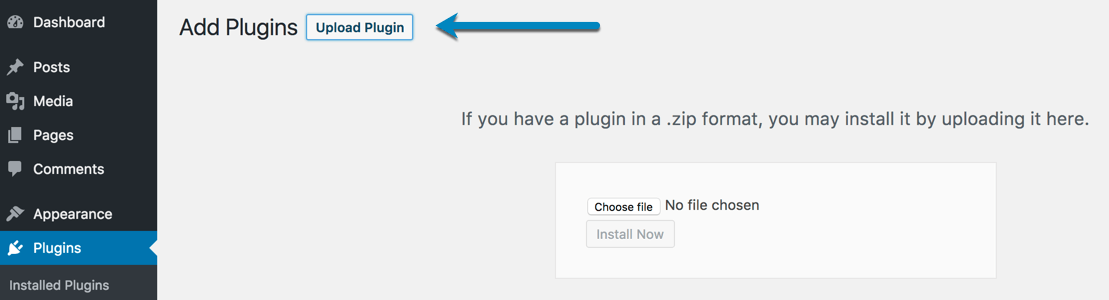
Step 4 : Click on Choose File and select the envato-market.zip file from where you saved and click on Install now.
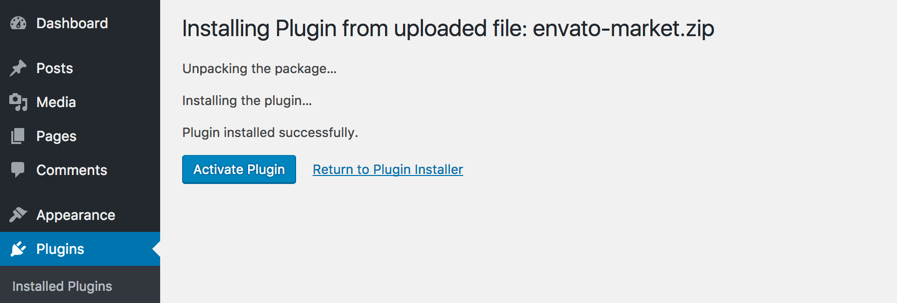
Step 5 : Click on Activate Plugin to activate the Envato Market Plugin.
You can also install the plugin by unzipping the archive and uploading the envato-market folder to the /wp-content/plugins/ directory using an FTP program.
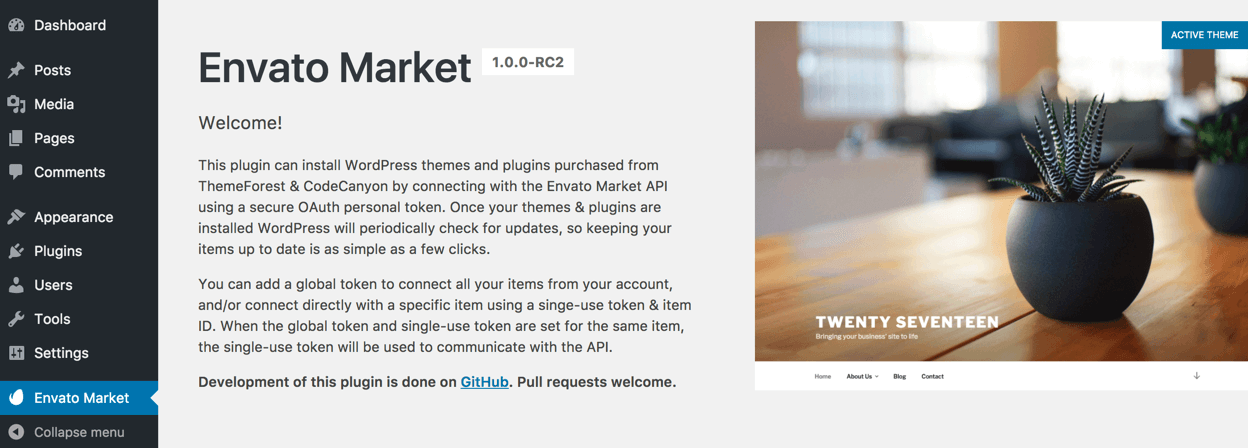
Step 6 : After the plugin is active, go to Envato Market tab from your WordPress dashboard.
Step 7 : You will need to configure the plugin by adding an Envato API Personal Token. Click the suggested link in the instructions to generate a personal token. (You can find the link to generate a personal token with required instructions on this page).
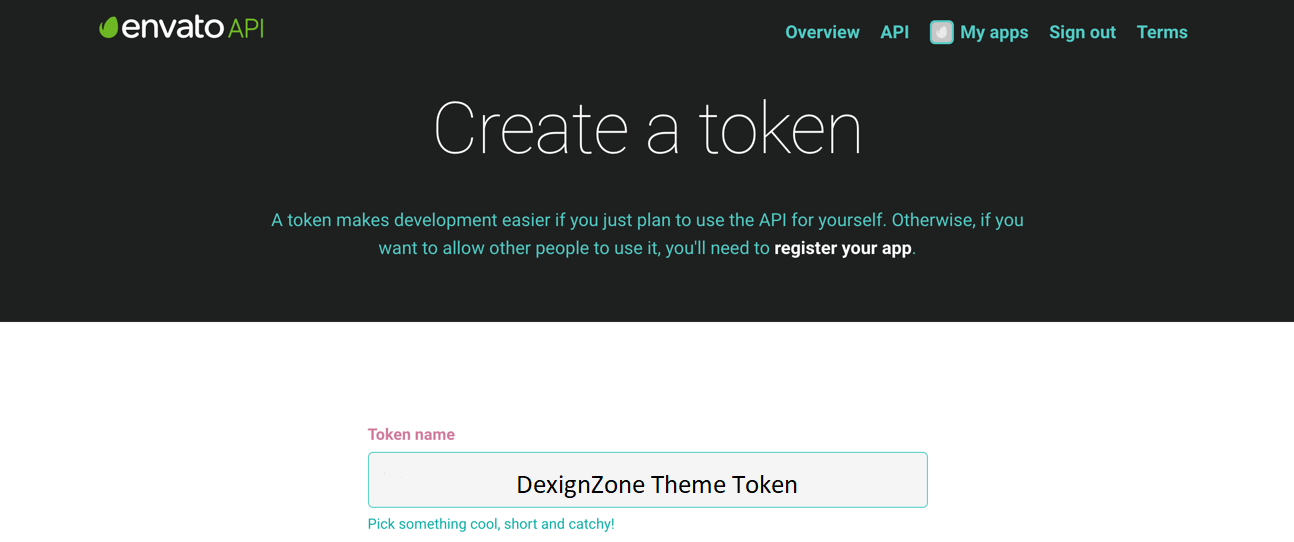
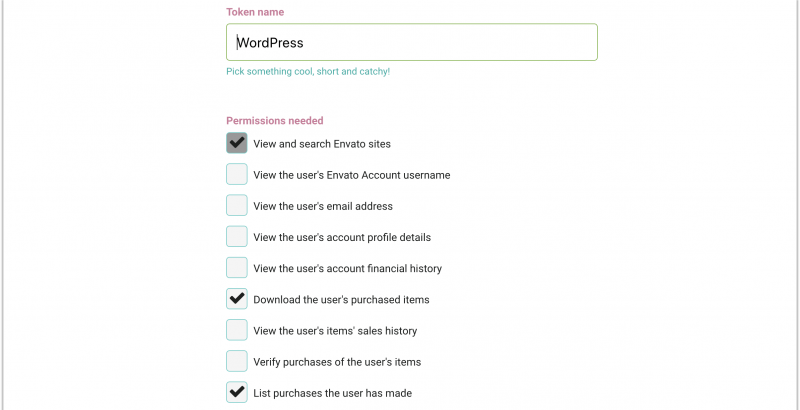
Scroll down on the page with all the required permissions selected and click on Create Token at the end of the page.

Make sure you only enable the required permissions including;
- 1. View and search Envato sites
- 2. Download your purchased items
- 3. List purchases you’ve made
See the screenshot below for enabling the required permissions.
You can either use a Global OAuth Personal Token or a Single Use OAuth Personal Tokens.The difference is clearly explained on the page.
Step 8 : You will see a success page with an option to copy your secret token key. Copy the key and confirm that you have copied the key from the page.
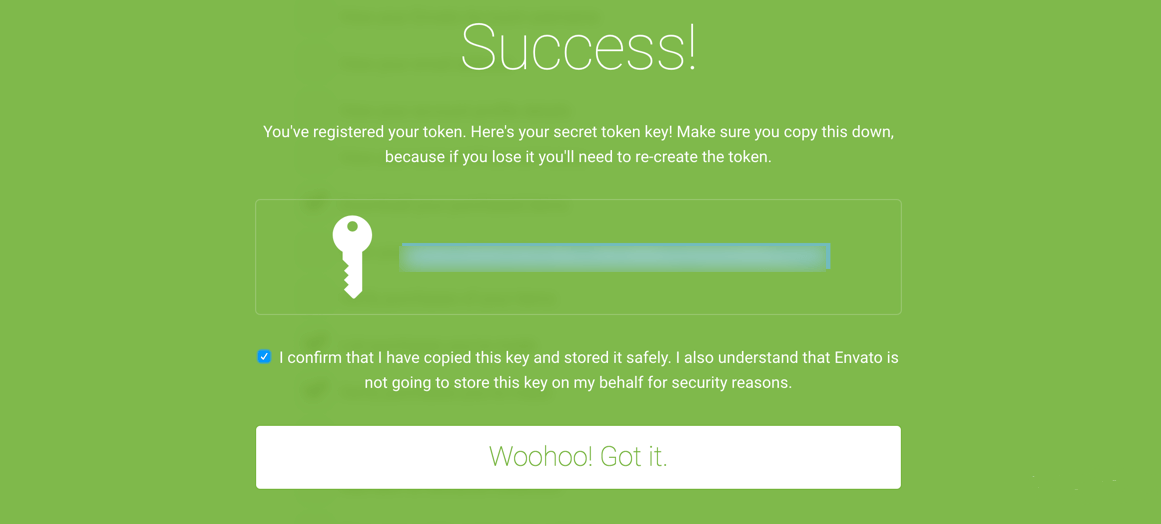 Envato will not save the secret token key and if will have to generate a new key if you lose it.
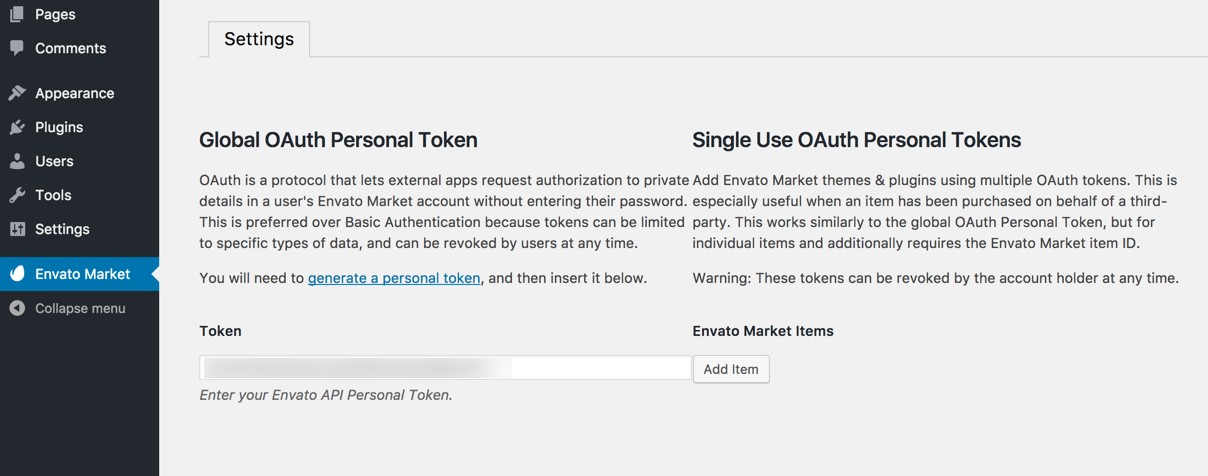
Step 9 : Enter the Envato API Secret token key and click on Save Changes.
Step 10 : You should now see all of your purchased WordPress themes from your ThemeForest account.
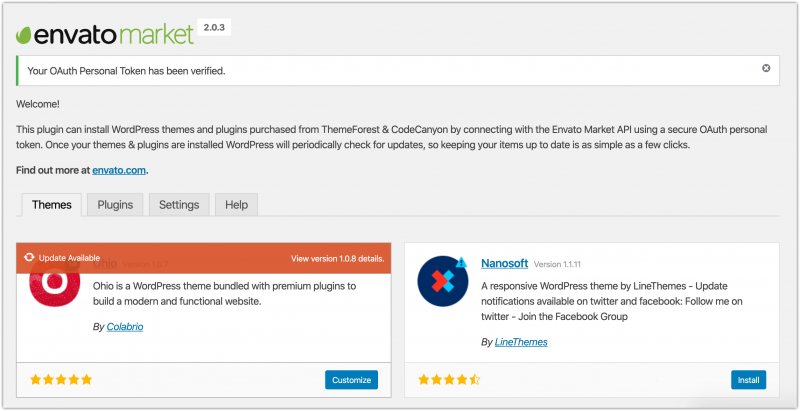
Click on Install Now to install any of your purchased WordPress themes from your ThemeForest account.
You can also see if any updates are available for your currently installed and active WordPress themes from this page.
BeGlide PageSpeed - #back to top
Step 1) Install and activate UpdraftPlus
It’s critical that you backup your WordPress installation before optimization (and on a regular basis!). UpdraftPlus provides a simple and effective way to backup your entire WordPress install, including your database, plugins, themes, uploads, and more.
a) Backup your WordPress installation
Under the “Settings” section in your WordPress sidebar, you’ll have access to a new menu option called “UpdraftsPlus Backups.”
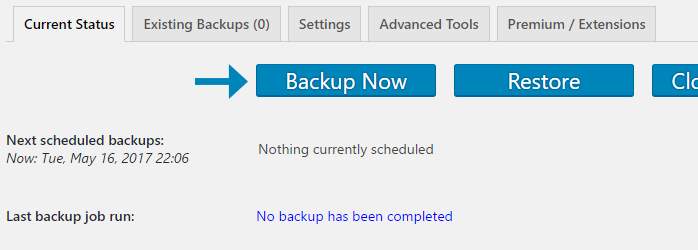
Click “Backup Now” to generate a complete backup of your WordPress install.
Click “Backup Now” – a popup will appear. Ensure that both “Include the database in the backup” and “Include any files in the backup” options are checked.
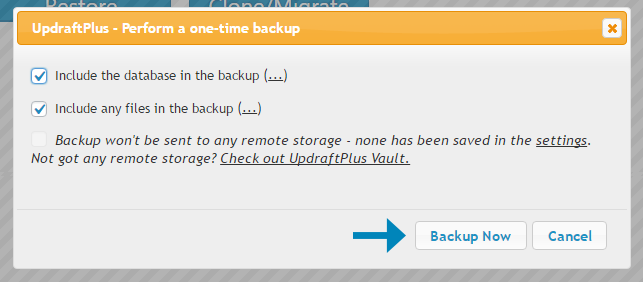
Ensure to backup both your database and your files.
Click “Backup Now” – UpdraftPlus will create a complete backup of your WordPress installation. If anything goes wrong with the optimization, or if your installation gets hacked or corrupted – you can restore using your backups.
That’s it for UpdraftPlus settings!
Step 2) Scale your images (Optional)
If your GTmetrix report indicates that you need to Serve scaled images, follow this guide we wrote on how to optimize images – specifically steps 2 to 4.
In WordPress, you can insert smaller sized images based on what WordPress has generated for you.

Try inserting a smaller image if you trigger the Serve scaled images warning.
Basically, you do not want to serve images that are larger in dimensions than what your user needs to display. Learn more about image optimization here.
Step 3) Install and activate WP Smush (Smush Image Compression and Optimization)
Under the “Media” section in your WordPress sidebar, you’ll have access to a new menu option called “WP Smush”
In this section, ensure that the “Auto-Smush Images on upload” feature is checked. The plugin will now optimize every image you upload henceforth since you activated it.
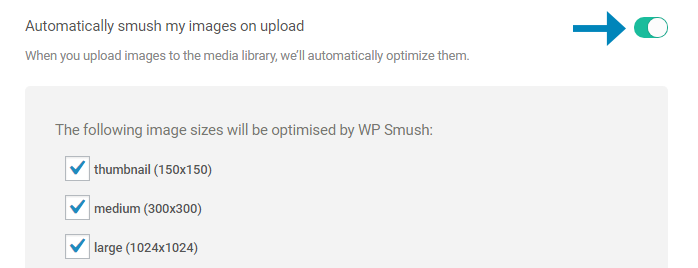
Ensure “Auto-Smush Images on upload” is enabled, and check off the image sizes you wish to be optimized.
Next, smush all of the images in your Media Library by clicking on “Bulk Smush 50 Attachments” (The free version of the plugin is limited to bulk smushing 50 attachments at a time. You’ll need to revisit this page and bulk smush the next 50 attachments).
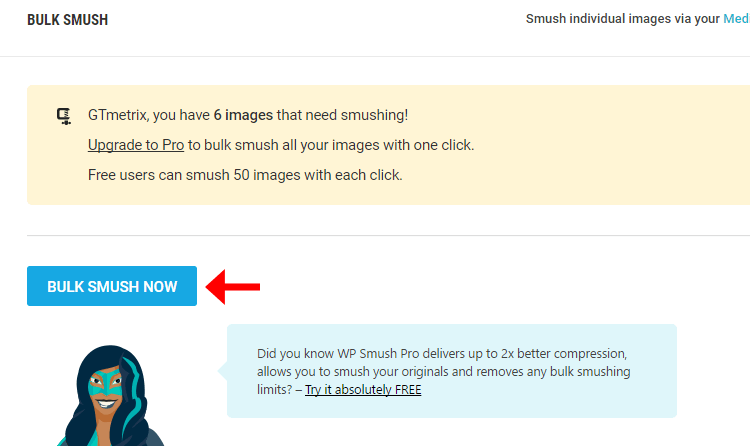
Click “Bulk Smush” Now to compress your Media Library images
That’s it for WP Smush! If you want more details on options like optimizing images outside of your Media Library, read our How to Optimize Images: A Practical Guide article.
Step 4) Install and activate WP Fastest Cache
On the sidebar, you’ll notice a new option called “WP Fastest Cache.”
a) Enable the following settings:
- Cache System
- Enable caching for faster delivery of pages.
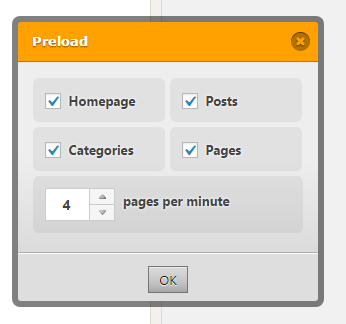
- Preload
- Upon clicking this, you’ll get a popup telling you which pages to cache.
- Check all of them and leave the “pages per minute” at 4 – click “OK”.
- You may need to reduce this number if your hosting service complains.
WP Fastest Cache Preload Options
- Logged-in Users
- Ensures that if you’ve logged in, you see the actual state of your pages, not the cached versions.
- Minify HTML*
- Compresses HTML and reduces file size.
- Minify CSS*
- Compresses CSS and reduces file size.
- Combine CSS*
- Joins your CSS files into a single CSS resource, reducing number of HTTP requests.
- Combine JS*
- Joins your JavaScript files into a single JS resource, reducing number of HTTP requests.
- Gzip
- Further compress your pages to be smaller in file size and faster to download.
- Browser Caching
- Helps with the Leverage browser caching recommendation.
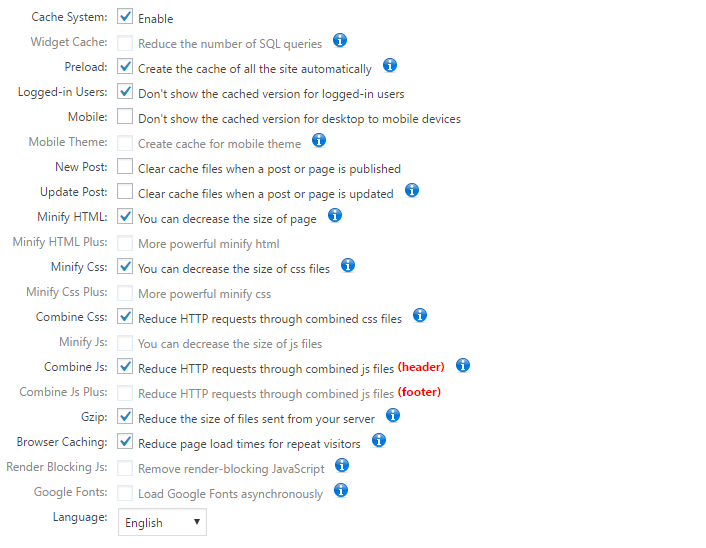
WP Fastest Cache – All enabled settings
Click “Submit” when you’re done.
That’s it for the WP Fastest Cache settings!
Important notes
Minification and Combining
Minifying and combining HTML/CSS/JavaScript can break functionality in your website. Minification essentially goes through your scripts are removes extraneous data like comments, formatting, whitespace and other things that computers don’t need to read. Combining takes the contents of each individual script and aggregates them all into a single script.
Because these processes modify data, they sometimes break functionality due to coding typos, syntax errors, duplicate function names, etc.
Make sure to check your site functionality after enabling the minification/combining features. If you find things are broken, disable all minification/combining features, and re-enable them one-by-one to find which feature is causing the issue.
If your hosting environment supports HTTP/2, combination of scripts is not needed, as the HTTP/2 protocol supports multiplexing – essentially allowing multiple downloads using a single TCP connection (as to only 6 parallel connections in HTTP/1.x.)
Page Caching
Whenever you make major changes to the site, like adding a plugin or modifying the CSS/theme, its recommended to delete the cache and preload it again to ensure you’re serving the latest version of the site. You can find the option to delete the cache in WP Fastest Cache in the “Delete Cache” tab.
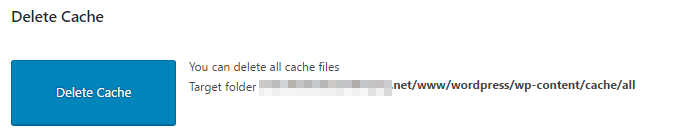
Delete your cache after major changes in theme or adding global plugins.
WP Fastest Cache will automatically preload the cache again after you’ve deleted it. New content like posts or pages do not require you to delete the cache.
Step 5) Analyze your site
Analyze your site again (via GTmetrix.com or with our plugin) and see the difference in performance!
You should see improvements in the following metrics:
- Fully loaded time/Onload time
- Total Page Size
- Requests
- PageSpeed/YSlow scores
- Serve scaled images
- Optimize images
- Leverage browser caching
- Minify CSS/HTML
- Enable gzip compression
- Make fewer HTTP requests
Your mileage may vary!
Step 6) Enable king composer optimization
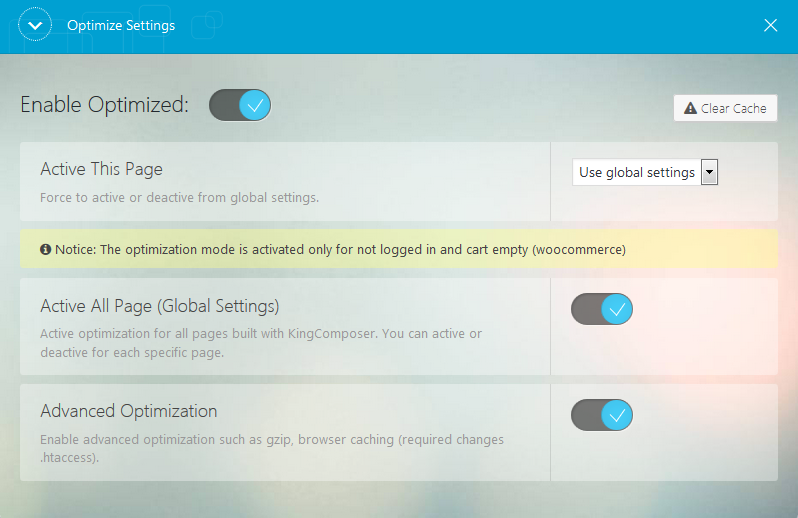
Note :- sometimes wordpress plugin wp fastest cache not working with king composer optimize functionality then you can use w3 total cache wordpress plugin
Theme Custom Work - #back to top
1. Child Theme Name Change :-
If you want to change theme name, you have to go through with some following steps:-
-
Step 1. You go to style.css and change theme name and text domain like this:

-
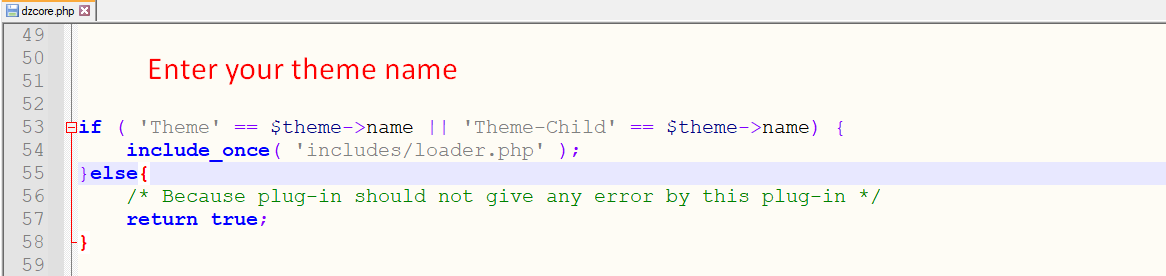
Step 2. Now, you go to dz-core plugin and open dz-core.php file and change theme name :
2. Taxonomy name change :-
If you want to change taxonomy name, you have to go through with some following steps:-
-
Step 1: Change taxonomy name and slug in the taxonomies.php file.
File Name: taxonomies.php
File Path: plugins\dzcore\includes\helpers
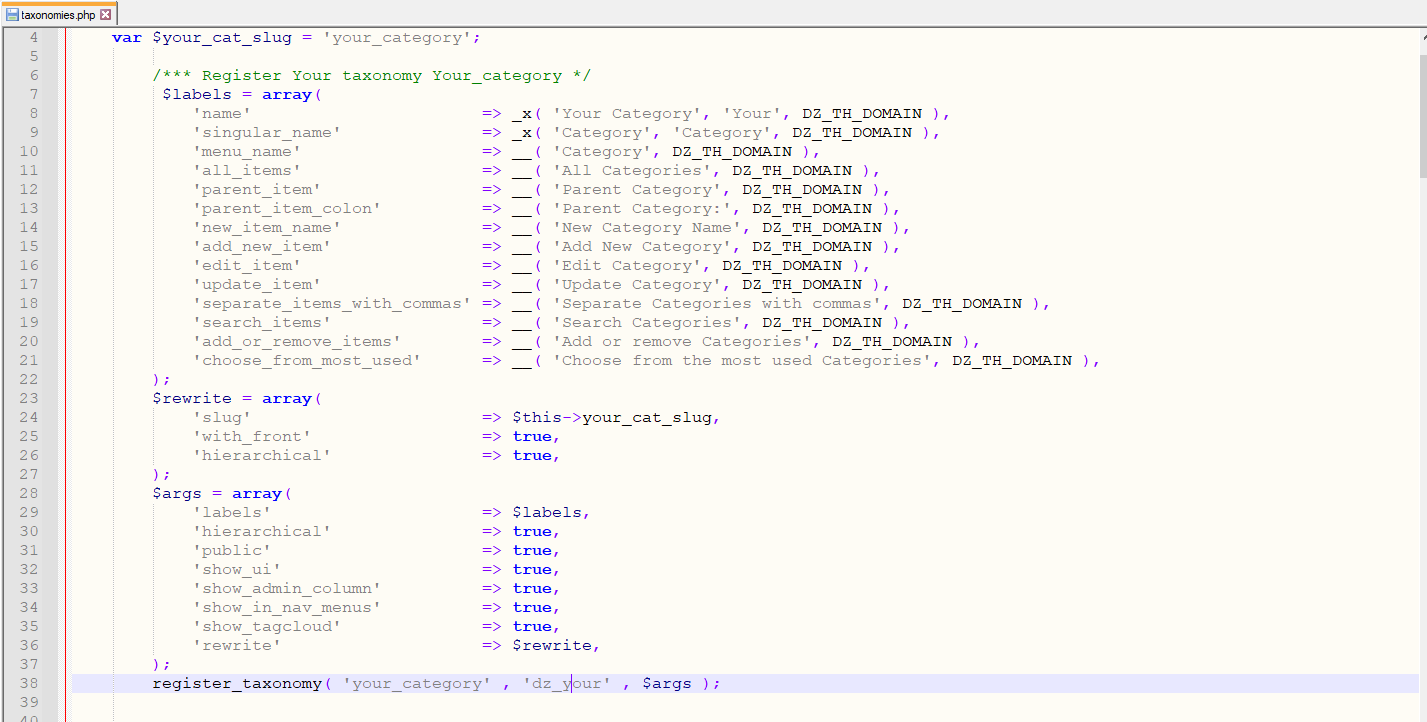
Step 2: Find the last slug and change it with a new slug, in the theme and the dzcore plugin
3. Custom Post Type name change :-
If you want to Custom Post Type name change you follow given steps:-
-
Step 1: Change CPT name in the post_types.php
File Name: post_types.php
File Path: plugins\dzcore\includes\resource
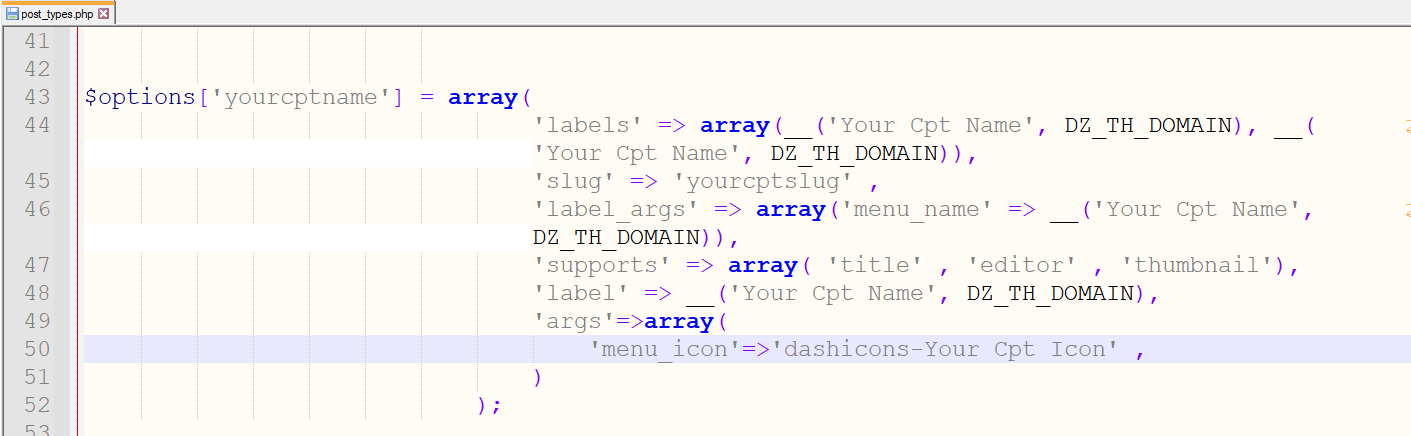
Step 2: Find the last slug and change it with a new slug, in the theme and the dzcore plugin
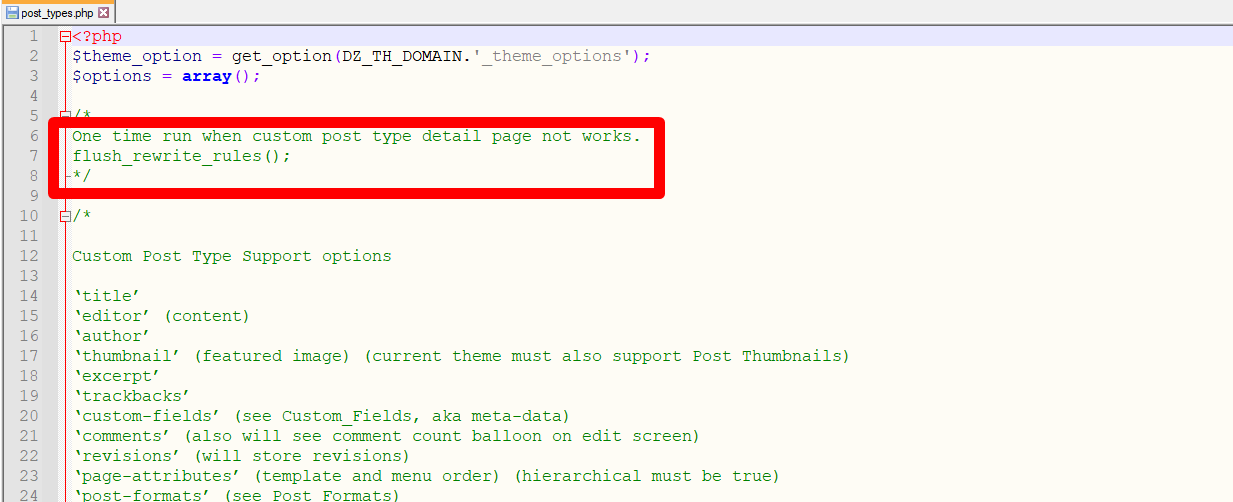
Note: You must run a function once whenever you change the taxonomy or CPT name.
flush_rewrite_rules()
Support Help - #back to top
Please remember you have purchased a very affordable theme and you have not paid for a full-time web design agency. Occasionally we will help with small tweaks, but these requests will be put on a lower priority due to their nature. Support is also 100% optional and we provide it for your connivence, so please be patient, polite and respectful.
Please visit our support forum or ask question @dexignzone
Support for my items includes:- * Responding to questions or problems regarding the item and its features
- * Fixing bugs and reported issues
- * Providing updates to ensure compatibility with new software versions
- * Customization and installation services
- * Support for third party software and plug-ins
- * Make sure your question is a valid Theme Issue and not a customization request.
- * Make sure you have read through the documentation and any related video guides before asking support on how to accomplish a adviso.
- * Make sure to double check the theme FAQs.
- * Try disabling any active plugins to make sure there isn't a conflict with a plugin. And if there is this way you can let us know.
- * If you have customized your theme and now have an issue, back-track to make sure you didn't make a mistake. If you have made changes and can't find the issue, please provide us with your changelog.
- * Almost 80% of the time we find that the solution to people's issues can be solved with a simple "Google Search". You might want to try that before seeking support. You might be able to fix the issue yourself much quicker than we can respond to your request.
- * Make sure to state the name of the theme you are having issues with when requesting support via ThemeForest.
Version History - #back to top
Version 2.4 - 09 June 2023
- * Add WhatsApp social sharing functionality
- * Add WooCommerce product detail page banner settings
- * Breadcrumb item class Add for category listing
- * Breadcrumb functionality add is_archieve function condition
- * Updated: Woo-Commerce template cart total designing issue and bug resolved
- * Updated: Woo-Commerce Plugin 7.7.2 and made the theme compatible
- * Contact Form 7 Plugin 5.7.7 and made the theme compatible
- * Resolved: Resolve some bugs in theme and made compatible with WordPress 6.2.2
Version 2.3 - 12 Sep 2022
- * Theme necessary plugins URL and data update
Version 2.2 - 30 May 2022
- * Added : Footer enable/disable option in page level settings
- * Update: Woo-Commerce template cart total designing issue and bug resolved
- * Update: Woo-Commerce Plugin 6.5.1 and made the theme compatible
- * Update WPBakery Page Builder Plugin 6.9.
- * Resolve bugs in theme and made compatible in WordPress 6
Version 2.1 - 04 January 2022
- * Added: Banner custom height option
- * Added: One Page Menu
- * Update: Manage All theme required menus in one main menu to make user friendly.
- * Update: Coming soon template and maintenance template not restricted for login user code update
- * Update: Woo-Commerce Plugin 6.0 and made the theme compatible
- * Improvement: CSS and JS code to get a better response
- * Resolve bugs in theme and made compatible in WordPress 5.8.2
Version 2.0 - 13 May 2021
- * Resolve some bug related to Theme Options and design.
- * Resolve header social icon design issue.
- * Added Sign In, Sign Up, Social Icon in mobile menu also.
- * Resolve Boxed layout custom background issue.
- * Resolve coming page responsive design issue.
- * Resolve revolution slider responsive issue.
- * Manage post view, post pagination elements
- * Resolve Page Loader design issue.
- * Resolve different post layout design issues.
Version 1.1
- * Update Revolution Slider Plugin 6.3.9
- * Add WPBakery Page Builder Plugin 6.5.0
- * Update Woo-Commerce templates according to Woo-Commerce 5.0.0 version
- * Add Redux theme options
- * Add Multi Theme Color Management
- * Resolve bugs in theme and made compatible in WordPress 5.6.2
You can find the version history (changelog.txt) file on Beglide-full.zip folder or you can check changelog on theme sale page.
Once again, thank you so much for purchasing this theme. As I said at the beginning, I'd be glad to help you if you have any questions relating to this theme. No guarantees, but I'll do my best to assist. If you have a more general question relating to the themes on ThemeForest, you might consider visiting the forums and asking your question in the "Item Discussion" section.