BeautyZone - Personal Blog WordPress Theme


First Steps - #back to top
First, thank you for purchasing our theme!
This guide provides instructions for installation, help on getting started and extensive documentation of features. It is recommended you read it thoroughly to fully leverage the BeautyZone theme's capabilities. Please also make sure to check out our Video Tutorials as they explain everything covered in here in greater depth. We hope you enjoy building with BeautyZone as much as we enjoyed developing it and continue to develop with new features!
The shortcode will give the output as in below image

Server requirements is one of the key factors for WordPress and BeautyZone theme, it is highly recommended to use a server which supports the following requirements. We explain about WordPress, BeautyZone, WooCommerce server requirements.
WordPress requirements
WordPress recommends following server settings.
| Setting | Description |
|---|---|
| PHP | Version 7 or greater. |
| MySQL | Version 5.6 or greater. |
| MariaDB | Version 10.0 or greater. Only required if you are not using MySQL. |
| HTTPS | Supported by the server. |
BeautyZone requirements
We recommends following server settings for Our WordPress Theme:
| Setting | Description |
|---|---|
| PHP | Version 5.6 or greater. |
| MySQL | Version 5.6 or greater |
| mod_rewrite | The Apache module needs to be activated for pretty permalinks. |
| GD Library | The library needs to be installed for Captcha and Image cropping. |
| cURL | Supported by the server. |
| OpenSSL | Supported by the server. |
| allow_url_fopen | Supported by the server. |
| post_max_size | 64 MB or greater |
| upload_max_filesize | 64 MB or greater |
| memory_limit | 256 MB or greater |
| max_execution_time | 900s or greater |
| max_input_vars | The minimum value is 4000 but the recommended is 6000. |
WooCommerce requirements
BeautyZone support WooCommerce officially so it is best to make sure your server also supports this plugin requirements if you are going to set up a shop.To learn about the plugin server requirements, read the official article.
Before beginning the installation and configuring of your new theme, you must first have WordPress already installed on a server.
If you are struggling, here is a very detailed guide at Wordpress Codex that will walk you through every step.
If you prefer something more visual, you can watch this video tutorial on how to install Wordpress by us
Once you have setup a copy of WordPress, there are two ways you can go about installing the theme:
- 1. FTP Upload
Unzip the download and upload the theme directory into your WordPress themes directory /wp-content/themes/.
- 2. WordPress Upload
This is definitely the easier route for most. Simply navigate to Appearance > Themes > Add New > Upload Theme. Click the 'browse' button and locate the still zipped theme folder. The theme will be uploaded and installed in a matter of seconds.
Demo Data - #back to top
There are two methods you can use, one is using our One-click Importer, the other is Importing manually. BeautyZone

See video tutorial:
-
Step-1 : Import XML
To import demo content by yourself, please follow some steps below:
You need to extra theme package file. And then:
- 1. Go to Tools > Import.


2. You need upload two files on the path below:
- - unfinityplus > inc > demo-data > theme-name > content > attachment-data.xml
- - unfinityplus > inc > demo-data > theme-name > content > content-data.xml


-
Step-2 : Import Options
1. On BeautyZone tab, click Theme Options > Import/Export


2. Click Import from File

3. Open file options.json on the the path: unfinityplus > inc > demo-data > theme-name > options.json .
4. Copy all content of options.json file and then paste it into text area.

-
Step-3 : Import Setting
1. On BeautyZone tab, click Theme Options > Import/Export
2. Click Import from File
3. Open file settings.json on the the path: unfinityplus > inc > demo-data > theme-name > settings.json .
4. Copy all content of settings.json file and then paste it into text area.

-
Step-4 : Import widgets
1. You must install Widget Importer & Exporter plugin before.
2. Go to Widget Importer & Exporter on the Tools menu

3. Click Browse.. button and upload file widgets.wie on the path unfinityplus > inc > demo-data > theme-name > widgets.wie .

-
Step-5 : Import Slider
- 1. Go to Slider Revolution.

- 2. Import slider.

- 3. You upload slider on the path unfinityplus > inc > demo-data > theme-name > revslider > demo-slider.zip. You need upload all sliders on here.

-
Step-6 : Page Builder Settings
- Add Page Builder in custom post type :-
- Go to WPbakery page builder -> Role Manager

After all finished, you will have the perfect website like our demo.
Plugins - #back to top
After installation, you will be suggested to install additional plugins. To install them and activate, please navigate to Plugins, you will see a list of required and optional plugins. We recommend that you install the following to get the best of our theme:
Visual Composer is the most popular drag and drop editor for wordpress.
If you need dedicated support for this component, please visit: Visual Composer on Code Canyon
This plugin patches (as long as it is active) the existent vulnerabilities in Revolution Slider plugin, including the latest SoakSoak (Arbitrary File Upload) vulnerability.
You can also monitor using the “Black list” option all the attackers that attempt to use a Revolution Slider exploit to gain access to your website.
For detailed inforamtion and support on this plugin, please go to: Revolution Slider
WooCommerce is a free eCommerce plugin that allows you to sell anything, beautifully. Built to integrate seamlessly with WordPress, WooCommerce is the world’s favorite eCommerce solution that gives both store owners and developers complete control.
If you need dedicated support for this plugin, please visit: WooCommerce
Contact Form 7 is one of the most popular form builders for wordpress.
We have created styles ready for you to use within your BeautyZone theme.
For detailed inforamtion and support on this plugin, please go to: Contact Form 7
Display beautifully clean, customizable, and responsive Instagram feeds.
Display Instagram posts from your Instagram accounts, either in the same single feed or in multiple different ones..
For detailed inforamtion and support on this plugin, please go to: Contact Form 7
Menu - #back to top
- 1. From the 'Appearance' menu on the left-hand side of the Dashboard, select the 'Menus' option to bring up the Menu Editor.
- 2. Select create a new menu at the top of the page
- 3. Enter a name for your new menu in the Menu Name box.
- 4. Click the Create Menu button.
- 5. Click Select to select menu created.


Your new custom menu has been defined.
You can add different link types into your menu, these are split between panes left of the menu you're currently editing.
- 1. Locate the pane entitled Pages.
- 2. Within this pane, select the View All link to bring up a list of all the currently published Pages on your site.
- 3. Select the Pages that you want to add by clicking the checkbox next to each Page's title.
- 4. Click the Add to Menu button located at the bottom of this pane to add your selection(s) to the menu that you created in the previous step.
- 5. Click the Save Menu button once you've added all the menu items you want.


Your custom menu has now been saved.
When planning the structure of your menu, it helps to think of each menu item as a heading in a formal report document. In a formal report, main section headings (Level 1 headings) are the nearest to the left of the page; sub-section headings (Level 2 headings) are indented slightly further to the right; any other subordinate headings (Level 3, 4, etc) within the same section are indented even further to the right.
The WordPress menu editor allows you to create multi-level menus using a simple 'drag and drop' interface. Drag menu items up or down to change their order of appearance in the menu. Drag menu items left or right in order to create sub-levels within your menu.
To make one menu item a subordinate of another, you need to position the 'child' underneath its 'parent' and then drag it slightly to the right.
- 1. Position the mouse over the 'child' menu item.
- 2. Whilst holding the left mouse button, drag it to the right.
- 3. Release the mouse button.
- 4. Repeat these steps for each sub-menu item.
- 5. Click the Save Menu button in the Menu Editor to save your changes.

- 1. Scroll to the bottom of the menu editor window.
- 2. In the section titled Theme locations, click the check box for the location where you want your menu to appear.
- 3. Click Save menu once you've made your selection.

Congratulations! Your menu has now been added to your site.
You can set any menu as Primary menu here.

Page - #back to top
Note: If you perform custom in Page option, your page will run with this set up and all set up in Theme option will be invalid. If you don't perform custom any things, your site will run with all option in Theme option.
1. Logo

2. Header

3. Banner

4. Sidebar

5. Footer

To set a page as Home page, go to Settings > Reading in your WordPress Dashboard panel.

- 1. Set "Front page displays" as "A Static Page"
- 2. In the drop down menu for "Front Page" choose a page which will be your home page.
- 3. Save changes.

Widgets - #back to top
To Add Widget on Sidebar, please following these steps:
- 1. Navigate to Appearance>Widgets to access the list of widgets and widget section that they can be added. The left hand side show all widgets you can use. The right hand side shows all different section you can add widgets to.
- 2. Simply drag and drop the widget you want into the widgets section you want to the right hand side.
- 3. When you finished, you can visit the site to see results.

Theme Settings - #back to top
Introduction -

Theme DZ Plugins -

1. Navigate to Appearance → Themes in your WordPress admin dashboard.
2. Click the Add New button at the top of the page then go for the Theme Upload option.
3. For the file upload, pick Theme Install / BeautyZone.zip in the theme package downloaded from ThemeForest and click Install Now.
4. Click Activate once the upload has finished and you're ready for the next step: Installing the Plugins.
Theme Options - #back to top
The options panel is home to all of the theme's extensive configuration options. To view the panel, click on Theme Options in the left-hand menu. Here you have the ability to alter many core aspects that make up how your theme looks and behaves. Any of the options that have some ambiguity to them conviently have descriptions to explain their purpose.


Blog — Writing New Posts - #back to top
To start adding posts to your blog, navigate to Posts → Add New.
1. Start filling in the blanks: enter your post title, write your actual body content in the
main post editing box below it.
2. As needed, select a category, add tags, and make other selections from the sections below the post.
3. When your post is ready, click Publish.
Deep Diving: Since creating and editing pages requires basic WordPress knowledge, we won't cover it in detail. If you're new to WordPress, you may find the following resources valuable: How to Create a new Post How to Edit and Existing Post Using Categories and Tags
Theme General Options - #back to top
We listed below all our theme options. You can learn how we used Woodex WordPress theme options in below;
In THEME GENERAL SETTINGS; Enter Google Map Api Key, Choose Page Preloader option and date format for the theme. In LOGO SETTINGS; You can change logo and favicon icon In HEADER SETTINGS; This theme has 2 types of header styles, website search feature according to the theme. In FOOTER SETTINGS; Choose footer settings for trending items, copyright and social icons. In POST SETTINGS; It has Single post page option In PAGE SETTINGS; Choose General(default settings when no other setting applied) and other common pages like (Tag, Category, Search, Archive, Author, 404) pages settings for banner title, banner height, banner image, sidebar, page layouts and pagination by ajax or not. In CATEGORY SETTINGS; You can upload category images here. In WOO COMMERCE SETTINGS; Required woo commerce settings available here. In THEME SETTINGS; You can choose skin color or page loader. In SOCIAL SETTINGS; Here social network links are added like facebook, google, linkdin, instagram, twitter, youtube, etc. In CUSTOM SCRIPT; You can add custom CSS, Javascript here. In ADVANCE OPTIONS; You can add dyanamic Sidebar here. In IMPORT/EXPORT; Easily Import the file and url as well as export also through copy the data.

Theme Update - #back to top
General Method –
1. Log into FTP Account using FileZilla or similar program.
2. Go to wp-content/themes directory
3. Move to the theme directory that you want to update.
4. Now, download the latest version of theme from ThemeForest.net/downloads
5. If you have downloaded the zip, extract it. Find the theme folder. It generally has style.css file in it.
6. Upload all files in that folder to the directory on FTP we found in step.
Envato Market Plugin Method –
Summary – How to Update Envato ThemeForest Themes
Here’s a quick summary of steps required to update Envato ThemeForest themes.
1. Download and Install the Envato Market plugin.
2. Activate the plugin and go to the Envato Market tab to configure the plugin.
3. Click on the link to generate an Envato API Personal Token. Copy-paste the token and save changes.
4. You should now see all of your Envato purchases including ThemeForest themes that you can install and update.
Installing Envato Market Plugin to Update WordPress Themes
Unlike other WordPress plugins, the Envato Market plugin is not available to install from the official WordPress plugins repository. So, you won’t be able to search and install from your Plugins page within the WordPress dashboard.
The Envato Market Plugin is hosted on GitHub and you can download the plugin from this Envato plugin page.
Step 1 : Use the plugin download link on the this Envato Market plugin page.
Although hosted on Github, the plugin authors do not recommend downloading directly from Github repository “Download ZIP” as Github does not package the plugin correctly.
Step 2 : Save the Envato Market Plugin archive.

Step 3 : Go to Plugins > Add New > and click on Upload Plugin at the top.

Step 4 : Click on Choose File and select the envato-market.zip file from where you saved and click on Install now.

Step 5 : Click on Activate Plugin to activate the Envato Market Plugin.

You can also install the plugin by unzipping the archive and uploading the envato-market folder to the /wp-content/plugins/ directory using an FTP program.
Step 6 : After the plugin is active, go to Envato Market tab from your WordPress dashboard.

Step 7 : You will need to configure the plugin by adding an Envato API Personal Token. Click the suggested link in the instructions to generate a personal token. (You can find the link to generate a personal token with required instructions on this page).

Scroll down on the page with all the required permissions selected and click on Create Token at the end of the page.

Make sure you only enable the required permissions including;
- 1. View and search Envato sites
- 2. Download your purchased items
- 3. List purchases you’ve made
See the screenshot below for enabling the required permissions.

You can either use a Global OAuth Personal Token or a Single Use OAuth Personal Tokens.The difference is clearly explained on the page.
Step 8 : You will see a success page with an option to copy your secret token key. Copy the key and confirm that you have copied the key from the page.
 Envato will not save the secret token key and if will have to generate a new key if you lose it.
Step 9 : Enter the Envato API Secret token key and click on Save Changes.

Step 10 : You should now see all of your purchased WordPress themes from your ThemeForest account.

Click on Install Now to install any of your purchased WordPress themes from your ThemeForest account.
You can also see if any updates are available for your currently installed and active WordPress themes from this page.
One Page Setting - #back to top
1. The One Page Setting will help you to Creating One Page.
First you have to create one page menu like this.


2. Then go to Theme Option and Click Menu Setting and Select Page like this : -

3. Then go to home section and open edit mode to CREATE ID in Elements

WPML - #back to top
The WPML plugin will help you to translate your website to different languages. Follow the steps described in this article to set up the plugin.
Activate the WPML plugin. Follow Dashboard > Plugins and click Activate under the WPML items.

After that click on Configure WPML to finish the plugin installation.
To manage languages, go to WPML > Languages.

The languages section allows you to make a WordPress site multilingual.
When you configure WPML for the first time, you need to choose the language of existing content. Select the language of your current website content in the Current Content Language section.

In the next step (Translation languages) add more languages to the site. Mark the languages you want to add. Then click on the Next button.

In order to let site visitors select their language, you can add a language switcher to the theme.
WPML’s standard language switchers include a drop-down languages list, a list of languages for the site’s footer, and a language switcher for the menu.

Click the “Add New Language Switcher to Menu” button to add the language switcher to the menu.

On the screen New Menu Language Switcher, select the position, style of menu items, specify what to add to the language switcher and choose the colors. Then click the "Save" button.

Here you can see a preview of your menu and position and you can manage them at any time. Click on the Next button to proceed to the further step.

Select the first option for the compatibility reporting.

Paste the site key that you can find on your wpml.org account page and click the Register button. if you don't have a site key, then click the button to generate a key for this site.

WPML String Translation
WPML’s String Translation module is part of the Multilingual CMS account type. To enable it, you first need to download and install it from your WPML.org account, under the Downloads section.
Then, navigate to WPML → String Translation.
For More Information... https://wpml.org/documentation/getting-started-guide/string-translation/.
MailChimp Options - #back to top
More Info: - click here...
Creating API Key and List ID
Get API Key:
1. Login to your MailChimp account.
2. Under the user menu dropdown at the top left side, click on Account link.

3. Go to the Extras » API Keys from the top navigation menu.

Under the Your API keys section, create an API Key by clicking on Create A Key button. Once generated, copy API key for later use in PHP script.

Get List ID:
1. Choose a list in which all the subscriber’s information would be stored. In that case, you need to create a list in the Lists page.

Enter into your created list and navigate to Settings » List name and campaign defaults.

Under the List ID label you will find the List ID. Copy List ID for later use in PHP script.

Then, you just need to click on Theme Panel, and the Integrations tab to add your API and List ID.

Page Speed Options - #back to top
First you have install and activate LiteSpeed Cache and Smush plugin


Disable the lazy loading setting in Smush Plugin : smush -> lazy load -> Deactivate
Go to LiteSpeed Cache Plugin :
1 : General setting -> guest mode ON
2 : Cache setting -> Purge Tab -> Select the page for which you want to enable caching
3 : Cache setting -> Purge Tab -> Serve Stale ON
4 : Cache setting -> Object Tab -> Object Cache ON
5 : Image optimization -> Image optimization setting Tab -> WebP For Extra srcset ON
6 : page optimization -> css setting Tab -> CSS Minify and Load CSS Asynchronously ON and CSS Combine External and Inline Off
7 : page optimization -> js setting Tab -> JS Minify ON
8 : page optimization -> HTML setting Tab -> HTML Minify ON
9 : page optimization -> media setting Tab -> Lazy Load Images and Responsive Placeholder and Add Missing Sizes ON
Smash Balloon Instagram Feed #back to top
First you have install and activate Smash Balloon Instagram Feed plugin

Go to Smash Balloon Instagram Feed Plugin :
1 : Step 1 -> Copy The Shortcode of Instagram Profile.

2 : Step 2 -> Paste The Shortcode In Shortcode Editor.

3 : Step 3 -> Select The Custom Template.

Theme Custom Work - #back to top
1. Child Theme Name Change :-
If you want to change theme name, you have to go through with some following steps:-
-
Step 1. You go to style.css and change theme name and text domain like this:

-
Step 2. Now, you go to dz-core plugin and open dz-core.php file and change theme name :

2. Taxonomy name change :-
If you want to change taxonomy name, you have to go through with some following steps:-
-
Step 1: Change taxonomy name and slug in the taxonomies.php file.
File Name: taxonomies.php
File Path: plugins\dzcore\includes\helpers

Step 2: Find the last slug and change it with a new slug, in the theme and the dzcore plugin
3. Custom Post Type name change :-
If you want to Custom Post Type name change you follow given steps:-
-
Step 1: Change CPT name in the post_types.php
File Name: post_types.php
File Path: plugins\dzcore\includes\resource

Step 2: Find the last slug and change it with a new slug, in the theme and the dzcore plugin
Note: You must run a function once whenever you change the taxonomy or CPT name.
flush_rewrite_rules()

Translation #back to top
To translation the theme, i suggest you using Loco plugin. This plugin can help you do all things easy.
Please read guide document for detail here: Loco Translate
Or, follow me:
Translate Theme – in cases, you need to change default texts of Our themes in your website front end. This theme is built our way that you can translate it with ease. We have already added default “.pot” WordPress language files and you can start WordPress theme translation from there.
Translate Theme – PO/MO files
WordPress uses 2 file pair with PO and MO extensions to understand where to put alternative texts inside code. PO file is a Key/Value pair file which will be used to add translations of specific phrases. MO file is compiled version of PO file which WordPress understands.
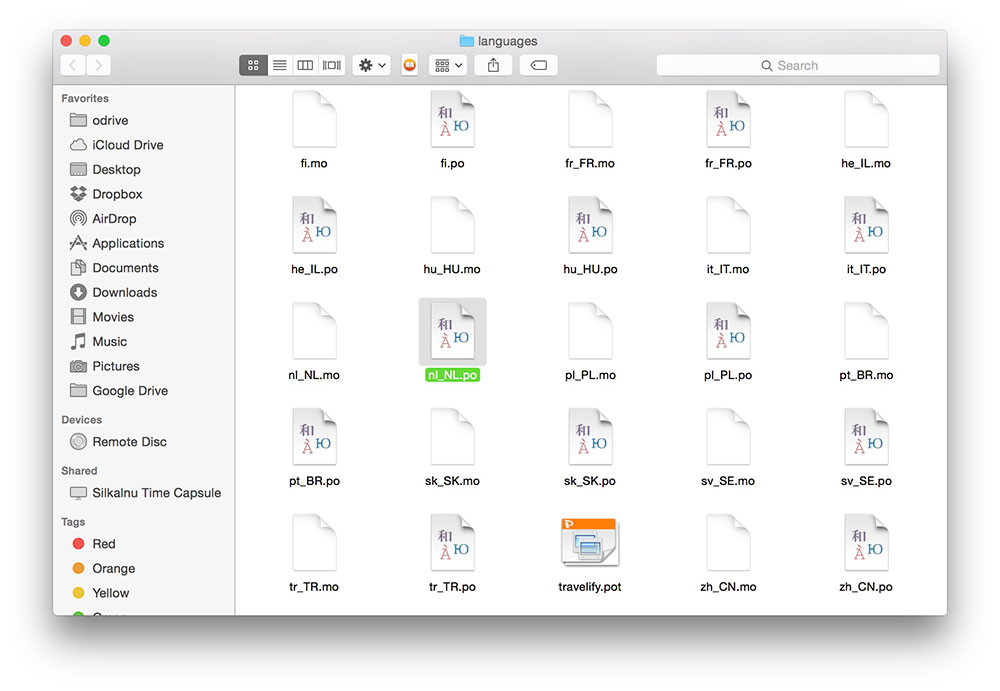
Our themes also have their own PO/MO file pair that you can use to translate different parts of the theme. Those files are located in wp-content/themes/theme name/languages folder.
How to edit PO files and Compile MO file out of it
You will need a software called POEDIT to edit PO files and add your translations inside that and generate MO file out of it. It is free, works on Mac, Windows and Linux, easy use and there is no reason not to use it.
For more information please read this article in details:
Steps to Translate theme:
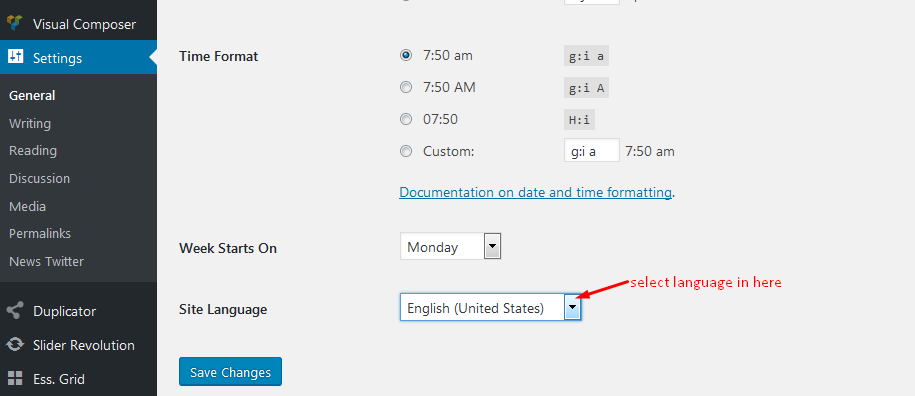
1. Set Default Language.
Go to Settings > General > Site Language and set it to your desired language.
2. Install the Child Theme.
Install the Child Theme so that your translation will be safe upon updating core theme.
3. Copy Languages Folder.
Go to wp-content/themes/theme name/languages and copy folder and paste it into your child theme wp-content/themes/theme name-child
So that you will have a folder on your child theme called languages:

You will see file there that you can use for translation (theme name.pot). Please consider that the name of these files should be the same as your default language code which you have set in wp-config.php file explained at the beginning of tutorial.
4. Use Loco Translate.
The Loco Translate is a third party plugin which makes it possible to edit the PO files and compile them to MO files directly from the WordPress Admin section.
5. Alternatively Use POEDIT.
If for any reason you can not use the Loco Translate plugin, you can use POEDIT software to do your translation and generate MO files alternatively. For more detailed information on how to use POEDIT
5.1. You need download POEdit from: https://poedit.net/
5.2. Second thing is to open default language files form your theme. in normal our theme, it is located in languages folder inside theme folder. You should use this default file for translation but you need to create a new file when you are done. Most themes has the same structure and language files should be somewhere inside theme folder. There is chance that your theme is not ready for translation so it might take time to modify.
5.3. Now in the Poedit click on original text one by one and write your translation underneath. Just like you can see iu the screenshot below. It will take some time to get through all of them so be patient.
If you think that some translations you won’t need you can leave them as they are in the original language.

5.4. Now the most important part: When you are saving your file in theme language folder you should use proper language code.
For instance if you have translated WordPress theme to German you shoulduse “de_DE.po” as file name and “fr_FR.po” for French. This will make sure that WordPress understands what language you are referring to.
Please note: Default language file extension is .pot (such as organic.pot... ) but you have to use .po in order to make your translation work. Also Poedit application will create .mo and it needs to be included in languages folder as well.
5.5. Now WordPress will use theme language the same as your WordPress language. If your WordPress dashboard uses French, don’t expect for theme to show German. Changing WordPress language will automatically
change theme language if it is available in the theme language folder under proper name we discussed in Step 4.
5.6. Changing WordPress language is as easy as adding
define ('WPLANG', 'fr_FR');
to the wp-config.php file located at your WordPress installation root folder.
Beware! You need to activate your child theme from Appearance menu to see translation working.
Beware! You will need to clear cache to see the translation.
Setting Default Language of WordPress
Since the introduction of WordPress version 4, there is a new option in general settings section which you can use to select your installation default language. Go to Settings > General > Default Language to see the option.
Thank you!
Support - #back to top
The team at DexignZone are always help you with any questions or recommendations you have about the BeautyZone theme. If you need any help or support please contact us through the ThemeForest Messaging system or
direct at ticksy: https://w3itexperts.ticksy.com/
Version History - #back to top
Version 2.5 (21-Mar-2023)
- * Added: Home Page 6
- * Update: Woo-Commerce Plugin 7.5 and made the theme compatible
- * Resolve bugs in theme and made compatible to WordPress 6.1
Version 2.4 (09-Aug-2022)
- * Resolved: Gutenberg pattern design issue
- * Update: Woo-Commerce Plugin 6.7 and made the theme compatible
- * Resolve bugs in theme and made compatible to WordPress 6.0.1
Version 2.3 (30-May-2022)
- * Added : Footer enable/disable option in page level settings
- * Update: Woo-Commerce template cart total designing issue and bug resolved
- * Update: Woo-Commerce Plugin 6.5.1 and made the theme compatible
- * Update WPBakery Page Builder Plugin 6.9.
- * Resolve bugs in theme and made compatible in WordPress 6
Version 2.2 (01-Jan-2022)
- * Update Revolution Slider Plugin 6.5.8.
- * Update WPBakery Page Builder Plugin 6.8.
- * Add One Page Layout With Center Logo Header.
Version 2.1 (27-Sept-2021)
- * Update Revolution Slider Plugin.
- * Update WPBakery Page Builder Plugin.
- * Add One Page Layout.
- * Update Woo-Commerce templates according to Woo-Commerce latest version.
- * Resolve bugs in theme and made compatible in WordPress 5.8.
Version 2.0 (12-March-2021)
- * Update Revolution Slider Plugin 6.5
- * Update WPBakery Page Builder Plugin 6.6.0
- * Add Redux theme options
- * Add Multi Theme Color Management
Version 1.0.5 (15-Nov-2019)
- * Update WPBakery Page Builder Plugin 6.0.5
- * Update Woo-Commerce templates according to Woo-Commerce 3.8.0 version
- * GDPR Ready compatible with GDPR Cookie Consent (https://wordpress.org/plugins/cookie-law-info/)
- * Add Gutenberg Style
Version 1.0.4 (20-March-2019)
- * Remove some bugs
Version 1.0.3 (20-Nov-2018)
- * Change Server for fast performance
Version 1.0.2 (15-Nov-2018)
- * ADDED: New Header Layout
- * ADDED: New Footer Layout
- * ADDED: Maintenance Page
- * ADDED: Icon Car on Header
- * FIXED: Bugs
Version 1.0.1 (29-Oct-2018)
- * FIXED: Change background color footer top
- * FIXED: Show/hide gallery footer
You can find the version history (changelog.txt) file on beautyzone-full.zip folder or you can check changelog on theme sale page.
Once again, thank you so much for purchasing this theme. As I said at the beginning, I'd be glad to help you if you have any questions relating to this theme. No guarantees, but I'll do my best to assist. If you have a more general question relating to the themes on ThemeForest, you might consider visiting the forums and asking your question in the "Item Discussion" section.